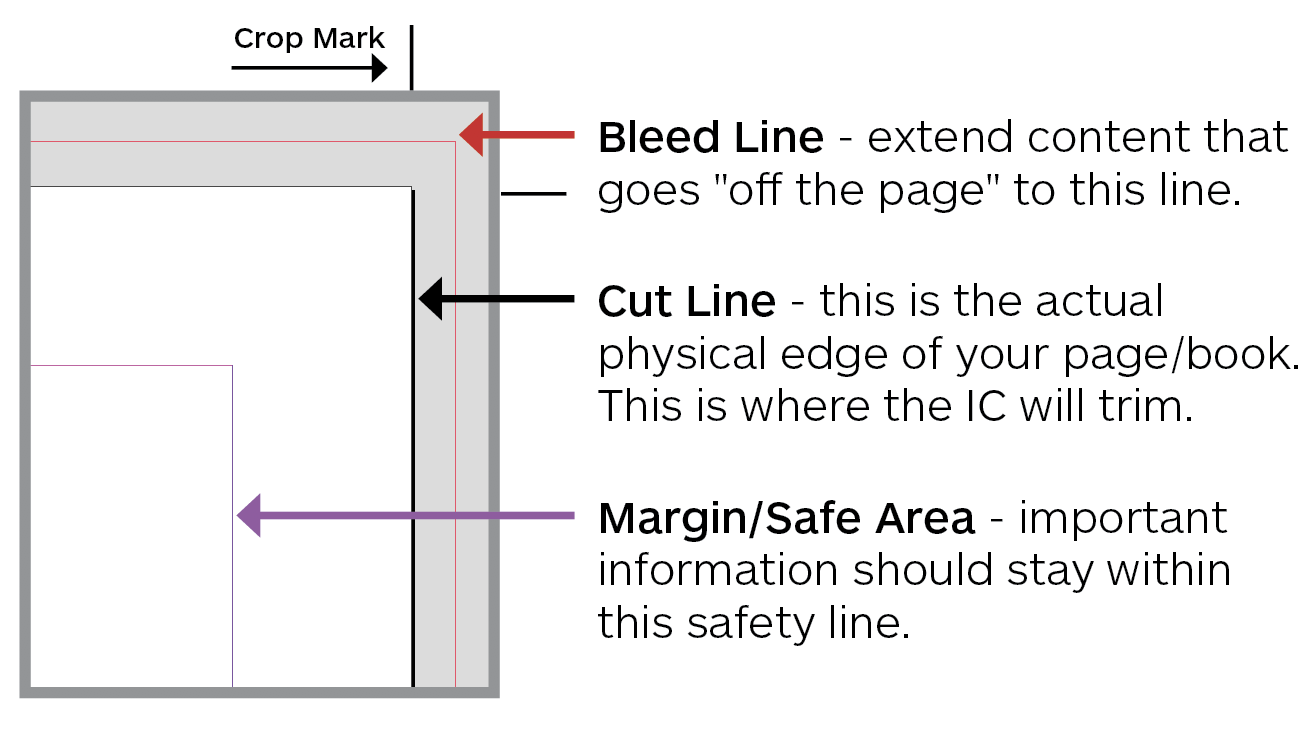
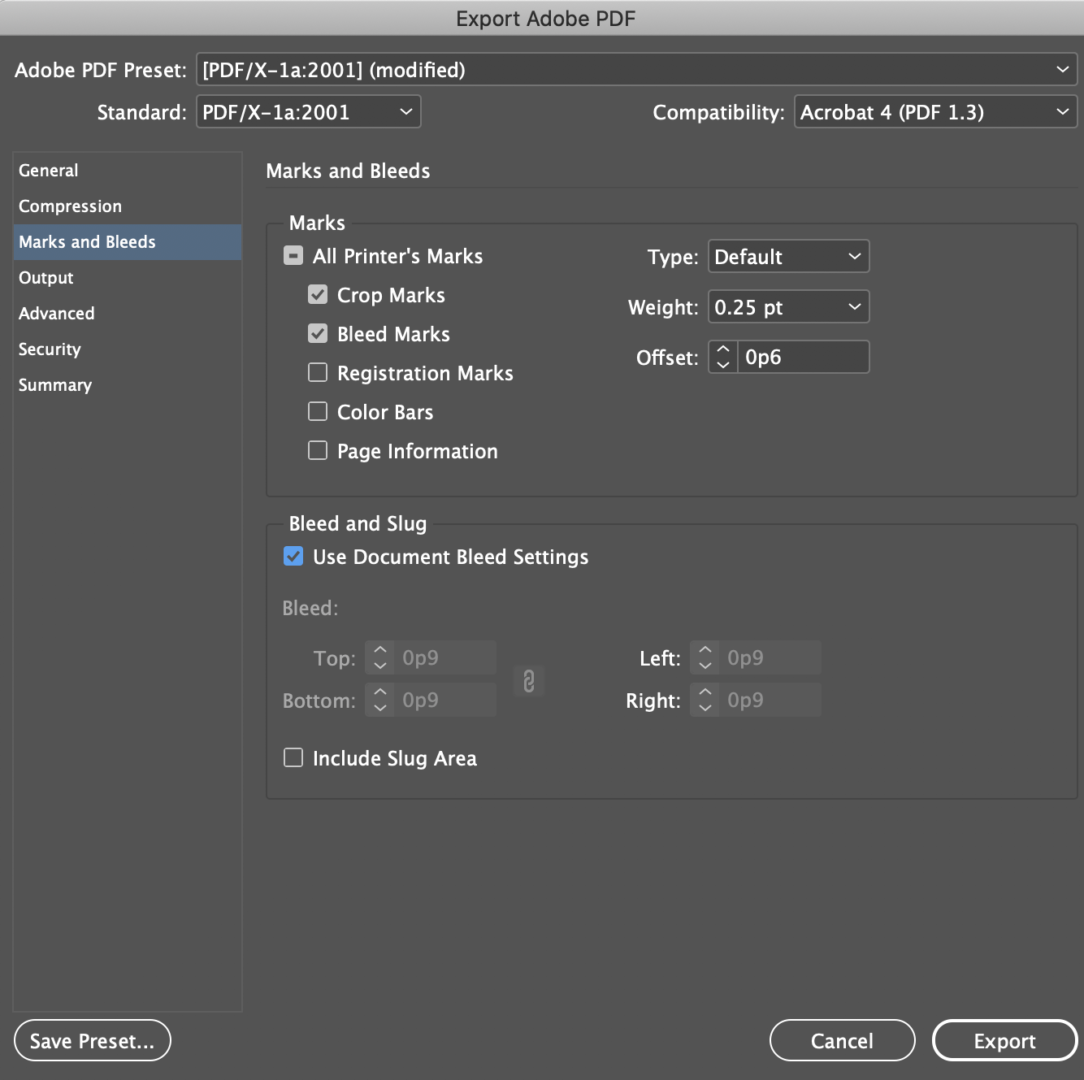
Marks & Bleeds Check Crop Marks, Bleed Marks, and Use Document Bleed Settings.
Offset 0.125″
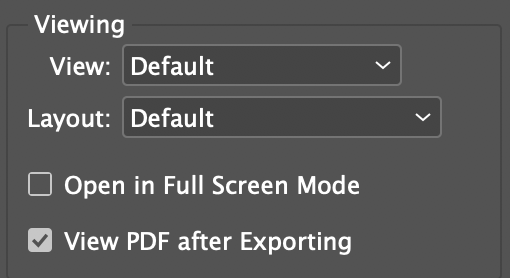
Viewing Check Video PDF after Exporting to be sure that your PDF file looks correct.
Make sure to open your PDF in Acrobat.
File Examples
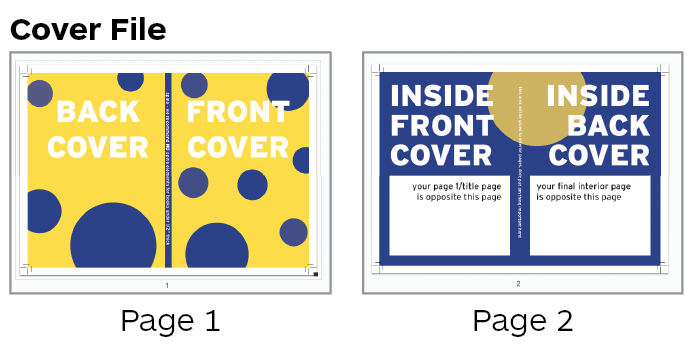
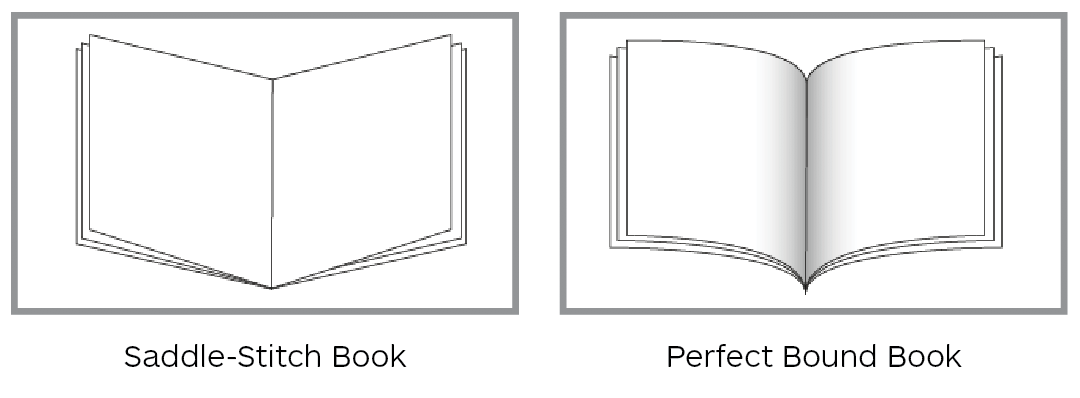
When you open your two files in Acrobat, this is what they should look like
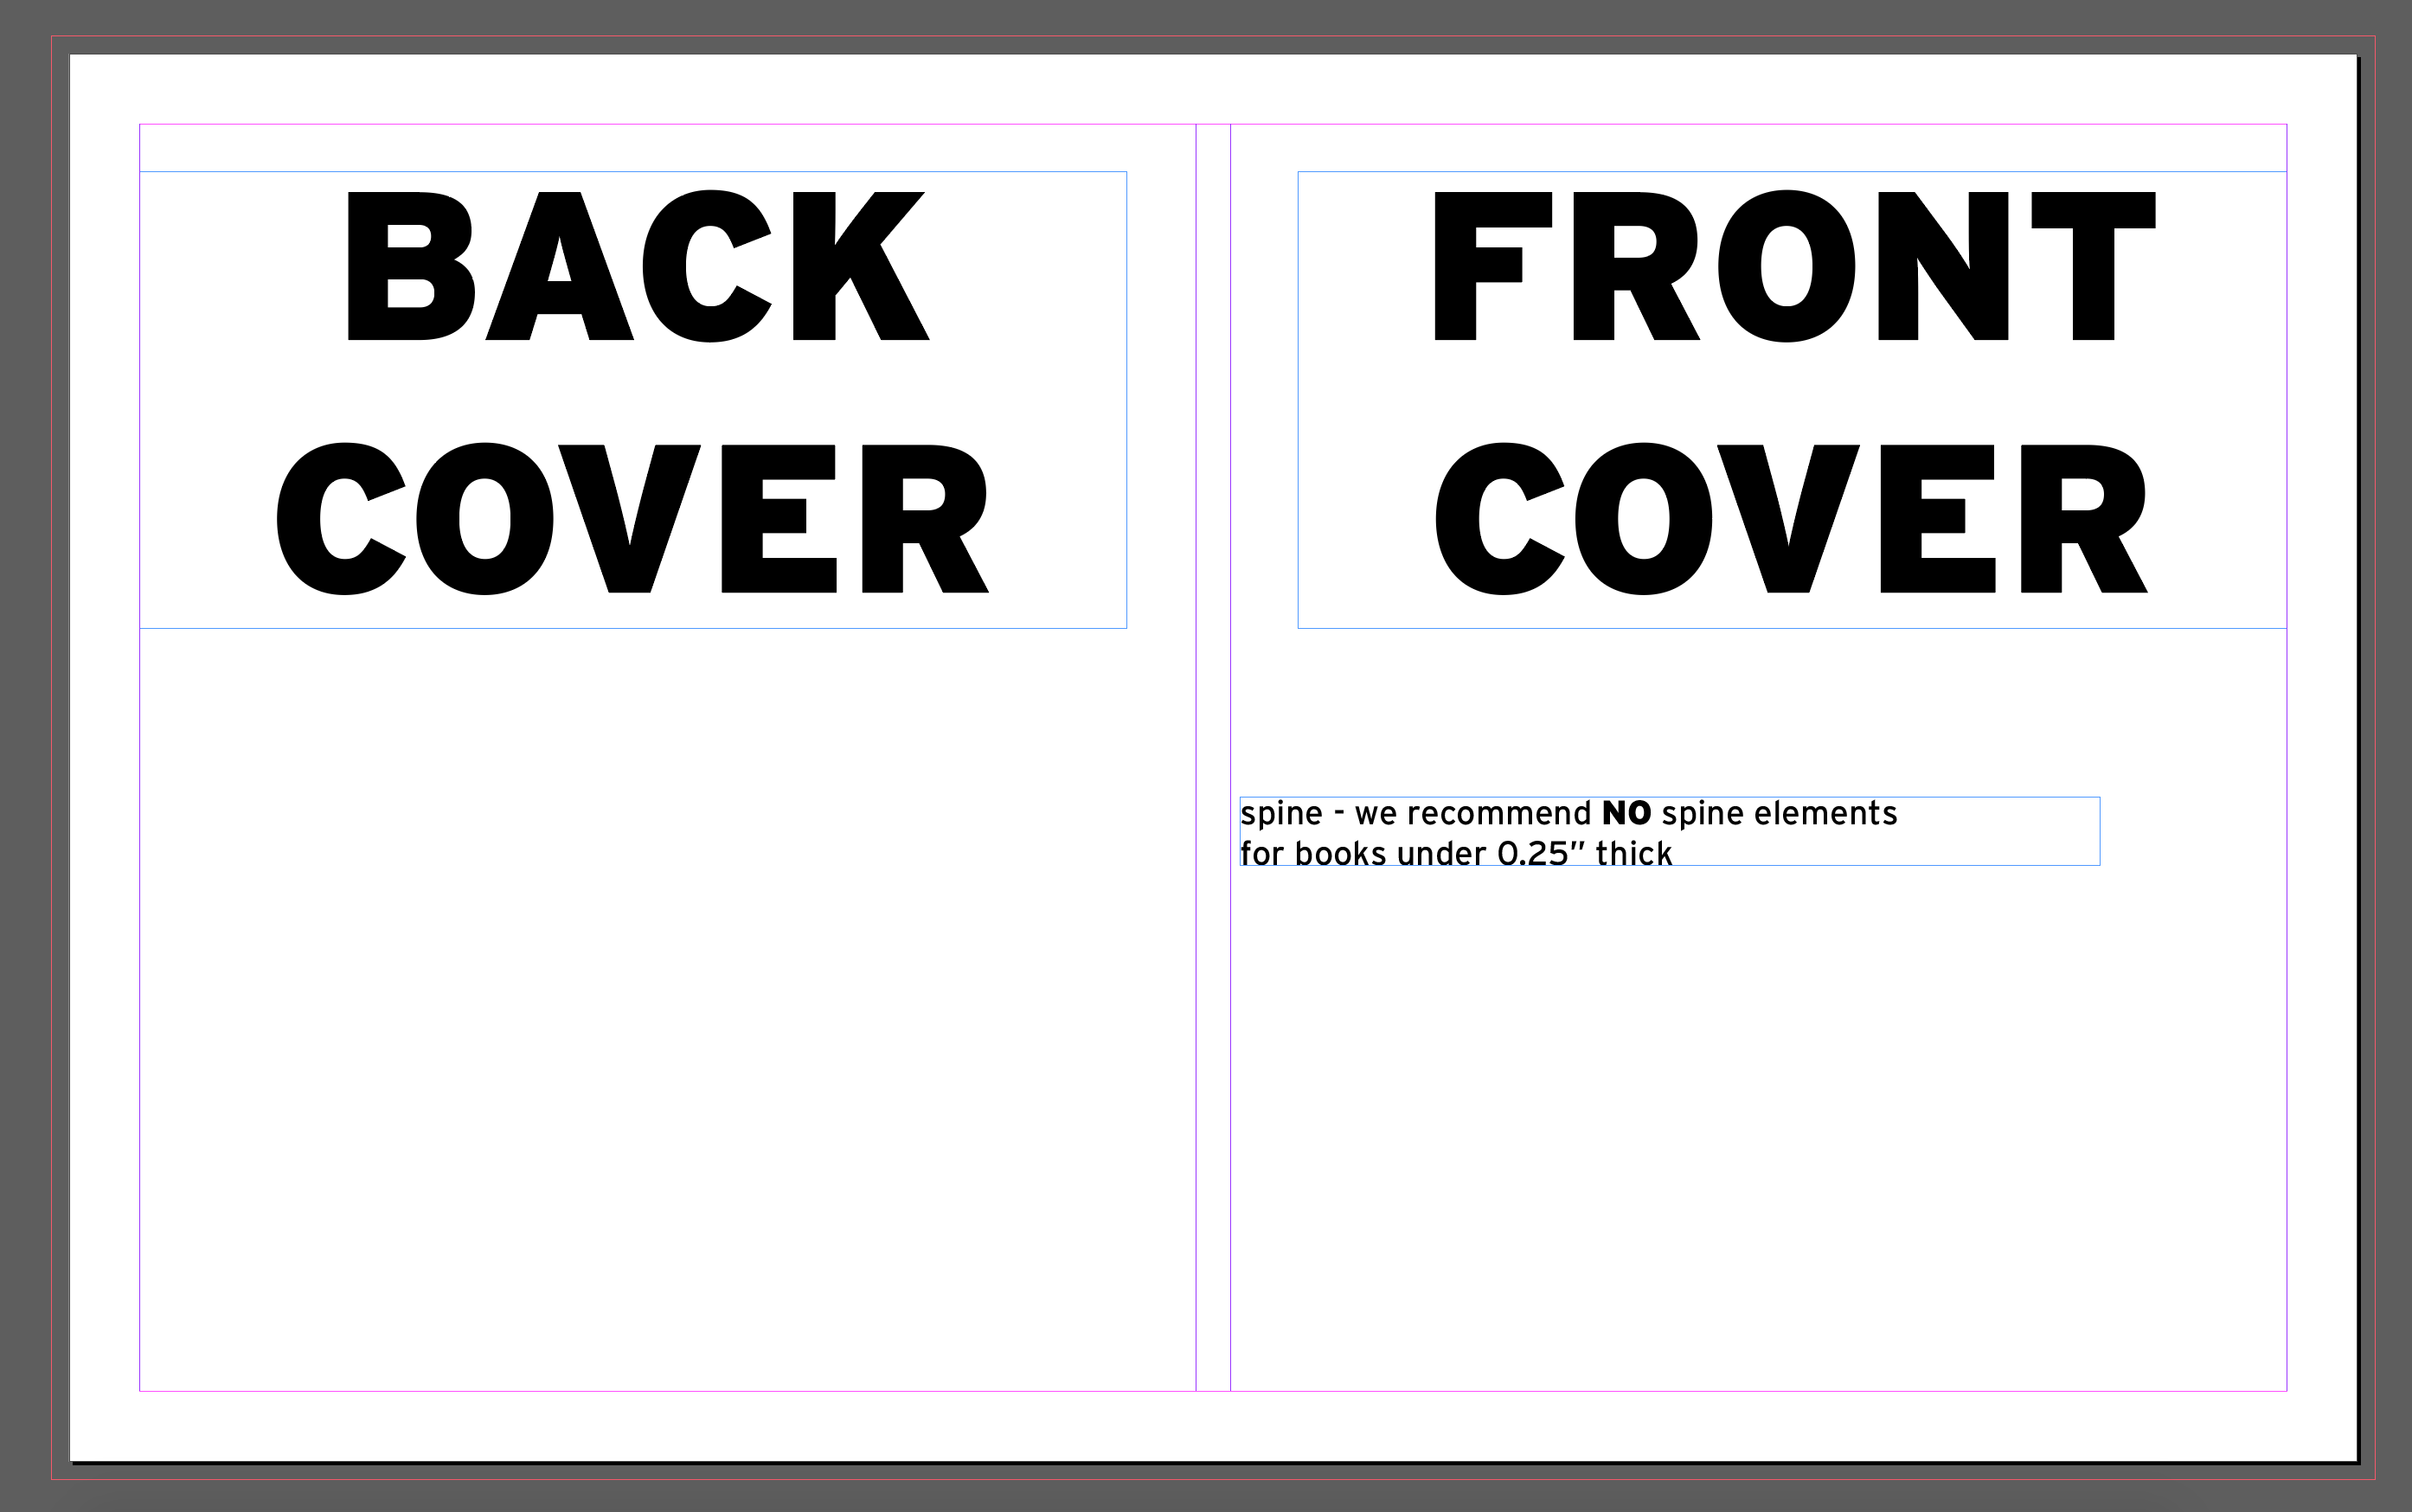
If you want the inside of your cover to be something other than the paper color, make sure your cover file has two pages. The inside of the front cover is on the left and the inside of the back cover is on the right.
Need Extra Help?
If you have further questions about file setup, please contact us by email or by scheduling a consultation.
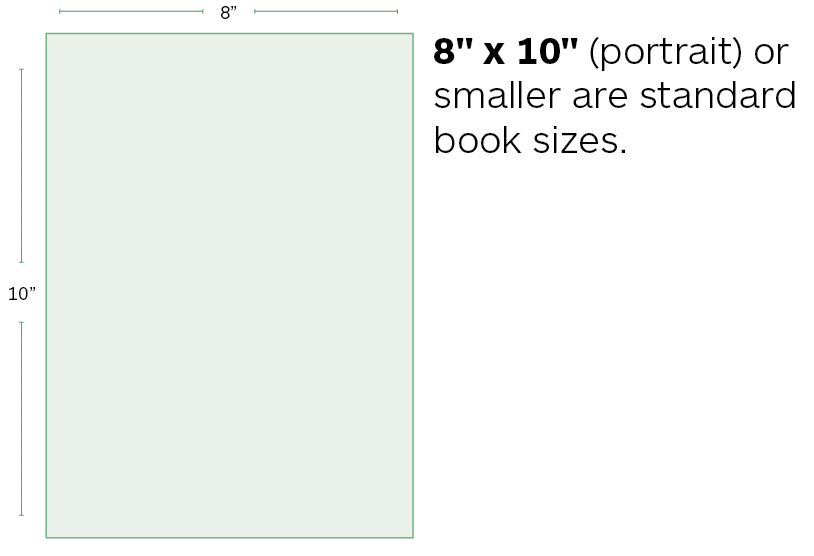
8″ x 10″ (portrait) or smaller are standard book sizes.
Covers larger than 12″ x 18″ must be printed on our inkjet printers. This costs more (we charge our inkjet by the square foot of your image) and this will add up to 1-2 business days to your turnaround time. Keep in mind that our inkjet papers also cannot print double-sided and depending on the paper selection may have a watermark on the backside of the paper.
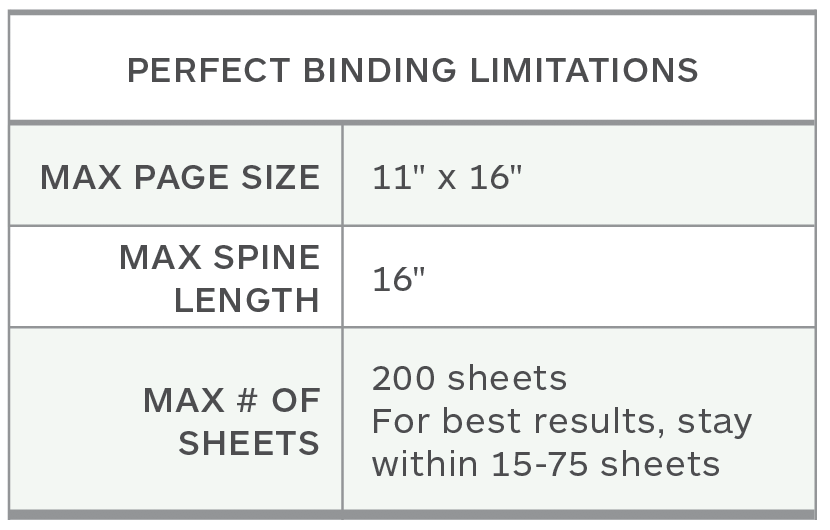
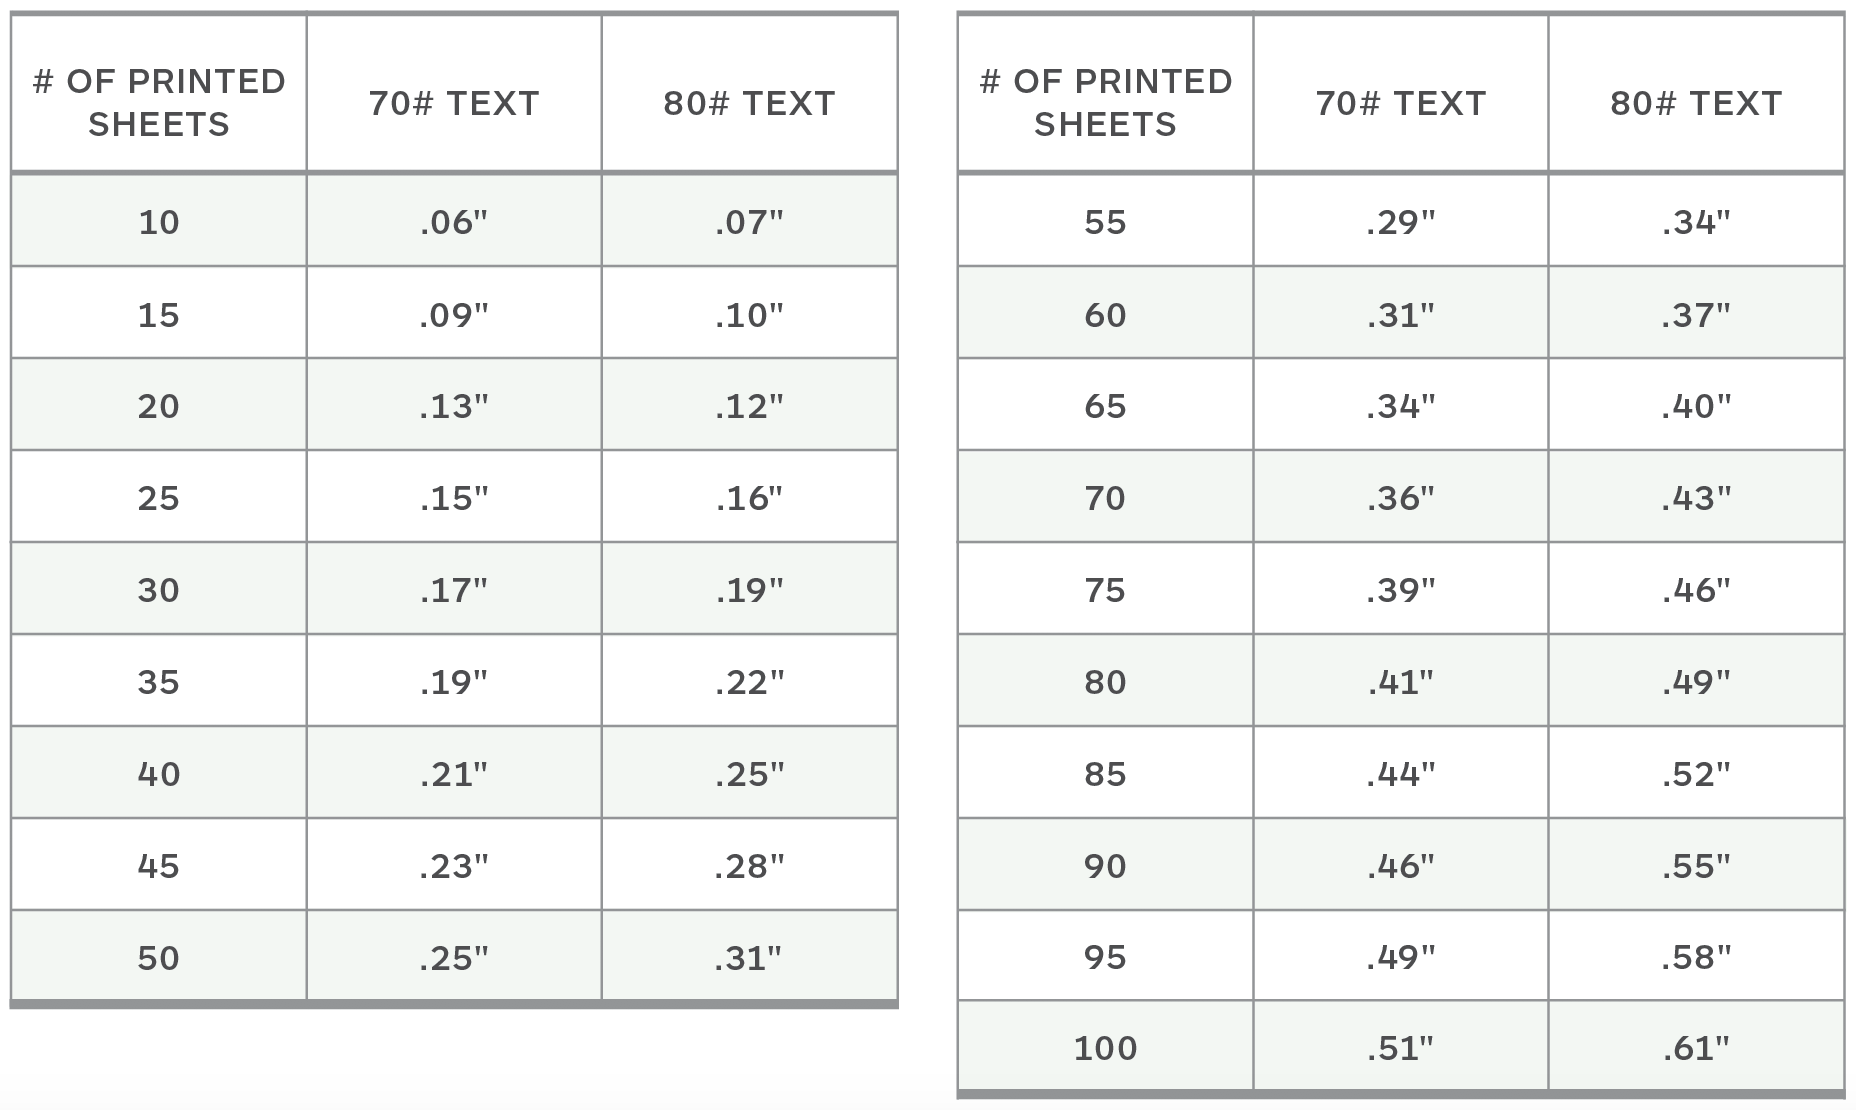
Spine Calculations
Below is an estimate of spine width calculations. Keep in mind this is just an estimate.
The dimensions of your spine will depend on the paper type you choose for your interior pages and the thickness of the paper stock.
We will do our best to adjust your cover file if needed. However, we may ask that you edit and resend your cover file once the binding process is underway. Please keep an eye on your CCS email.
File Preparation
You will need to create 2 InDesign files. There will be a Body/Insides file and a Cover file.
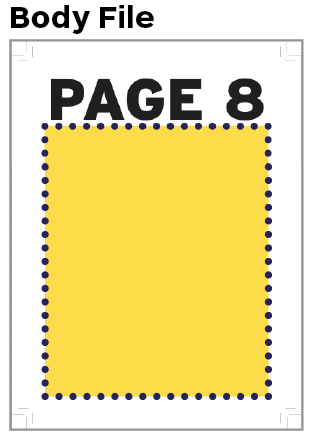
Body File
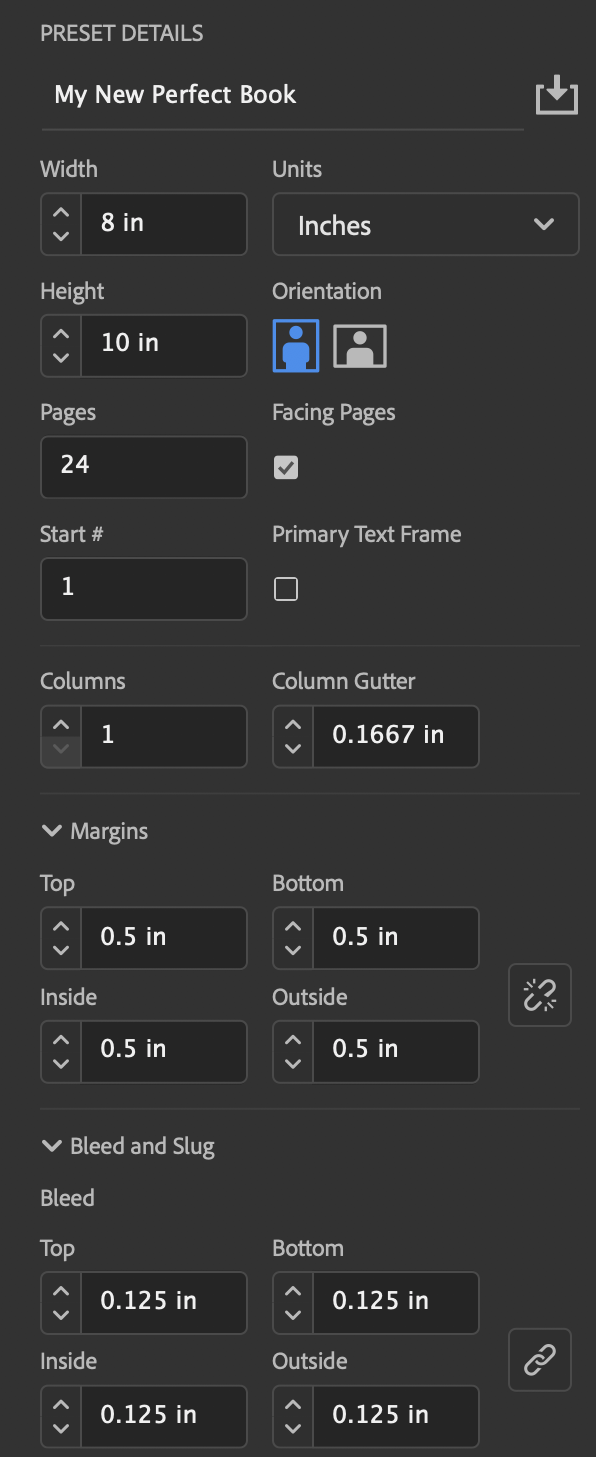
The interior pages must be laid out in InDesign, as facing pages, with a bleed included in the document.
Document Size is the dimensions of your final book in inches. Bleed set to 0.125″ on all sides Margins set to at least 0.25″ on all sides
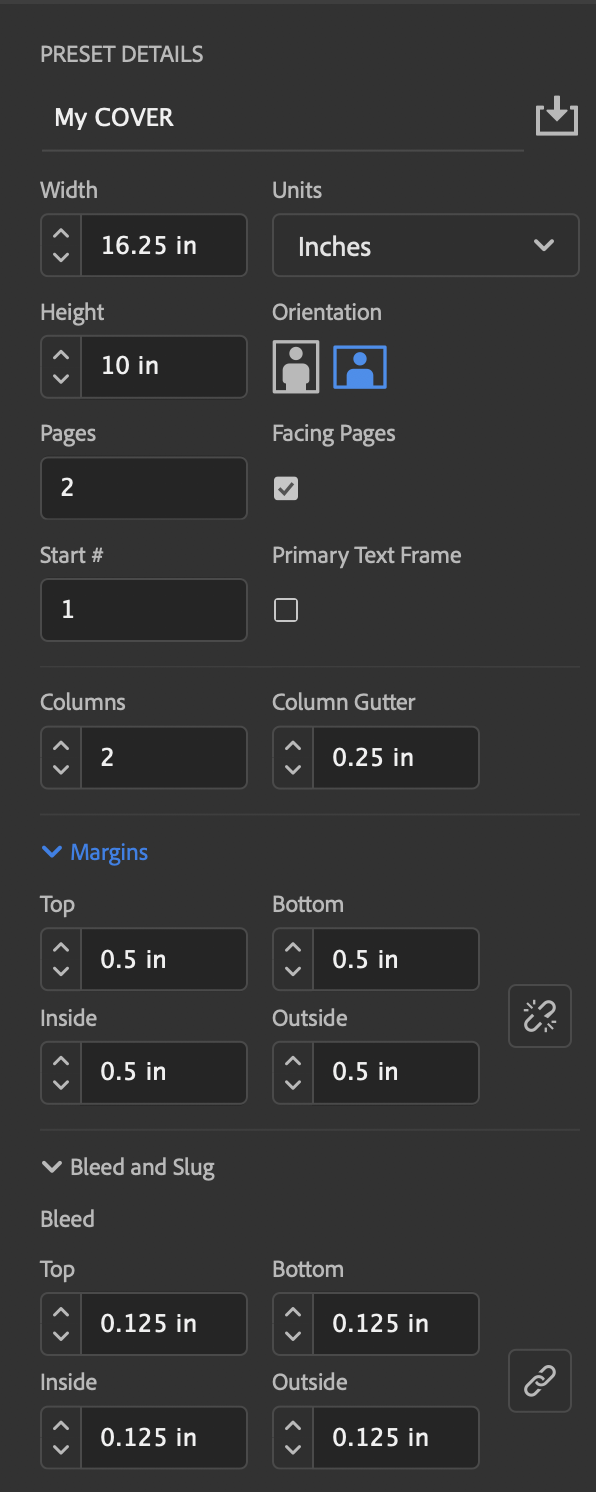
Cover File
The interior pages must be laid out in File > New Document…
Give your cover file 2 columns and set the column margin to be the spine width. You now have guides for your spine.
Set your Documents Margins & Bleeds to 0.125″ (to match your body file)
Gutter
Perfect bound books are glued at the spine which results in approximately a 1/4″- 3/8″ of the inside edge of your pages to be less visible since a perfect bound book cannot lay completely flat without the spine breaking.
There will be a portion of each inside page that will lose visibility (or be swallowed) into the spine. Be mindful of this while designing and adding an extra cushion to the binding-side margin of each page. We recommend approximately 1/2″ of a cushion.
For this reason, we highly recommend printing a proof copy before submission.
How to design for images & text across a two-page spread
The gutter can be problematic when you are placing an image across the center spine.
When an image or text covers a two-page spread, the inside 1/4″ on both pages will be obscured. This amounts to approximately 1/2″ in the center of the image or book. Text and images may not line up correctly across the spine. This is a natural occurrence with a perfect-bound booklet.
Generally speaking, 1/2″ for your gutter margin is the best recommendation for most books.
Need Extra Help?
If you have further questions about file setup, please contact us by email or by scheduling a consultation.
PDF documents can be exported using many different settings depending on the desired output destination (print, web, working file, etc.).
PDF Tips
There are many ways to create a PDF file, but not all of them work well for professional printing and/or file sharing. The way in which you create a PDF can dramatically alter the quality of your printing.
The Imaging Center recommends using PDF/X-1a for most print submissions.
PDF/X-1a
All transparency and layers are flattened
Spot colors are maintained
RGB content is converted to CMYK
PDF/X-4
This is a newer PDF standard that takes advantage of modern prepress processes.
Retains live transparency & layers
Retains CMYK, RGB, LAB, and spot colors
Intended for workflows that support live transparencies
Definitely worth trying to use!
Recommended Changes to Settings
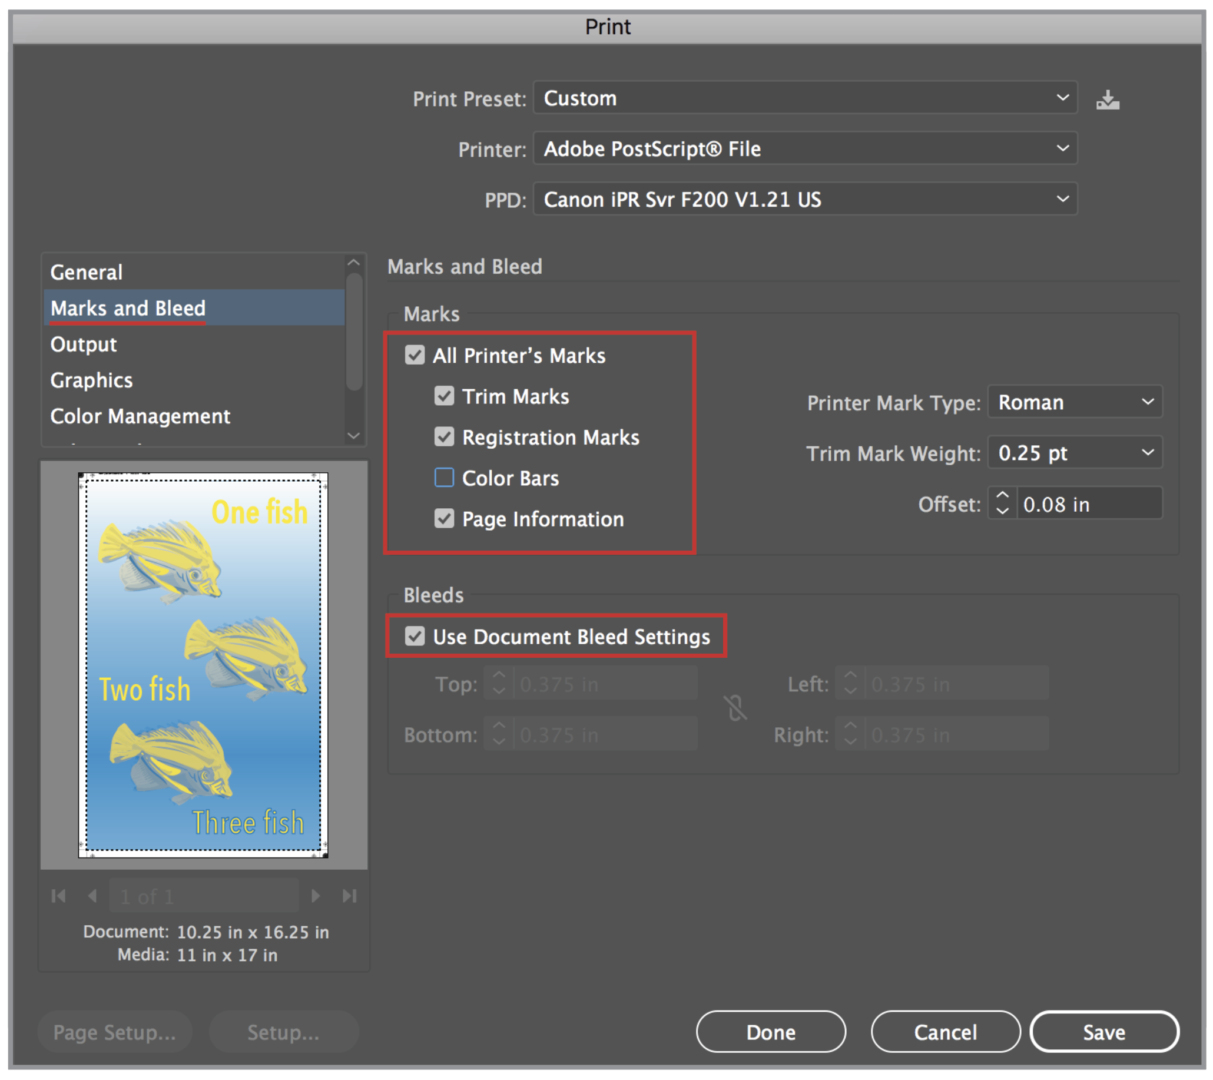
Marks & Bleed: Only include crop & bleed marks if the file set up for that item requires it. Click ‘Use Document Bleed Settings’ to include previously setup bleed, usually should be set to 0.125″(1/8″)
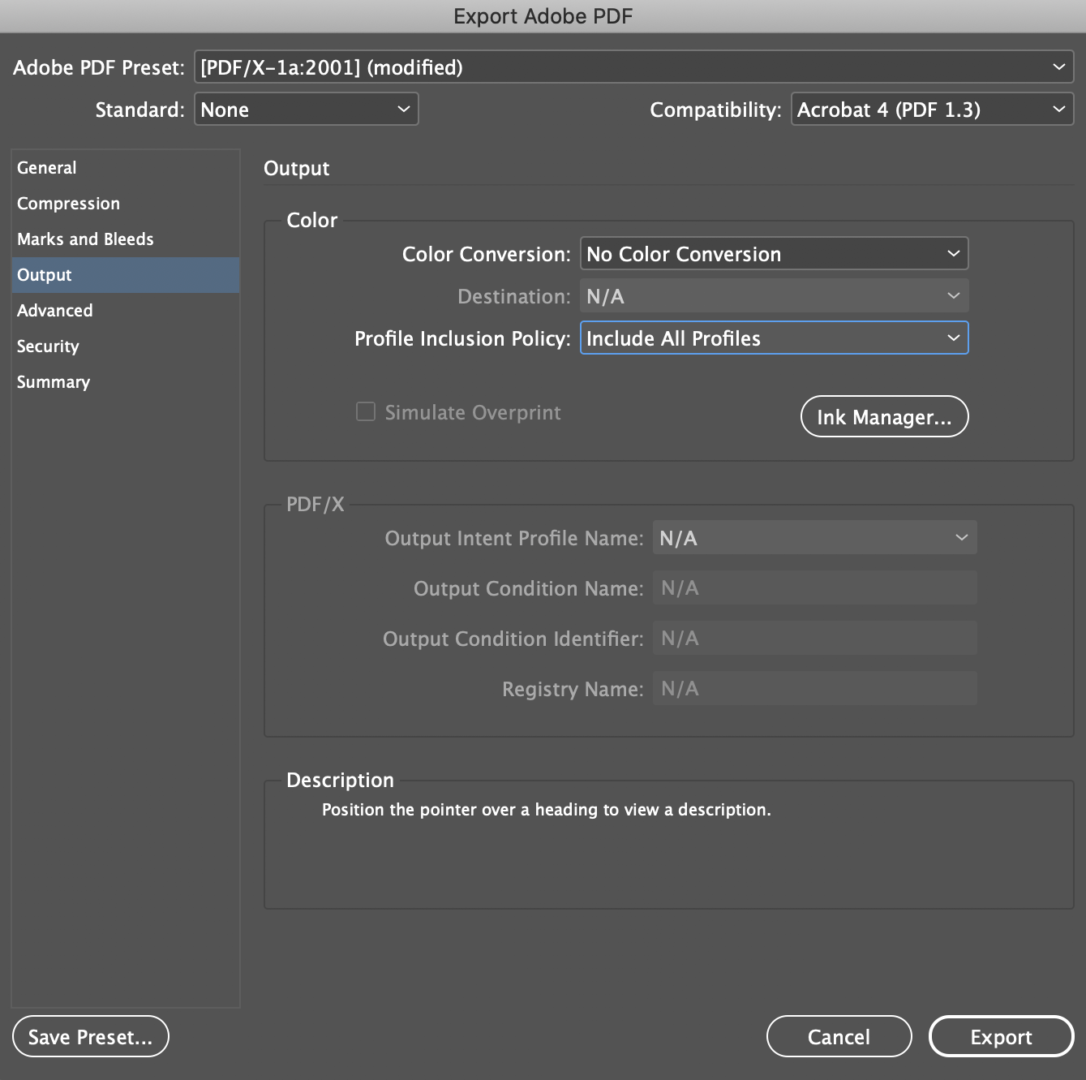
Output Color Conversion: Change to No Conversion & Include all Profiles
When designing artwork in Adobe Illustrator, make sure you are only using the Pantone spot color swatches. Do not try to create your own spot colors. The automated color separations consistently recognize Pantone spot colors. The swatches that we have available also are clearly labeled so you’ll always know what colors you are using.
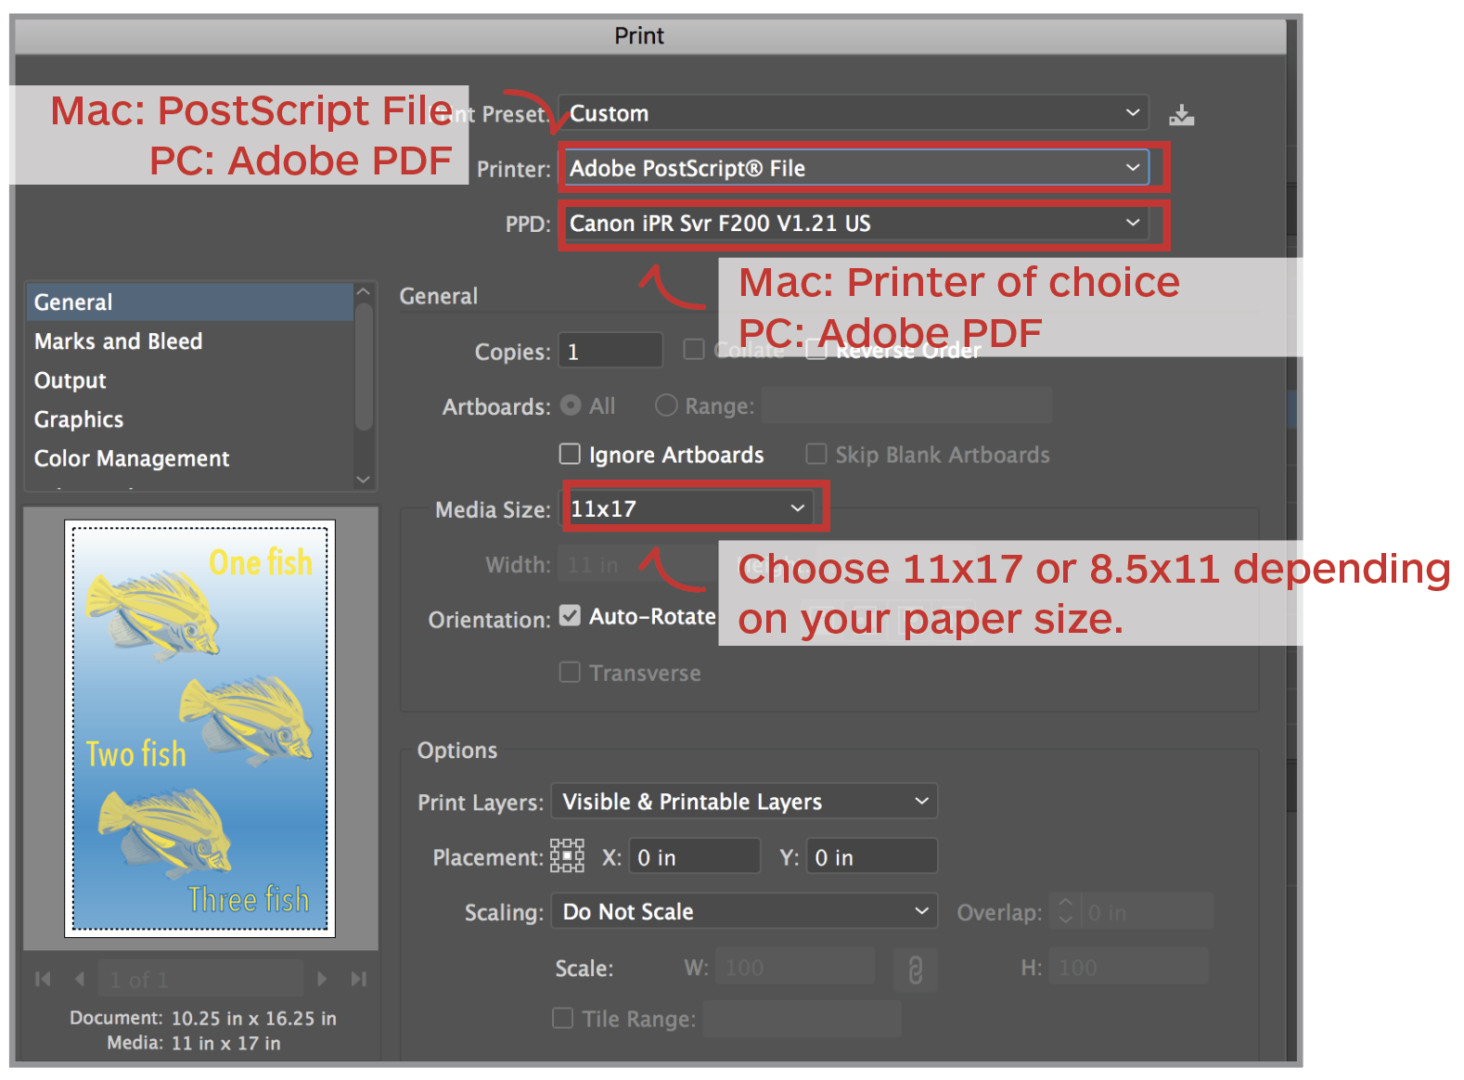
Pull up the print menu in Illustrator: File > Print or ⌘P
Mac Users: For the Printer, select Adobe PostScript File. This will allow you to “print” to a pdf.
Set Media Size to 11″ x 17″ or 8.5″ x 11″, depending on the size of your document.
For the PPD, select any printer that you have installed on your computer. If you don’t have any printers on your laptop, (or you don’t have an 11×17 printer installed on your laptop) install the Xerox Print Driver found on our Drives & Downloads page
PC users: For the Printer, select Adobe PDF. This will allow you to print to a pdf.
Set Media Size to 11″ x 17″ or 8.5″ x 11″, depending on the size of your document.
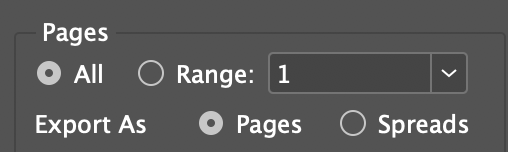
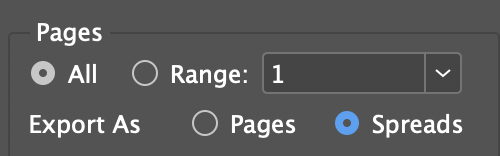
Marks & Bleeds Menu
Check “All Printer’s Marks”
Select “Use Document Bleed Settings.”
If you use the Illustrator template, your document should be exactly 11”x 17” or 8.5” x 11” with bleed. This depends on the template size you chose to make your work. Template files have a 1/2” bleed on all sides.
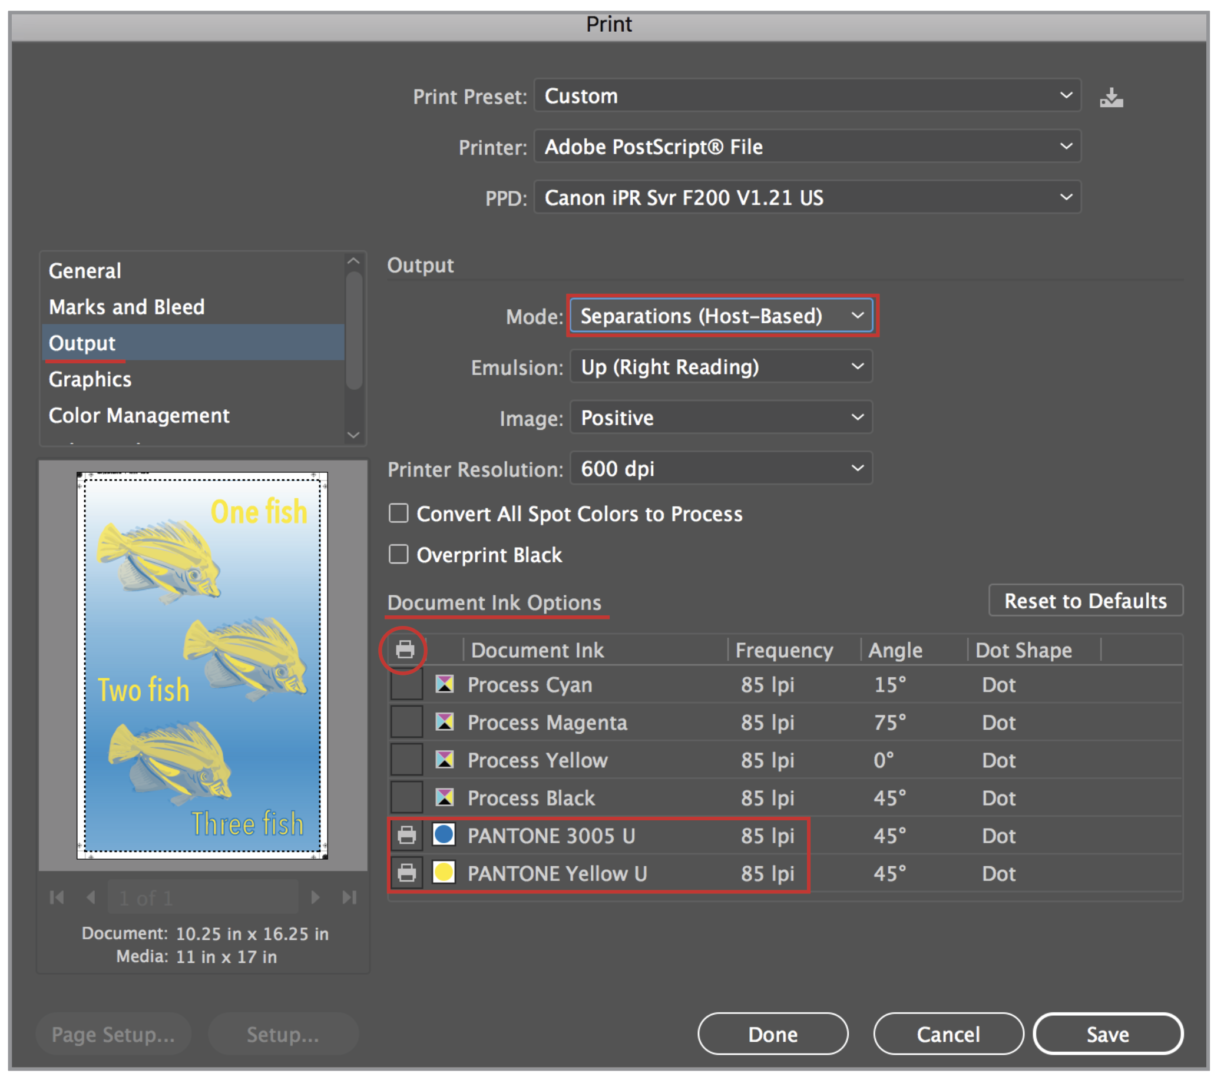
Output Menu
Change the Mode from Composite to Separations (Host-Based).
In the Document Ink Options, make sure that the print icon is on for the Pantone spot colors you are using and off for all of the Process/CMYK colors.
If the process colors are checked on, this means you have something in your file that is set up for CMYK. This is not a viable printing option for the Risograph.
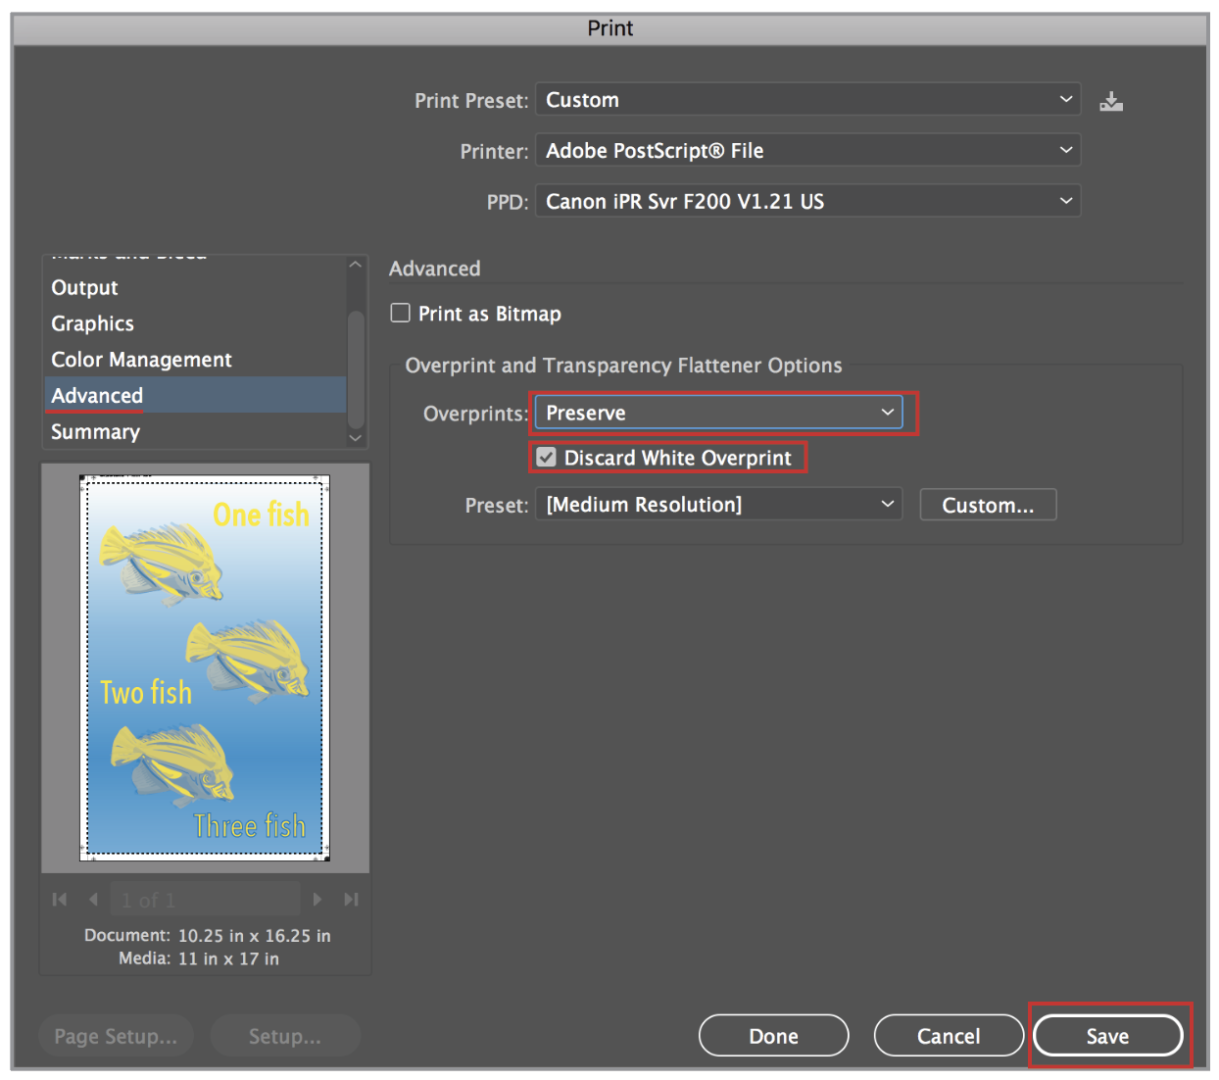
Advanced Menu
Change the Overprints option to Preserve.
Check on “Discard White Overprint.”. Click Save
This will create a postscript or .ps file. Open in Acrobat Distiller or Preview to convert the file to a pdf.
Save the file as a pdf. Your colors should be separated into black and white pages with the Pantone number listed at the top of each page.
If I want to switch out the color of a plate (print on a blue plate using the teal drum), do I need to alter and re-save my file?
No. The printer reads your plate as a grayscale file and prints in whatever color is loaded into the machine.
Is this the only way to save a Photoshop file?
No. There are a lot of ways to prepare a Photoshop file. You are welcome to research and use other methods on your own.
Troubleshooting
I can’t add a new adjustment layer to my file
Once you add spot colors and/or switch to Multichannel mode, you cannot add any more adjustment layers. However, you can make channel adjustments using Image > Adjustments > Levels (or Curves).
If you want to make major adjustments to your file, go back to CMYK or RGB mode and make the adjustments. Note that this will delete the spot colors that you’ve already made. But if you are making drastic changes, it is better to do so in CMYK or RGB. After you’ve made your changes, repeat your preferred process of color separation.
The Multichannel or CMYK mode is grayed out
Some of the color modes won’t convert between each other. You may need to switch to grayscale first, and then switch to your chosen color mode. Grayscale will discard color information, so you will need to re-color if you use it as an in-between mode.
Tips
Double-sided printing tips
There will always be roller marks when double-siding. But they can be minimal if you take the following steps
Print the side with the least amount of ink coverage first.
Bring back your opacity to 80% across the board.
Roller marks tend to appear towards the top and center of the page. The more ink in that area, the more prevalent the roller marks.
Interactive Pieces
Anything that is being handled a lot (like a flipbook or resume) should be at 80% max.
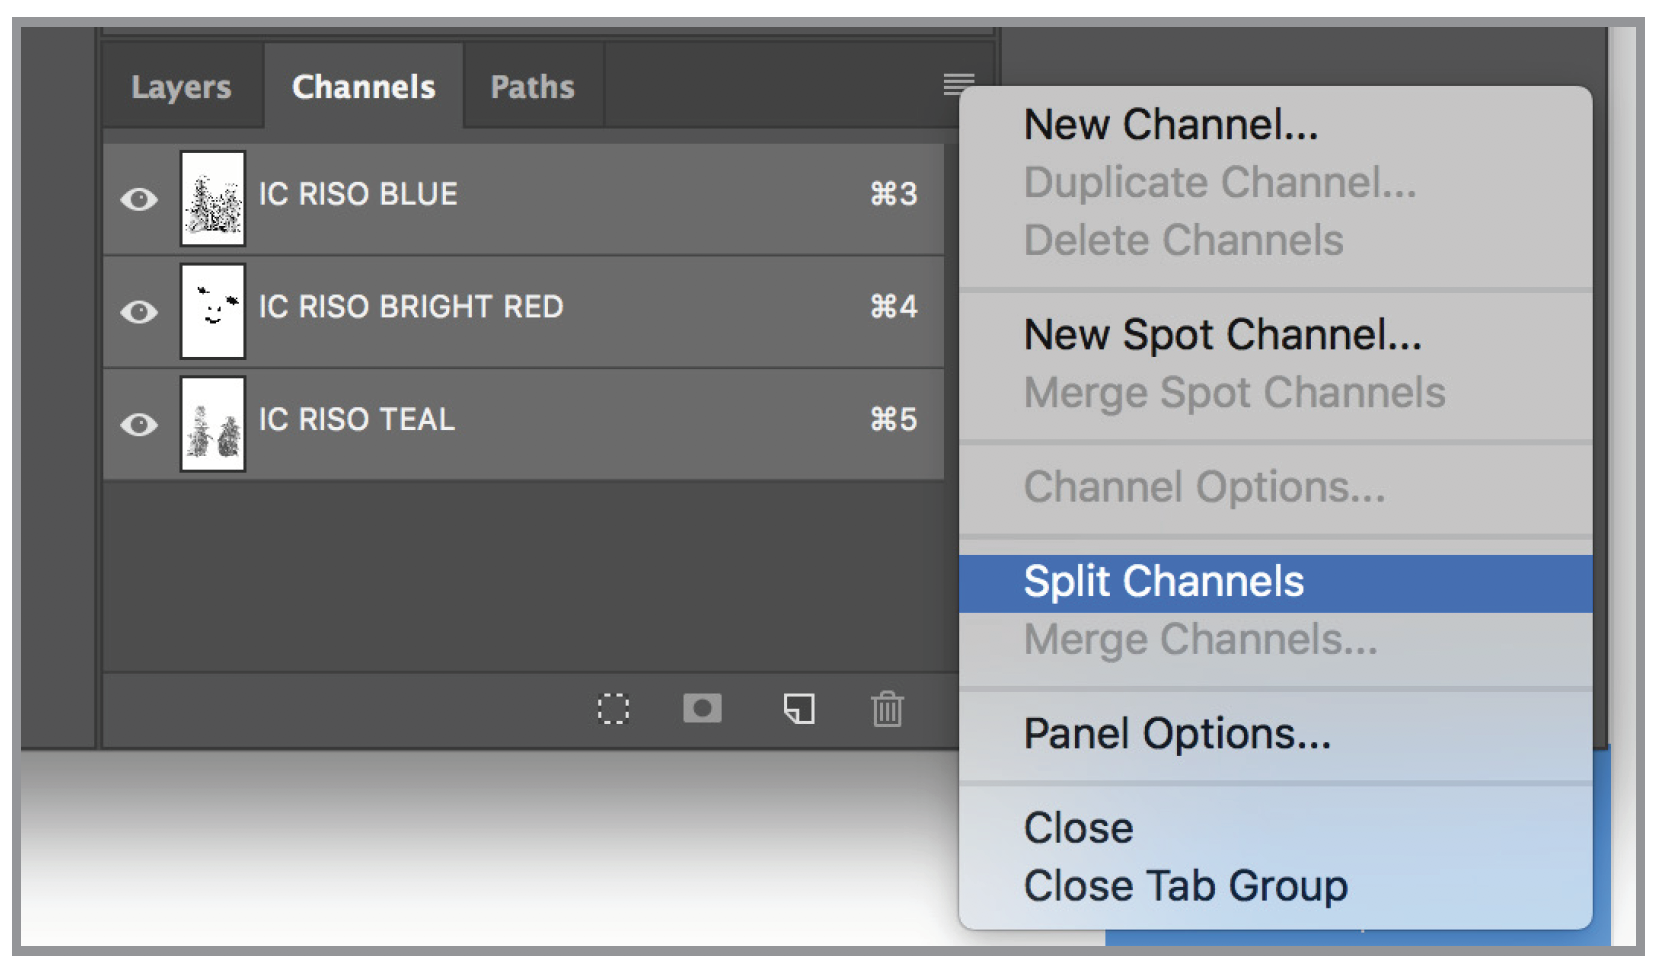
Each channel needs to be its own separate pdf file. The easiest way to do this is to split the channels. First, save your work.
Split your channels using the Channels menu
Photoshop will generate 3 separate grayscale files.
Save each as a pdf.
Combine these newly separated pdfs into one single pdf file with a screenshot of your composite image. You are now ready to print in the Imaging Center!
If you prefer to add the Riso colors manually, be sure to add them as SPOT PANTONE colors
Save your document as a new file.
Note: these methods all require switching your color mode and deleting channels, which can be a destructive workflow (e.g., layers get flattened or color information is discarded). When working with channels, it is difficult to revert back to the previous look. It is best to keep your final piece, with all its layers and edits, as a separate file.
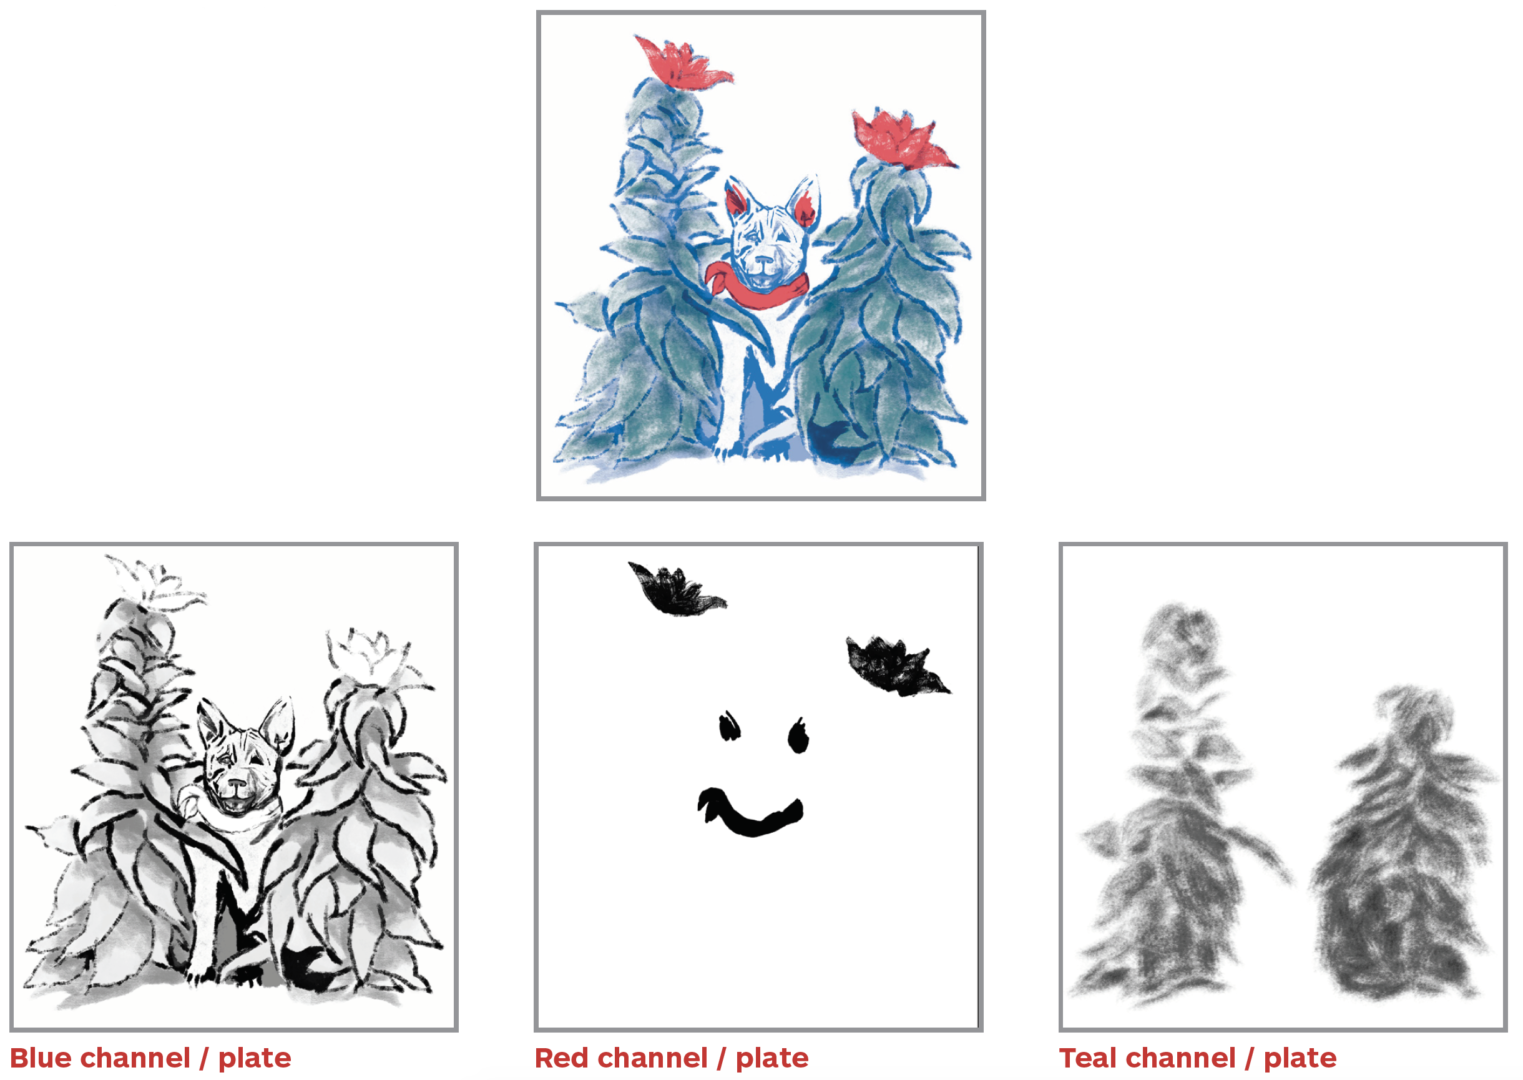
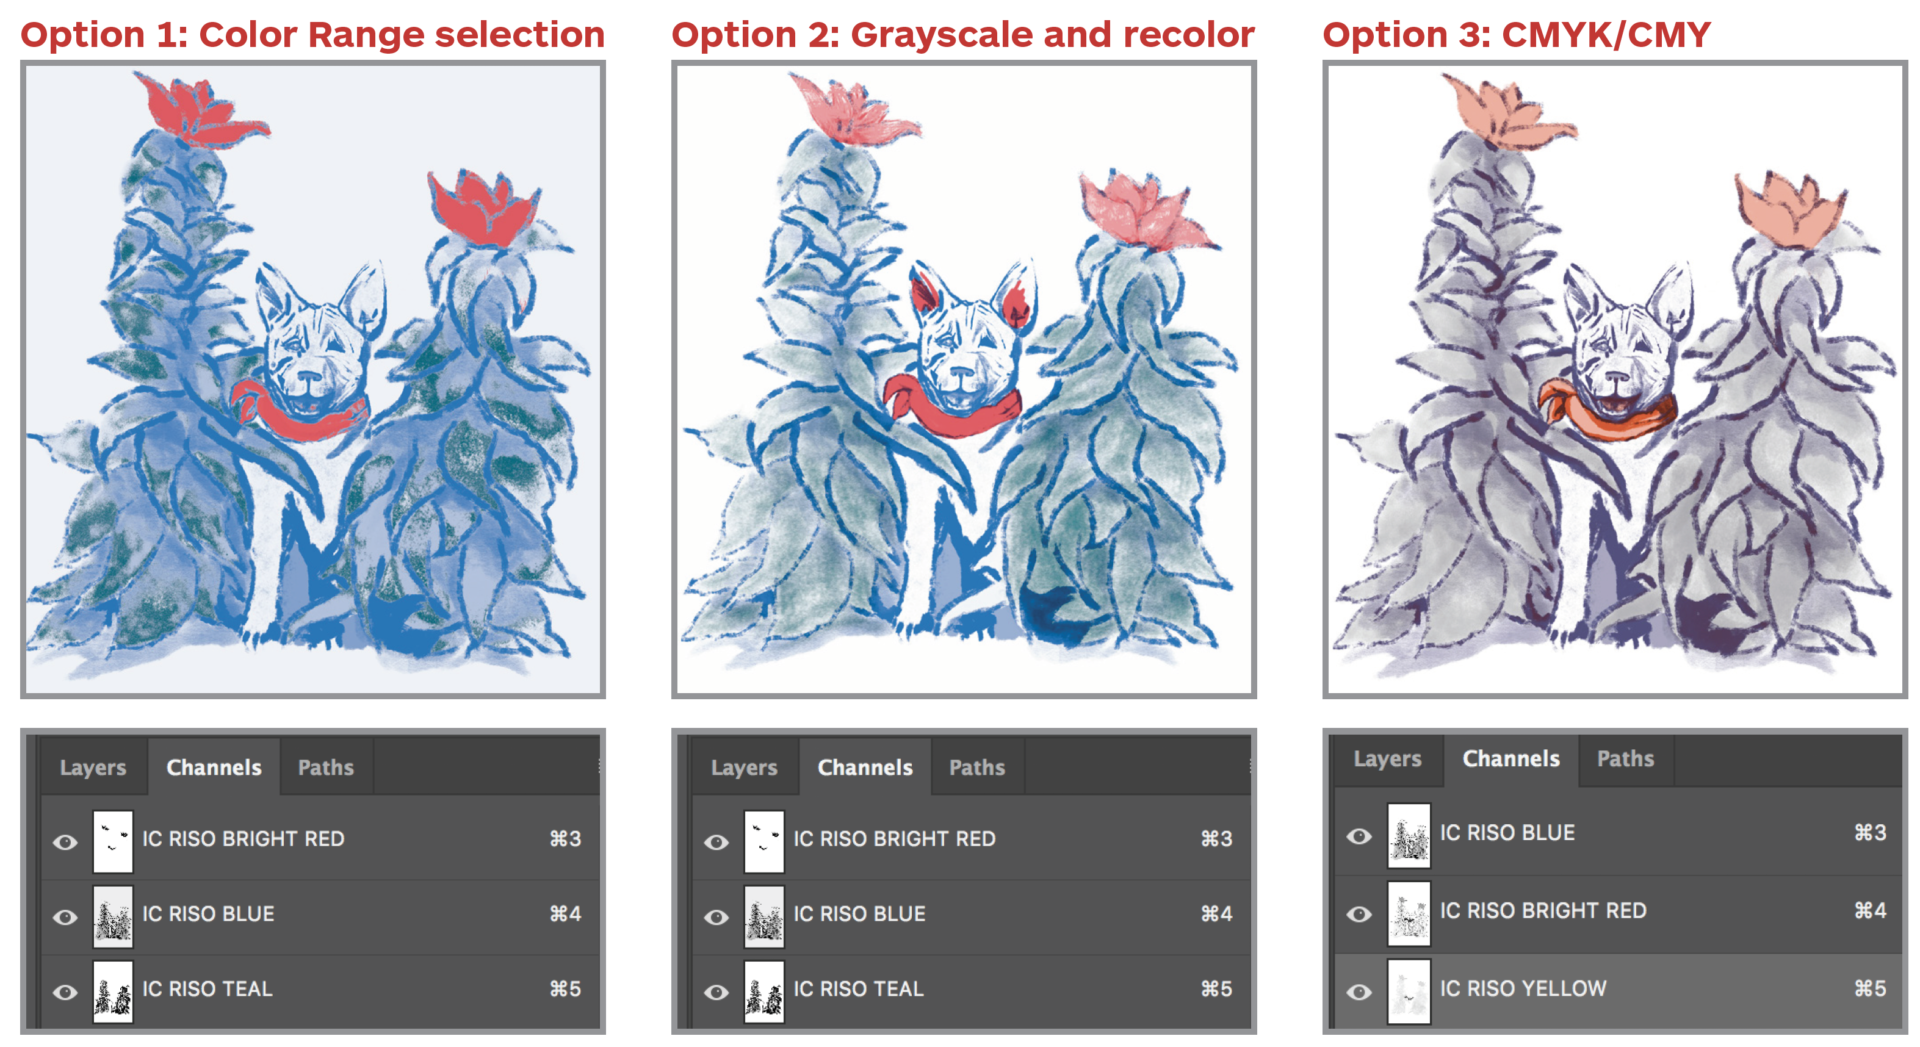
At this point (one way or another) all your colors should be divided into channels:
None of these is a perfect conversion, so you may want to make some adjustments directly to the channels.
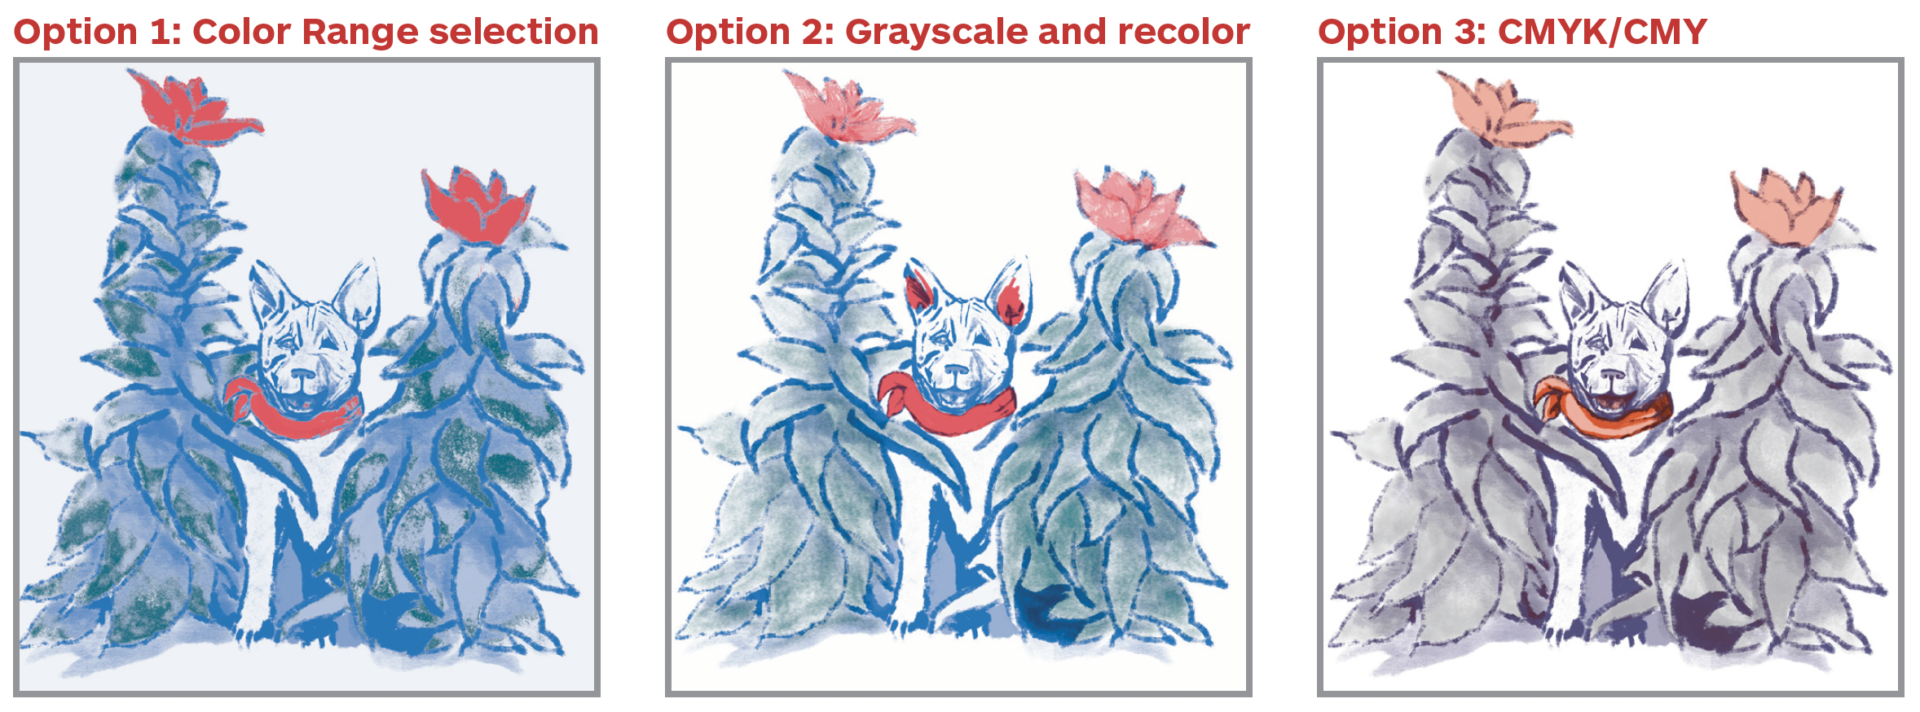
If you are happy with your conversion, skip to Split Channels!
Adjust Color Using the Brush Tool
Color range selection doesn’t deal with blended or overlapped colors very well. You may want to go back in with a brush and fill in (or remove) areas on each channel.
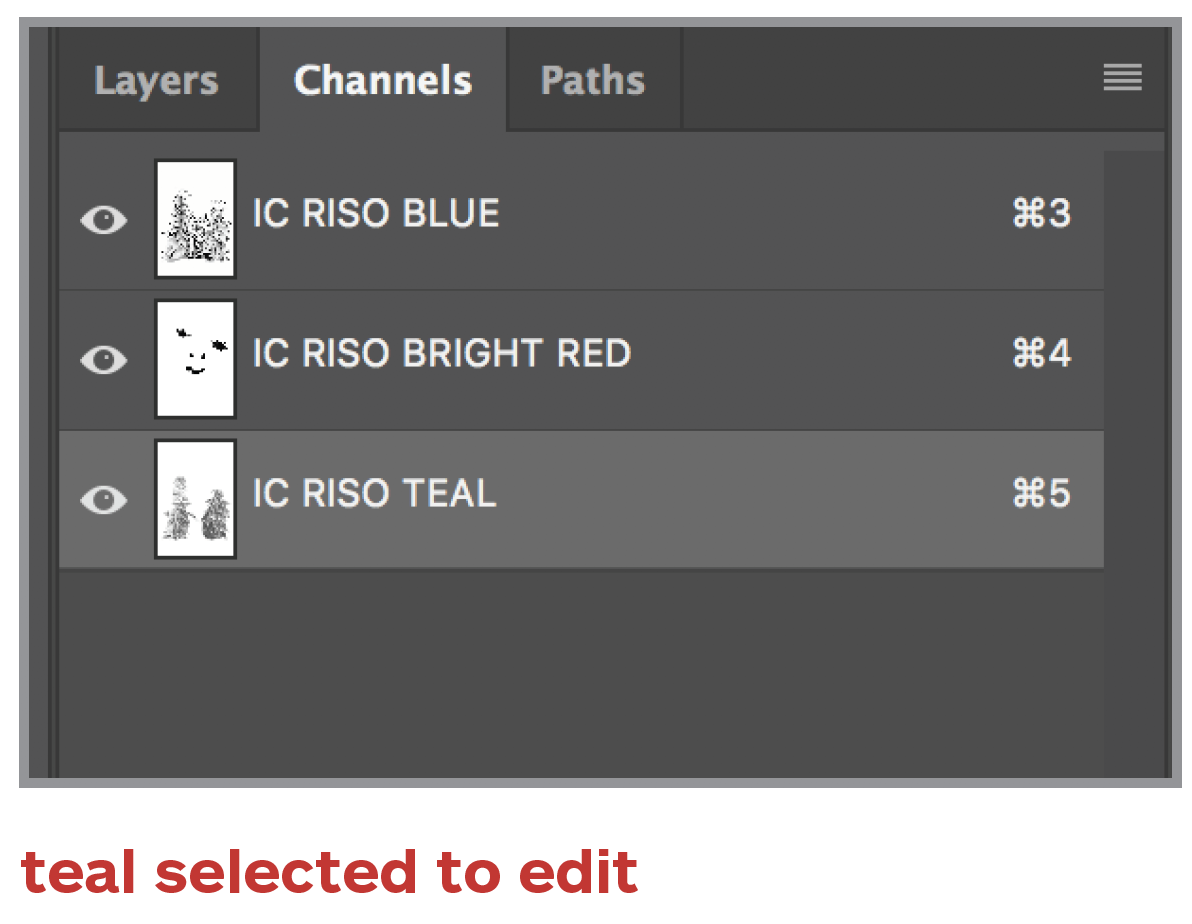
Select the spot channel you want the change.
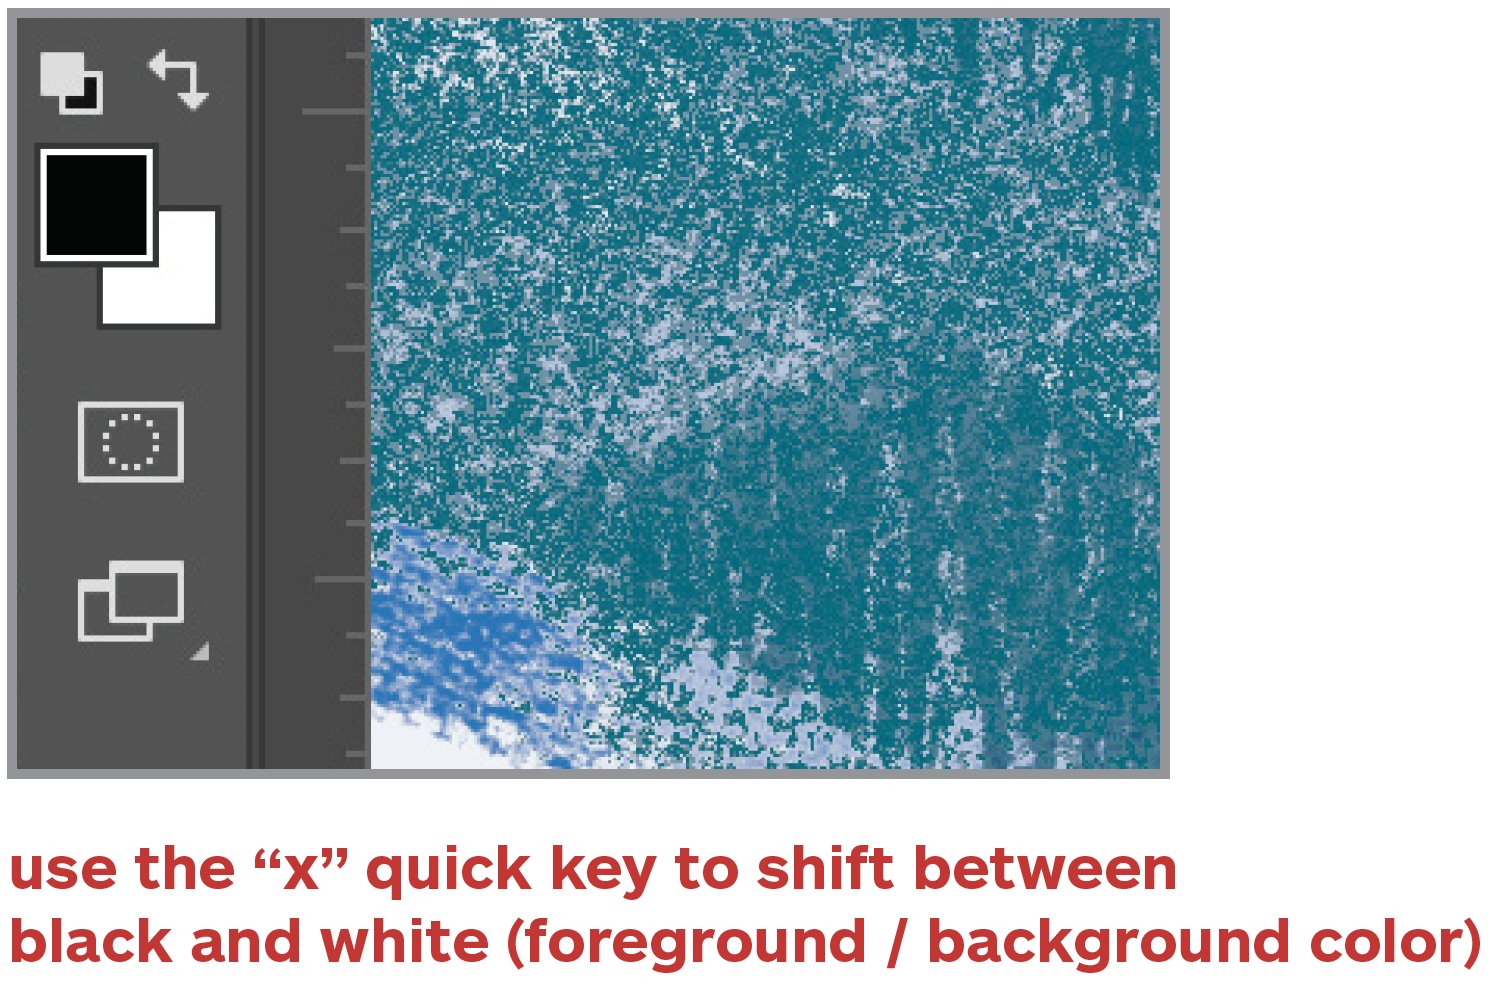
Set your foreground color as black and background color as white.
Use the brush tool to paint in or remove color.
Black adds color and white erases. Grey can be used to paint in a lower opacity.
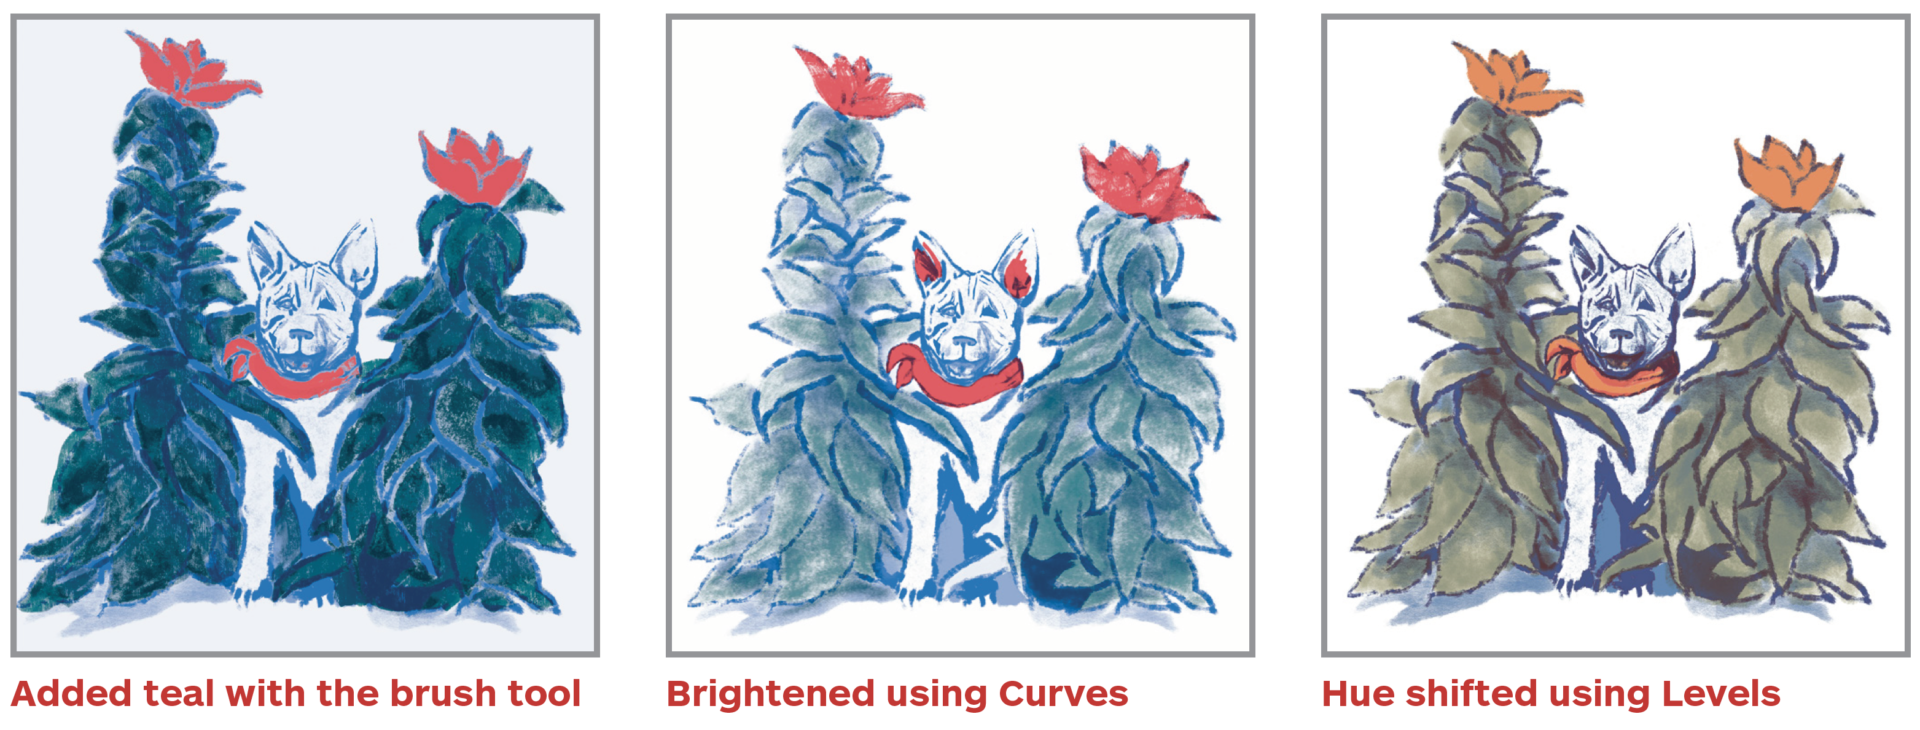
Example: we added teal with the brush tool
If you are happy with your conversion, skip to Split Channels!
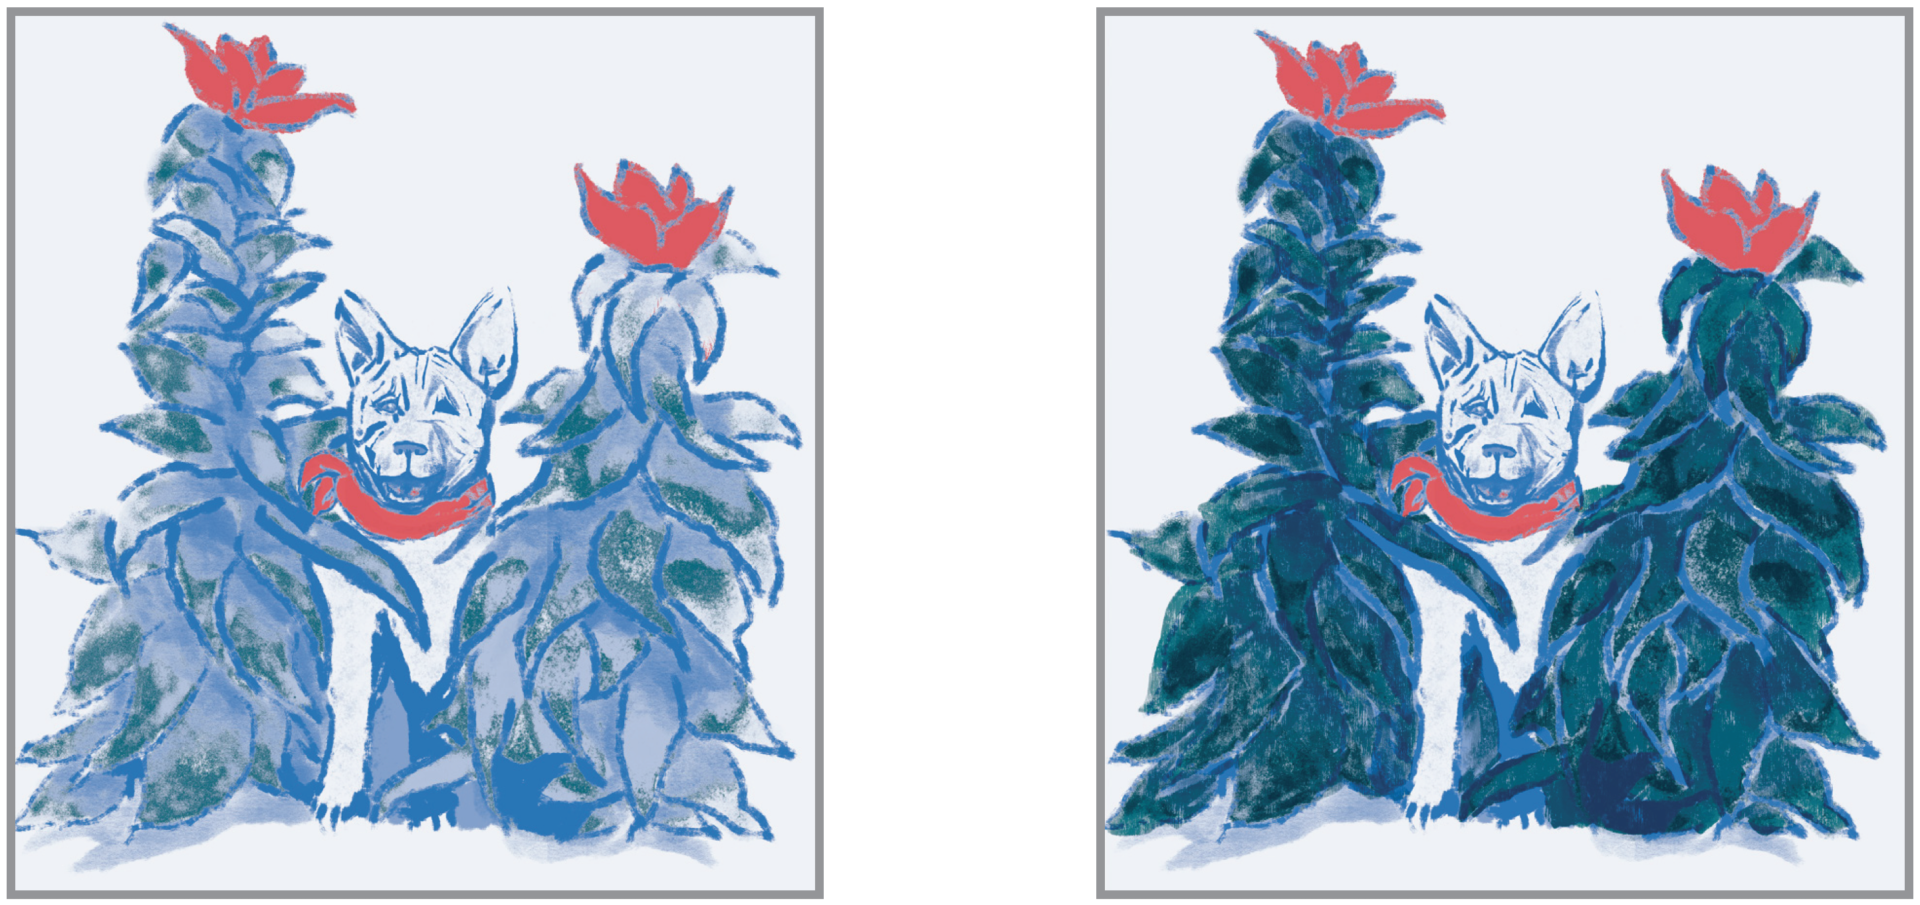
Change the Value Using Curves
Select all your channels and open up the Curves Adjustment. Sometimes the grayscale image is too light. This allows you to control the luminosity of each color.
Menu Bar > Image > Adjustments > Curves…
Example: we brightened our image by adjusting the curves
If you are happy with your conversion, skip to Split Channels!
Change Hues Using Levels
Select all your channels and open up the Levels Adjustment. This allows you to control the intensity of each color. You can adjust your hue by adjusting the levels. The color usually needs to be adjusted when converted from CMY to BRY:
Menu Bar > Image > Adjustments > Levels…
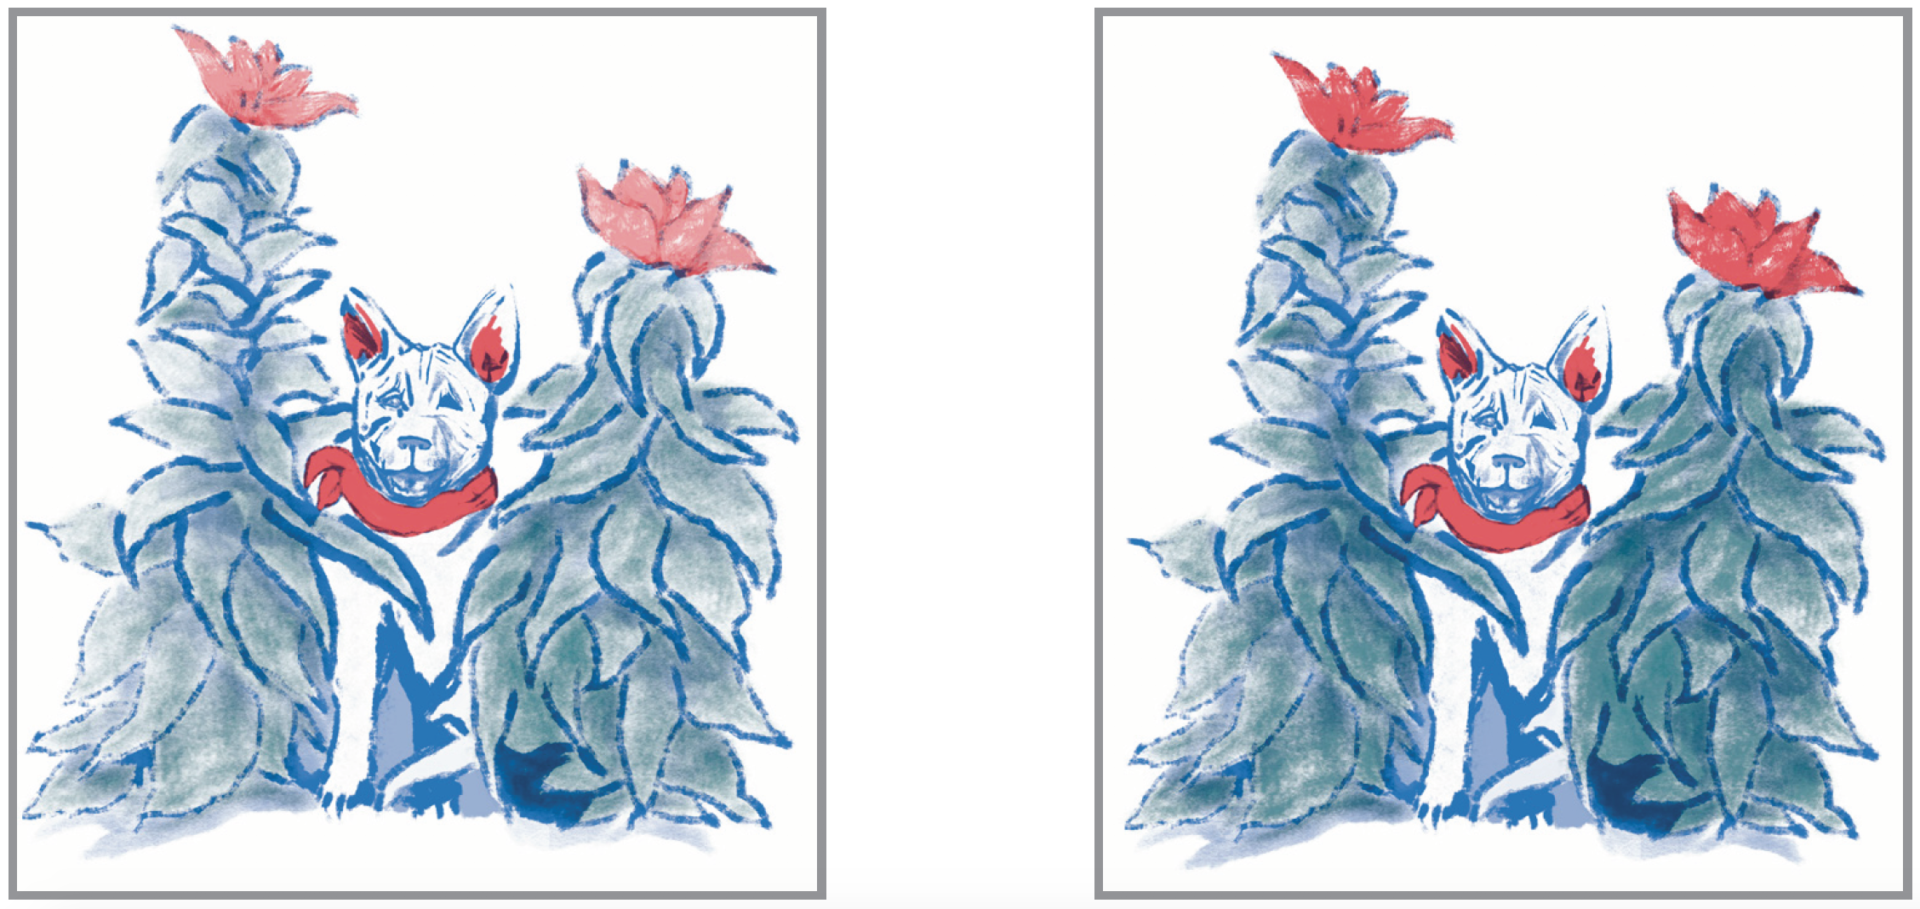
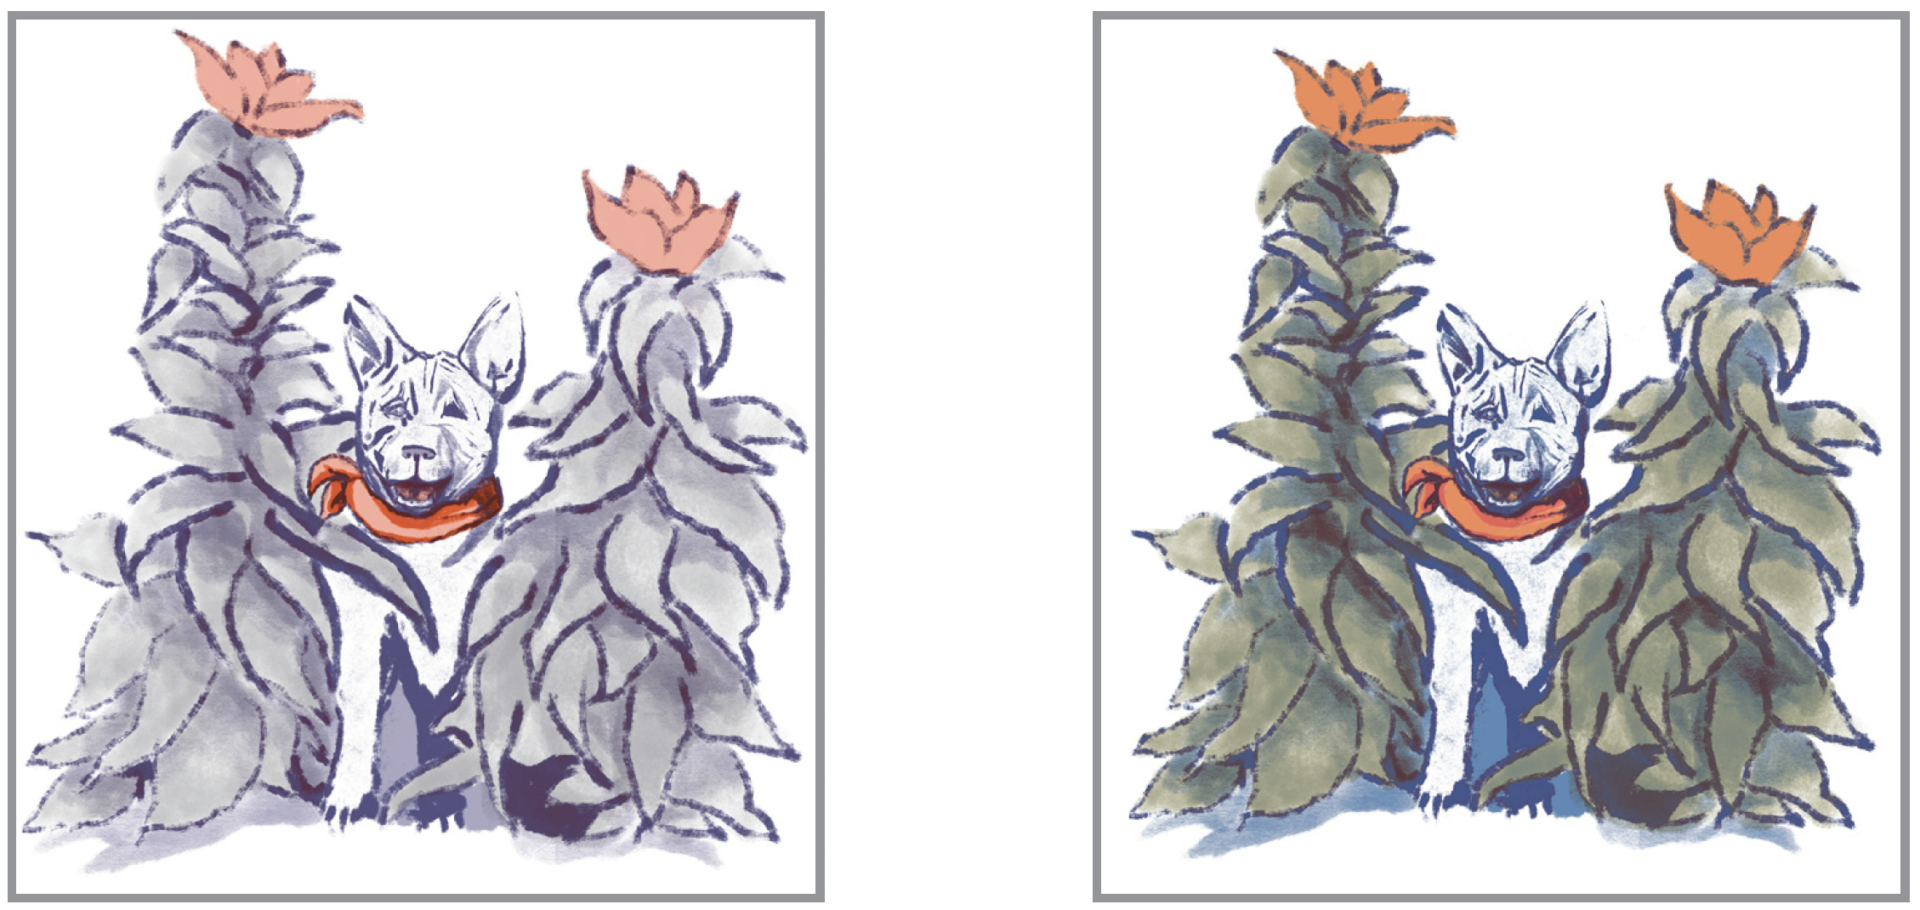
Example: we shifted the hue of this image by adjusting the levels
If you are happy with your conversion, skip to Split Channels!
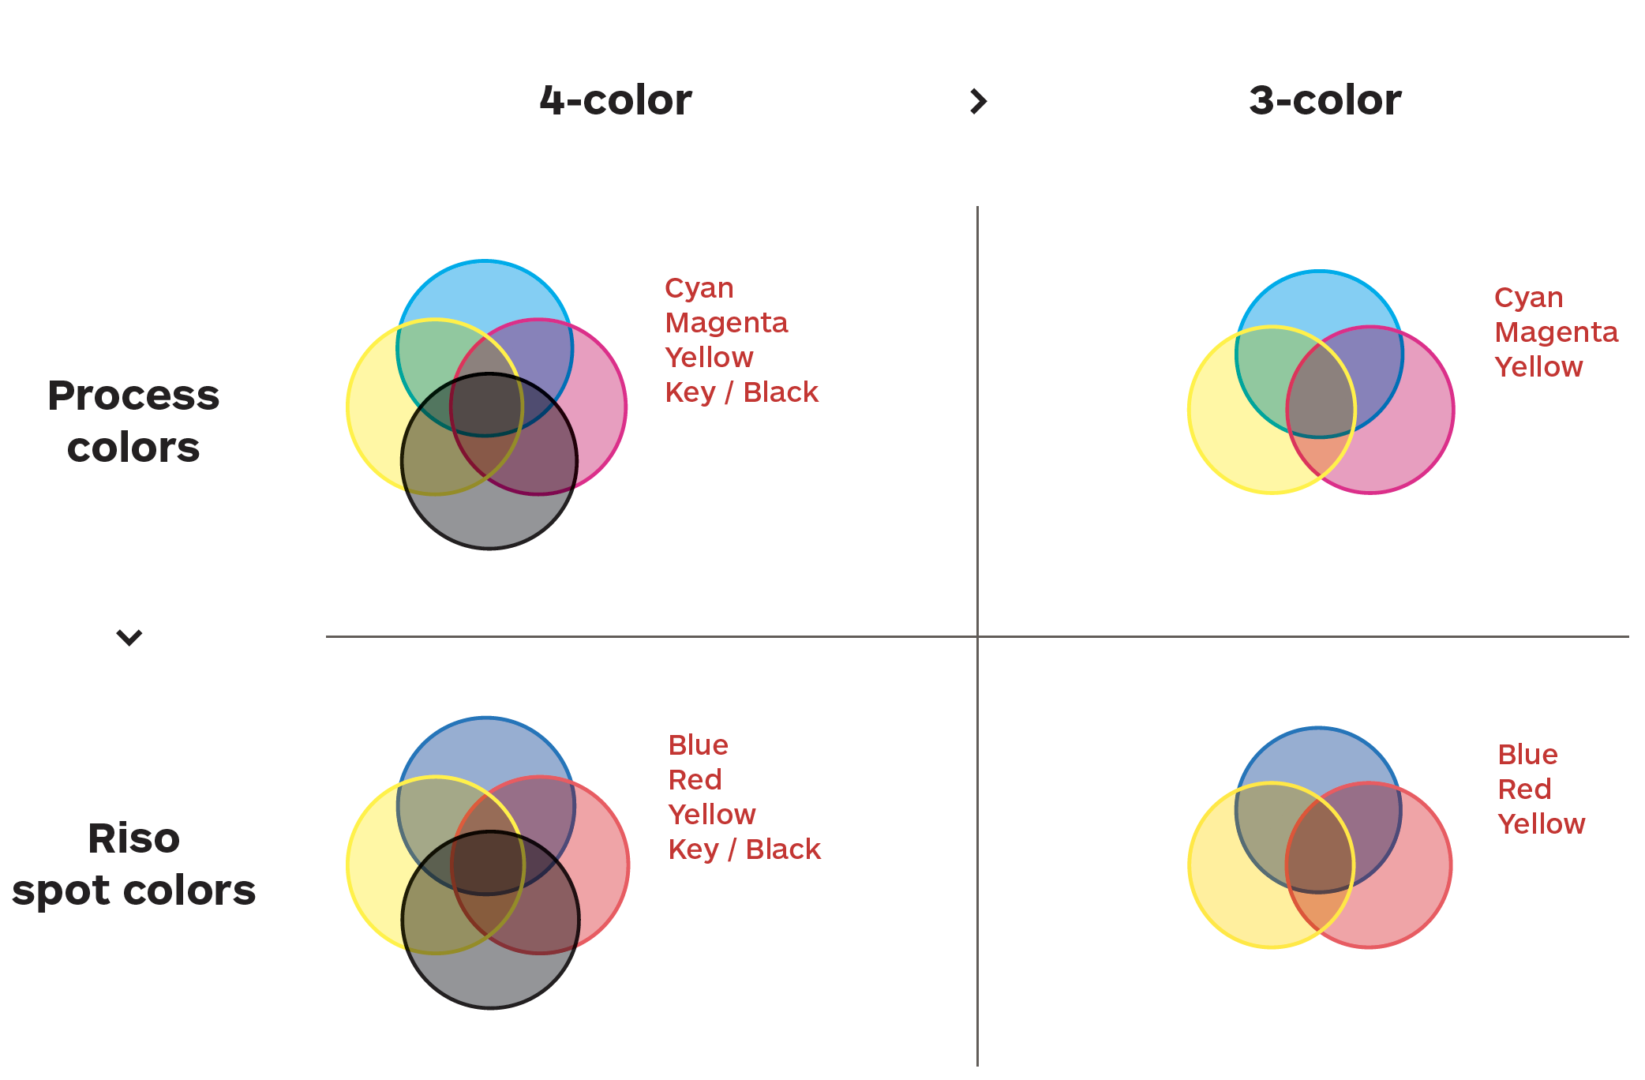
This version involves working with color systems. Rather than print every single color in your image, most printers use process colors, such as CMYK.
Set your color space to Working CMYK
Menu Bar > Edit > Convert to Profile… >
Destination Space: Working CMYK – U.S. Web coated (SWAP) v.2
You can print with CMYK channels by using Blue, Red, Yellow, and Black (BRYK). However, we recommend eliminating the Black channel through the following method. This will leave you with a three-color CMY (or BRY) print.
CMY / BRY printing
CMYK process printing creates roughly half of its blacks using the color black, and the other half using a combination of the other three colors. We can use the CMY channels to cover part of the shadows and black portions of the print.
Using the Channel Mixer, you can increase the amount of black information covered by each of the three channels.
Channel Mixing
Select all your channels. While keeping all channels selected, turn off the visibility for the black channel. Notice the value difference when you turn it off the black channel. You will try and simulate this value level using the other three channels.
Open the Channel Mixer Menu Bar > Image > Adjustments > Channel Mixer… >
Output Channels Switch between the different Output Channels (Cyan, Magenta, Yellow) to see how the Source Channels change with each color.
You can see that the sliders are all set to 0% for all colors except their own. For example, on the Cyan Output Channel, the sliders are set as follows: Cyan 100%, Magenta 0%, Yellow 0%, Black 0%)
Adding Black information to your CMY colors
Starting with Cyan, move the black source channel slider up. (e.g. Move the Black slider from 0% to 50%. This will increase the black content printed on the Cyan channel. You will see the color mix into your piece in the background.
Repeat this step with Magenta and Yellow.
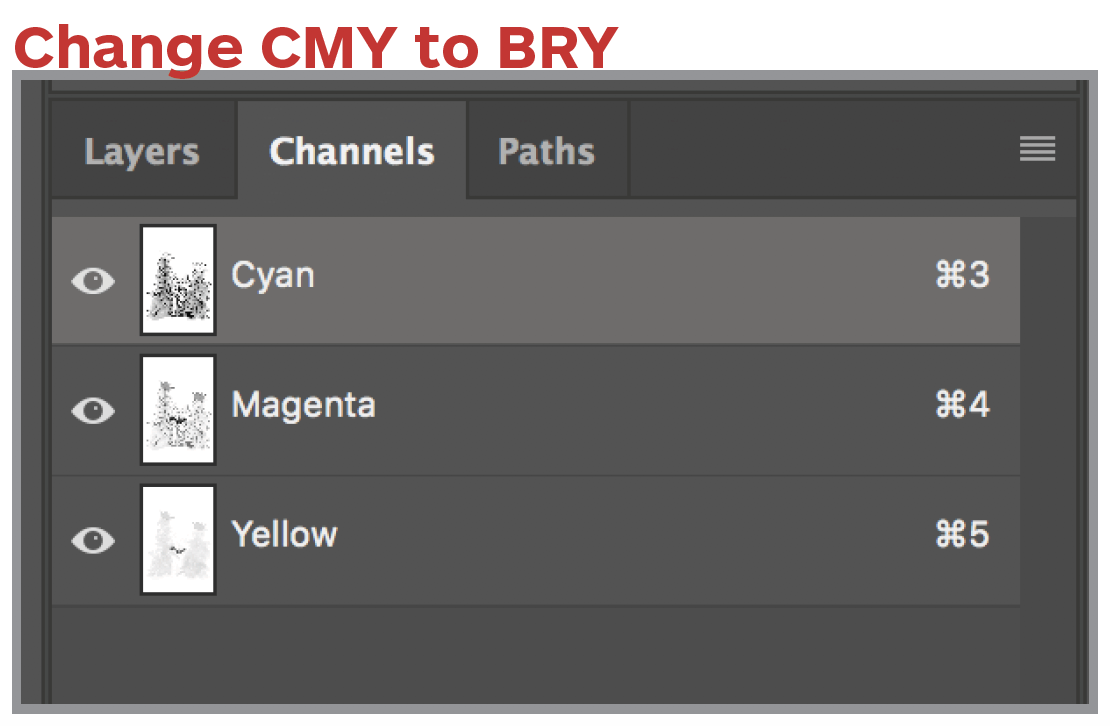
Convert CMYK channels to BRY Spot Colors
Change your mode to Multichannel
Menu Bar > Image > Mode > Multichannel
Delete the black channel from the Channels panel.
Convert CMY channels to Riso BRY spot colors
Double-click on a channel, and use the eye dropped to select the corresponding Riso color.
Cyan > RISO BLUE/3005 U | Magenta > RISO RED/185 U | Yellow > RISO YELLOW/Yellow U
If you are happy with your conversion, skip to Split Channels
This method changes your piece to grayscale. You will manually add the colors back in by painting on Spot Channels. This can be time-consuming if you have a detailed color image.
Change your mode to Grayscale
Menu Bar > Image > Mode > Grayscale
Click OK through the “Discard other channels?” warning. This process will also flatten your layers.
Your piece will be in black and white without any color information. You should only have one Gray channel.
Change your mode to Multi-channel
Menu Bar > Image > Mode > Multichannel
Click OK through the “Flatten layers?” warning. (This process will flatten your layers.)
Your single Gray channel should change to Black.
Change your Black Channel (your first color) to a Riso spot color
Double-click on your black channel.
Use the eyedropper to select your desired spot color from the Riso swatches panel.
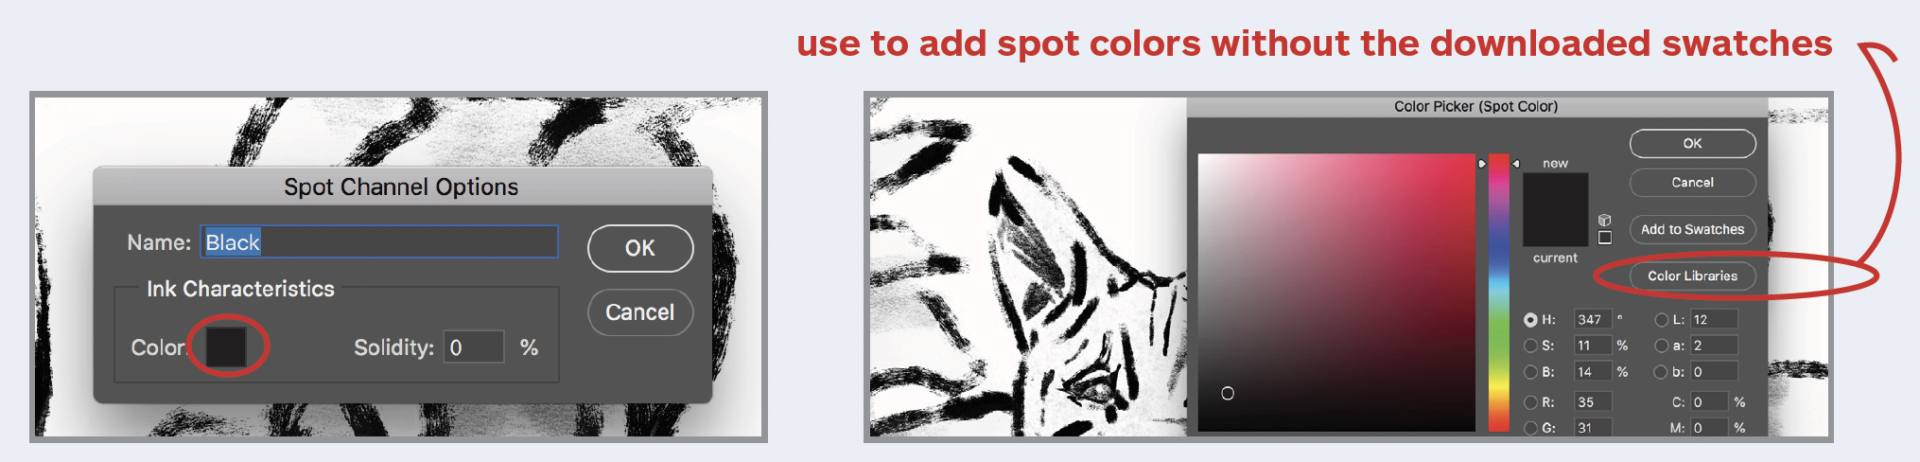
If you did not download the swatches file, you can find and add the Pantone equivalent color.
Click on the black swatch to pull up the Color Picker box.
Click on Color Libraries and type in your desired Pantone color using the Riso color guide.
Because you only have one channel, the content in your piece will appear in grayscale. Click OK.
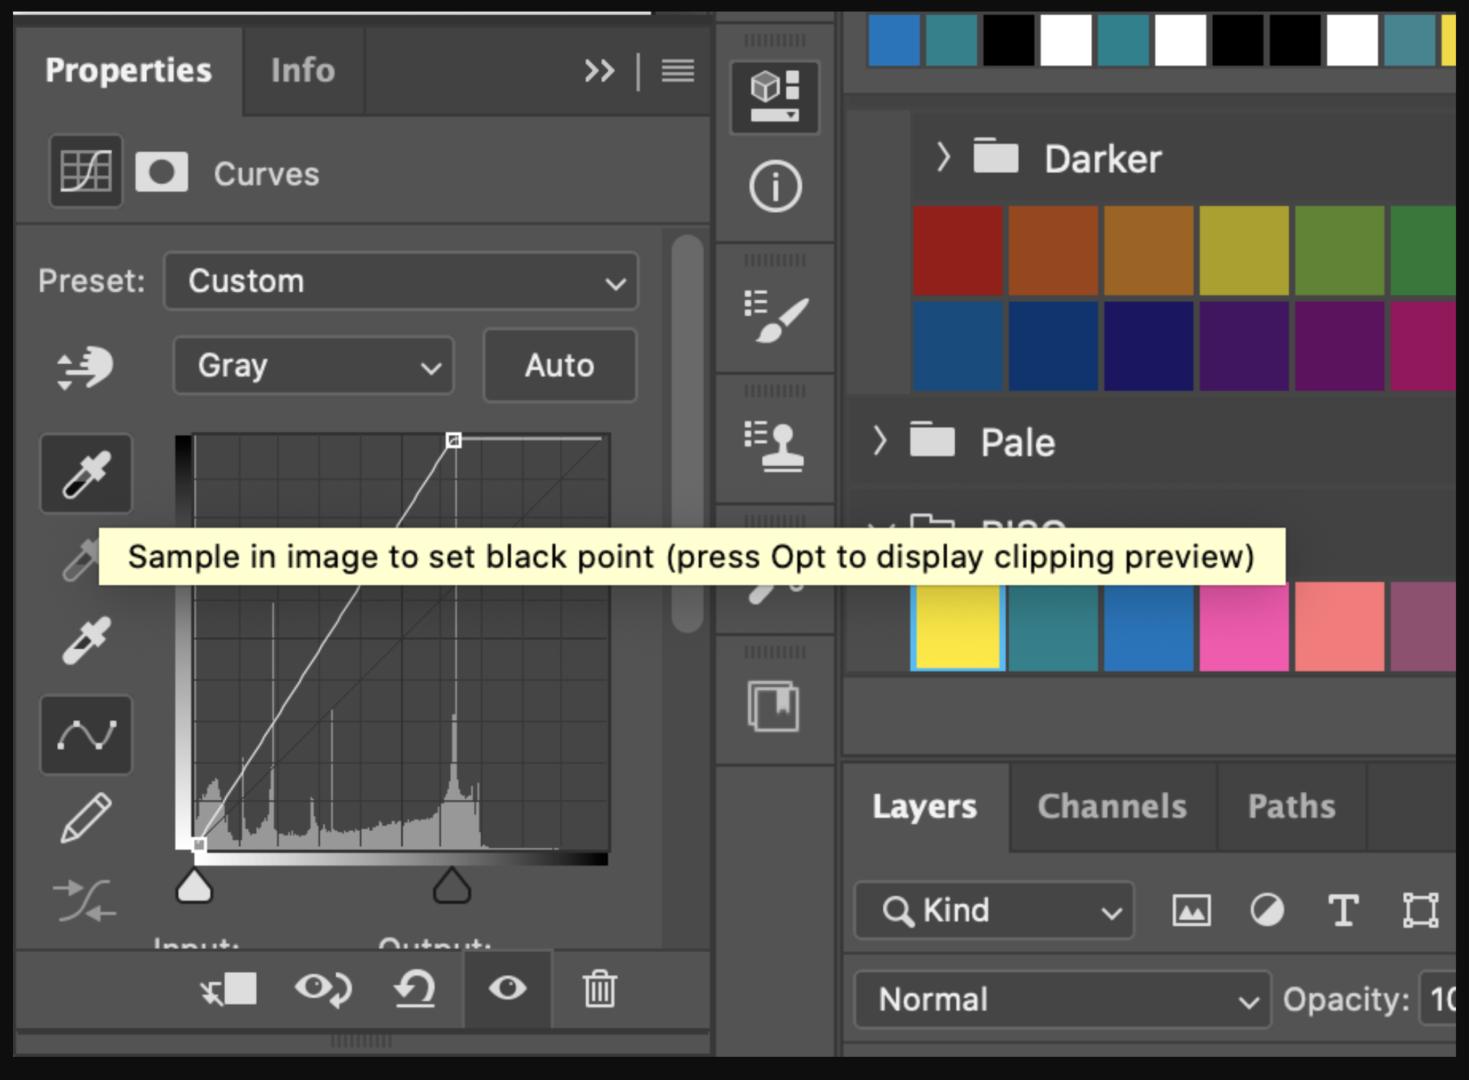
If your image appears washed out, feel free to change the values using Curves, Levels, or your own favorite method of adjusting Luminosity. I would suggest re-setting your black point using Curves:
Menu Bar > Imaging > Adjustments > Curves
Select the black point dropper and click on the darkest point in your image.
Add a second (or third or fourth) spot color as desired for your piece:
Go to the Channels menu panel.
Select “New Spot Channel…” from the drop-down menu.
Use the eyedropper to select your desired spot color from the Riso swatches panel. (Your first channel will now show up in color)
Click OK
With your new channel selected, use the paintbrush tool to add in your new spot color. (Use a black swatch.)
Add a channel for each color you want to print.
If Option 2 color conversion works for you, skip ahead to Additional Optional Adjustments.