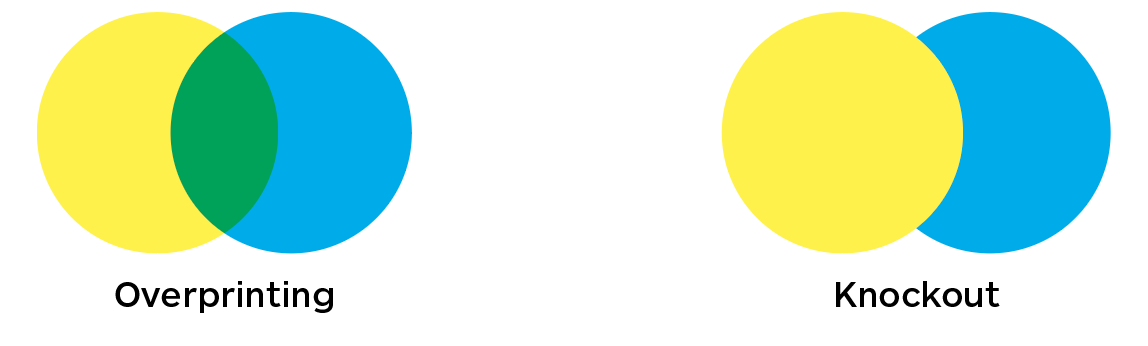
Overprinting: is when colors are printed over each other. This creates new colors as the colors are blended.
Knockout: is when you cut out overlapping colors from the lower layers so that you only print with the pure spot colors.
College for Creative Studies
Overprinting: is when colors are printed over each other. This creates new colors as the colors are blended.
Knockout: is when you cut out overlapping colors from the lower layers so that you only print with the pure spot colors.
The Risograph has limits of accuracy. Each color layer requires a separate pass through the printer, registration on multi-color Risograph prints will never be perfect.
It is recommended that you add registration marks to your image to aid in lining up multiple layers. These can also double as trim marks if you plan on cutting down your print to size.
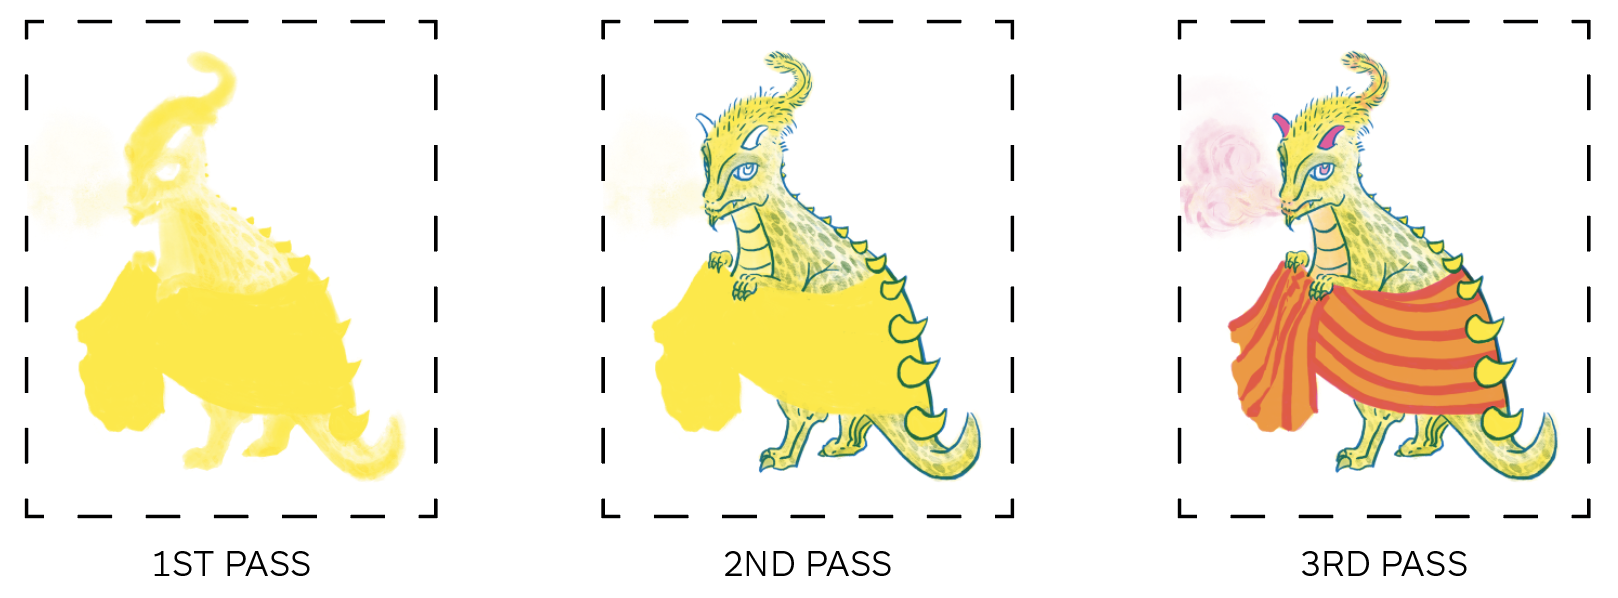
Line work printed over solid blocks of color will usually look best.
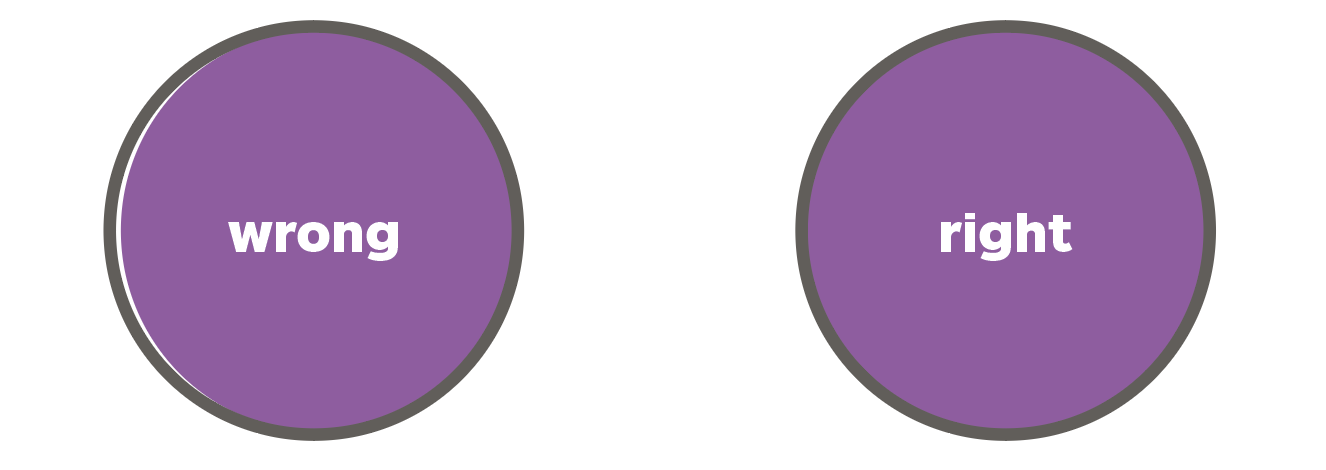
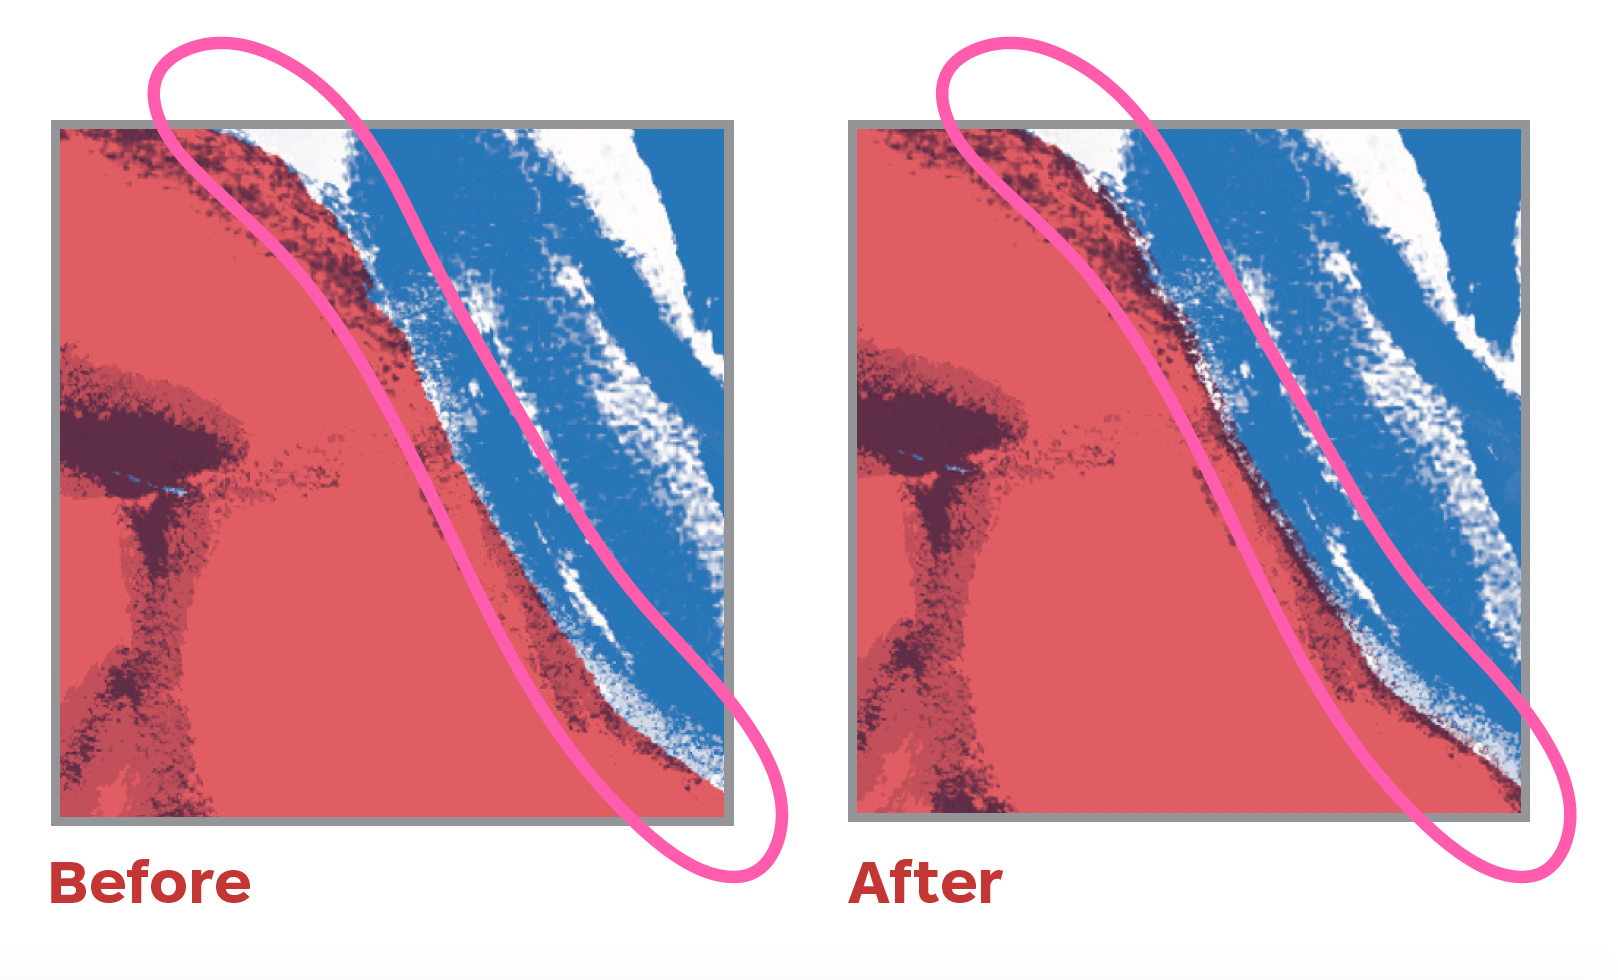
Registration (aligning overlapping colors) can be tricky and often imperfect on the Risograph.

When colors are misaligned (misregistration), you can be left with a glaring white gap that can detract from your overall piece.
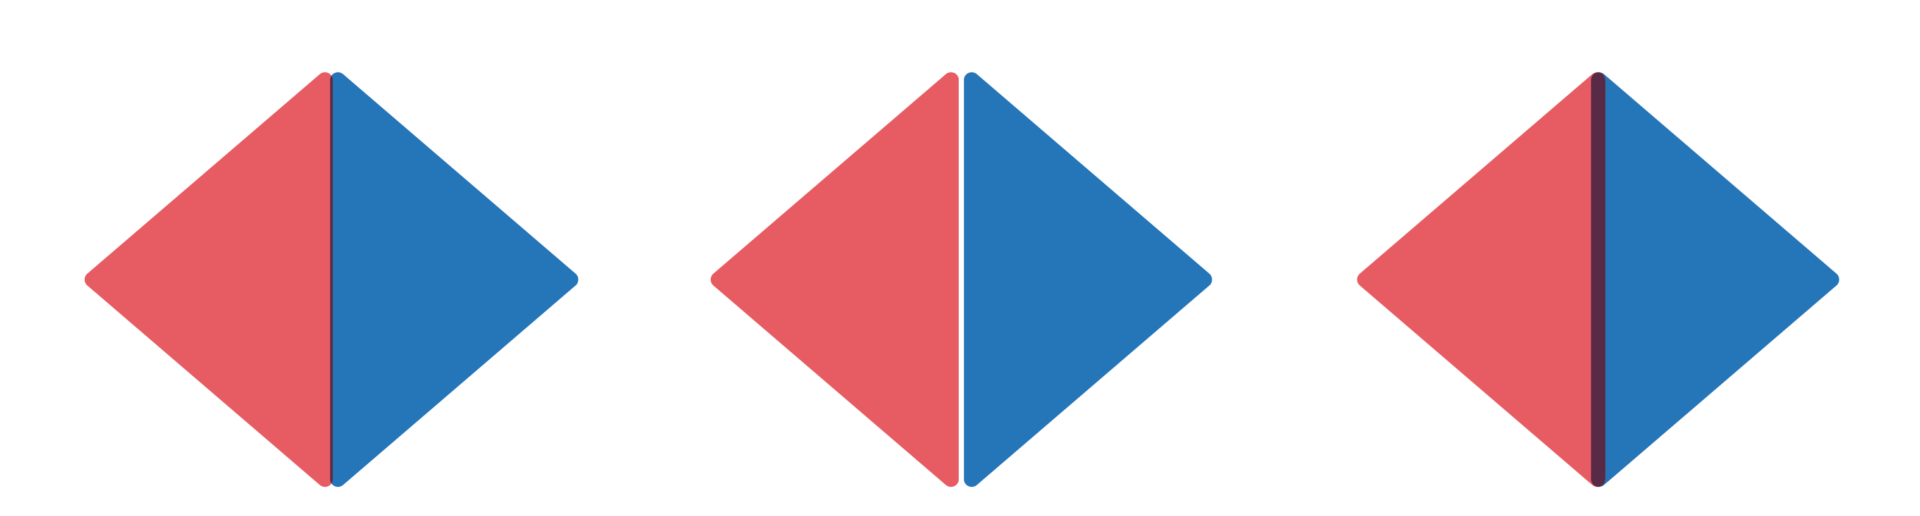
Trapping is a remedy to misregistration. Trapping is the practice of adding a little bit of overlap between adjacent colors to make sure that there are no white gaps between them even when registration is a little uneven. In other words, trapping expands pixels where color channels touch or overlap.

Select all channels you want to trap.
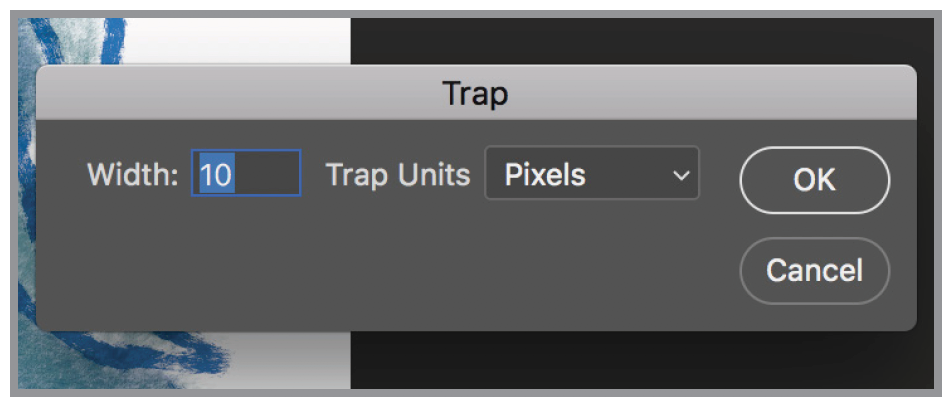
Trap
Menu bar > Image > Trap…
Select the number of pixels or millimeters you want to trap. (We recommend you do the highest allowable.)
There will only be a slight visual difference in your file, but this will help your colors overlap once you print.
Click OK.
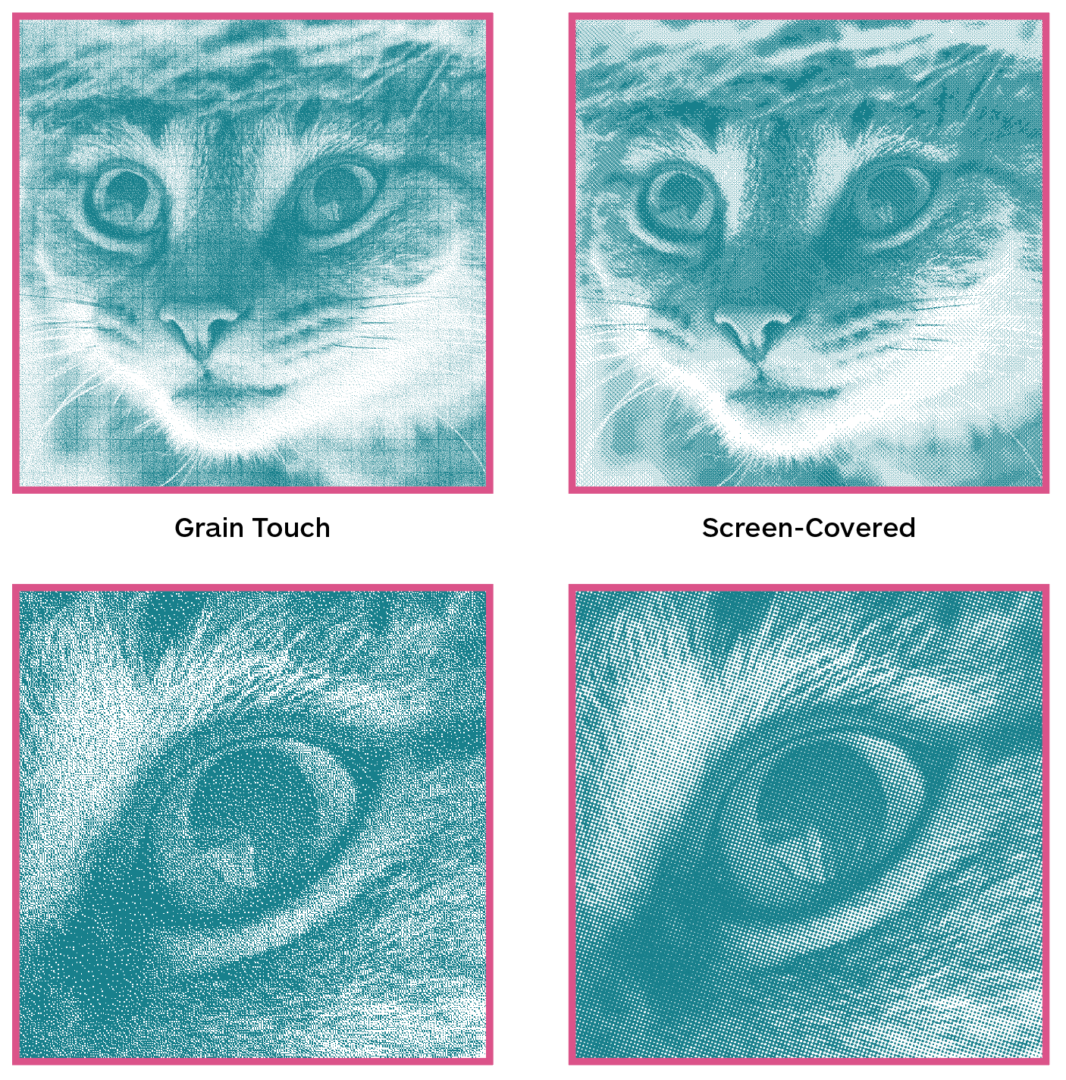
The Risograph can print at 600 d.p.i. and has two gradient techniques to choose from:
We recommend using Grain Touch over Screen-covered. If you have questions about screen-covered and Riso halftones, please contact the IC.
Use opacities and overprinting, or overlapping colors, to create new values and hues.
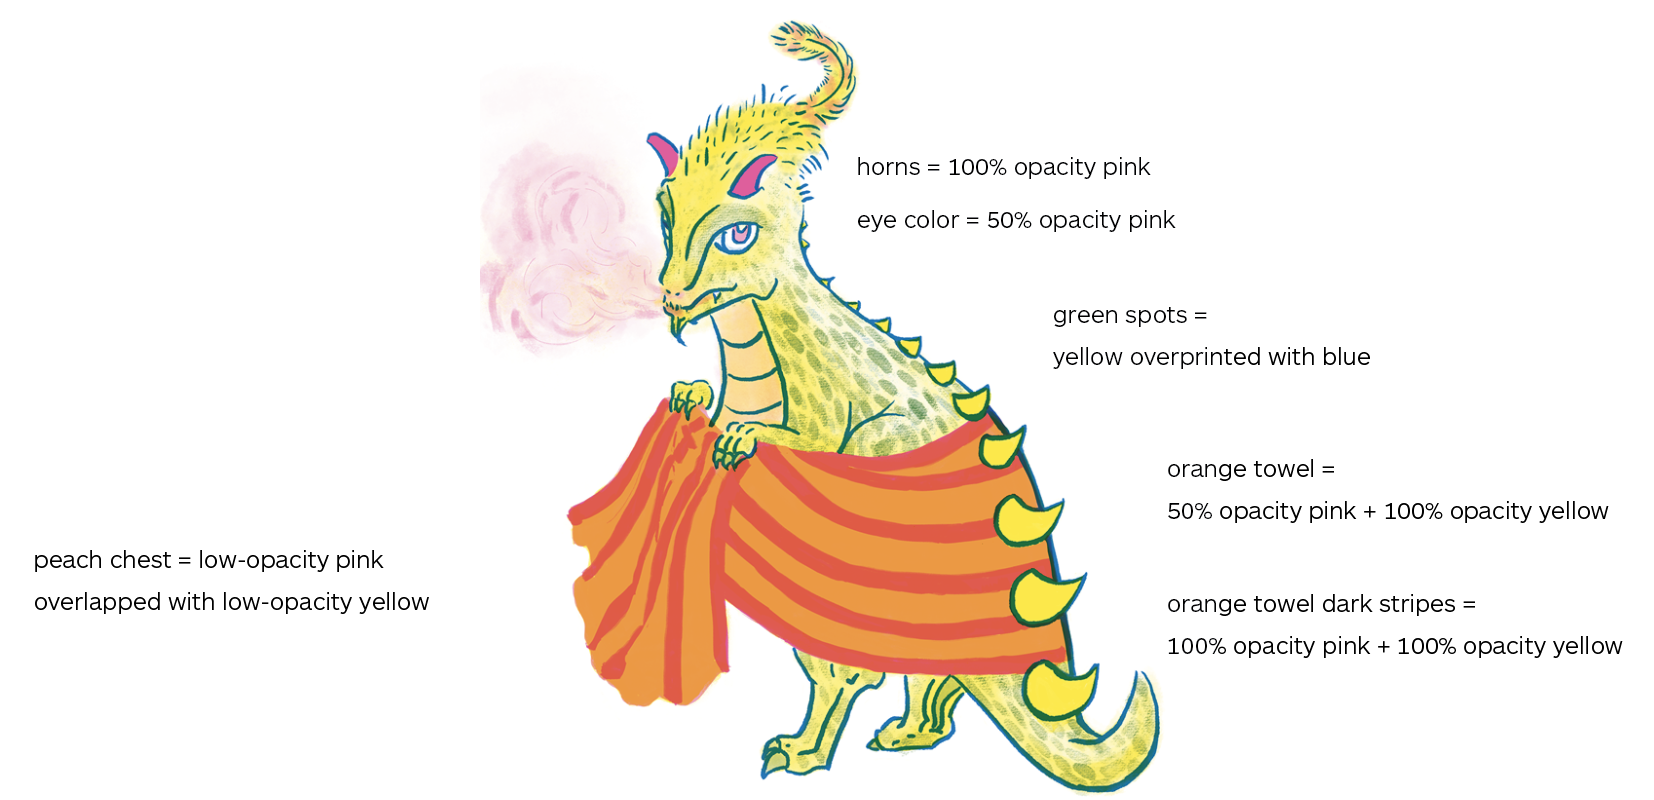
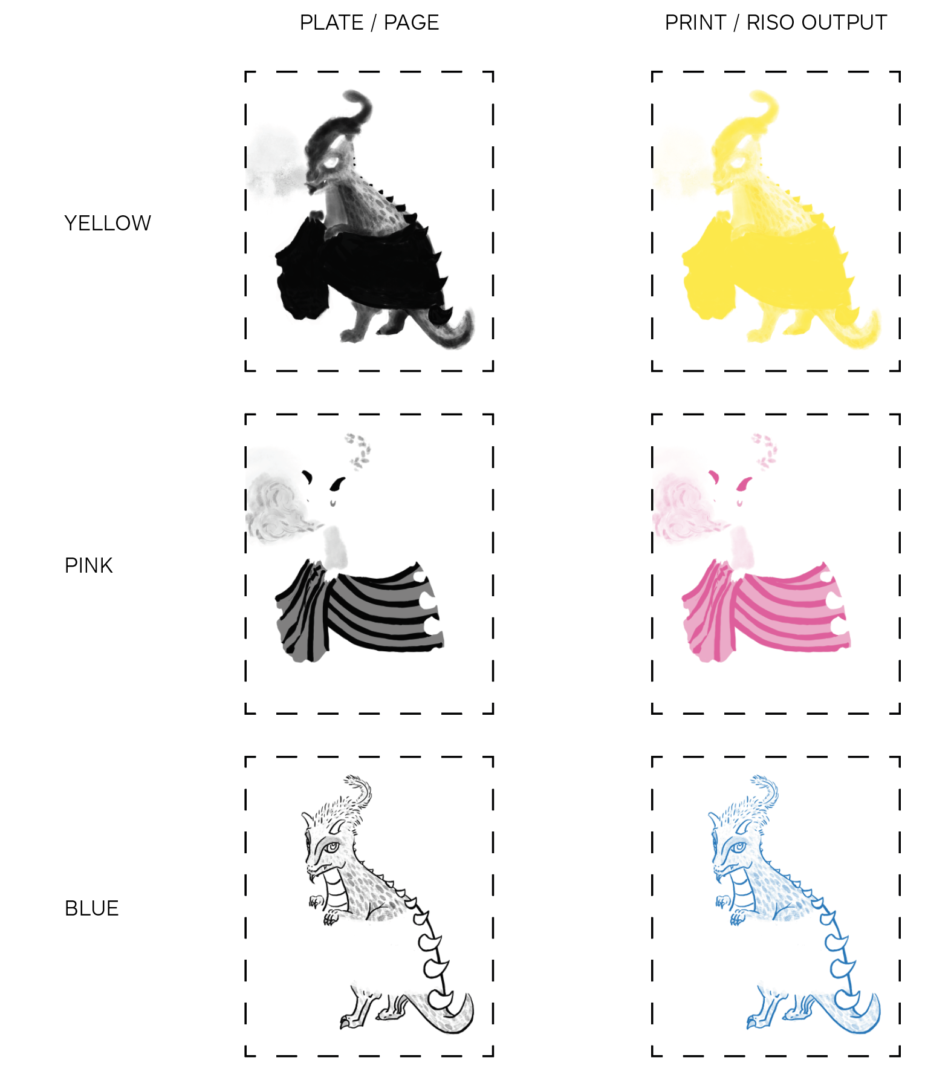
The RISO will print these colors one at a time:
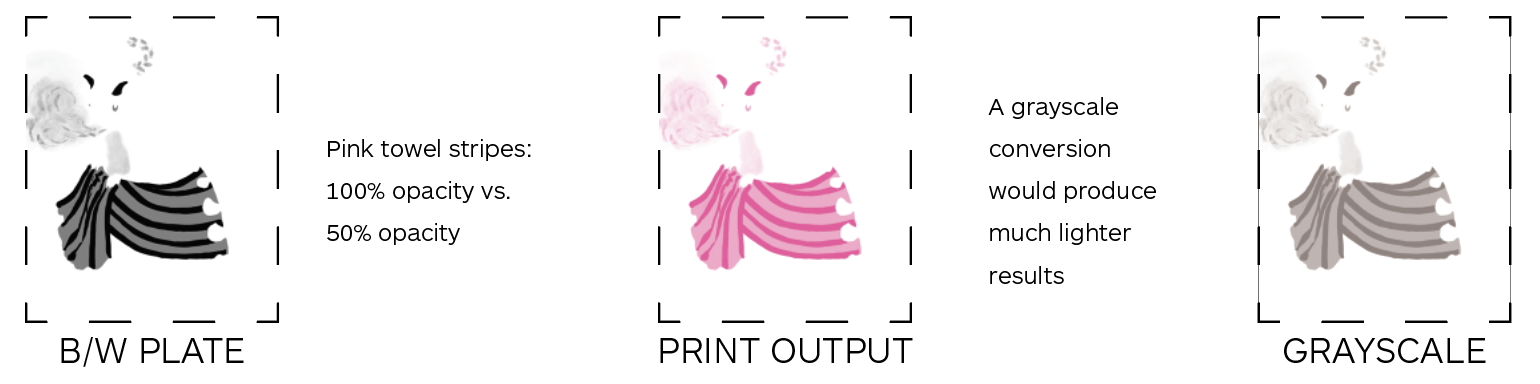
Opacity does not work the same way as grayscale. Take the pink towel for example. In order for a color to print 100% pink, your plate must be 100% black.
The Risograph prints one color at a time, which means your piece needs to be separated into pages by color:
The Imaging Center will accept staff and faculty print jobs through the department print request form. If color prints or posters are being charged to a department, an 8-digit budget code number is required in order for the job to be processed. The appropriate account number can be obtained from your Program Manager.
IC Techs will send you a print estimate when a print job is submitted via CCS email during our business hours. You will have the opportunity to approve the estimate and your job will be processed. If you submit a job outside of those hours, expect an estimate to be sent within one hour of opening the following business day.
If you do not receive an estimate or price quote, please let us know. It is highly recommended that you calculate your own job cost prior to coming into the Imaging Center.
Your print job will be completed in the order it was received. The standard turnaround time for the laser printers is 1 full business day. The standard turnaround time for the inkjet printers is 2 full business days. There are no “Rush” options currently. Please be aware that during midterms and finals, turnaround times can increase up to 2-3 business days. It is likely that your department request will be complete before this time.
You will be notified via your CCS email when your job has been completed.
We will work to the best of our ability in the Imaging Center to meet your special print and paper requests. Please contact Michelle Peck to talk about the logistics, such as scheduling needs or paper requests.
For faculty teaching a sponsored project course, or any other course that will require large-scale printing, please contact Michelle Peck in the Imaging Center within the first few weeks of the semester with information on what type and how much printing is needed to complete the project and any major due dates.
In order to set up a student print budget, the Imaging Center will need a current class roster and budget authorization from the Office of Partnerships.
More information on sponsored studio policies can be found HERE.
Faculty & staff are welcome to print personal projects in the Imaging Center. The IC does reserve the right to extend the turnaround time for staff and faculty personal print jobs in order to complete the student and/or department workload.
This resource list is updated regularly. If you do not see one of these options in the drop-down menu while submitting a job, please write in the paper option on the form. Imaging Center staff will connect with you if that paper is no longer in stock.
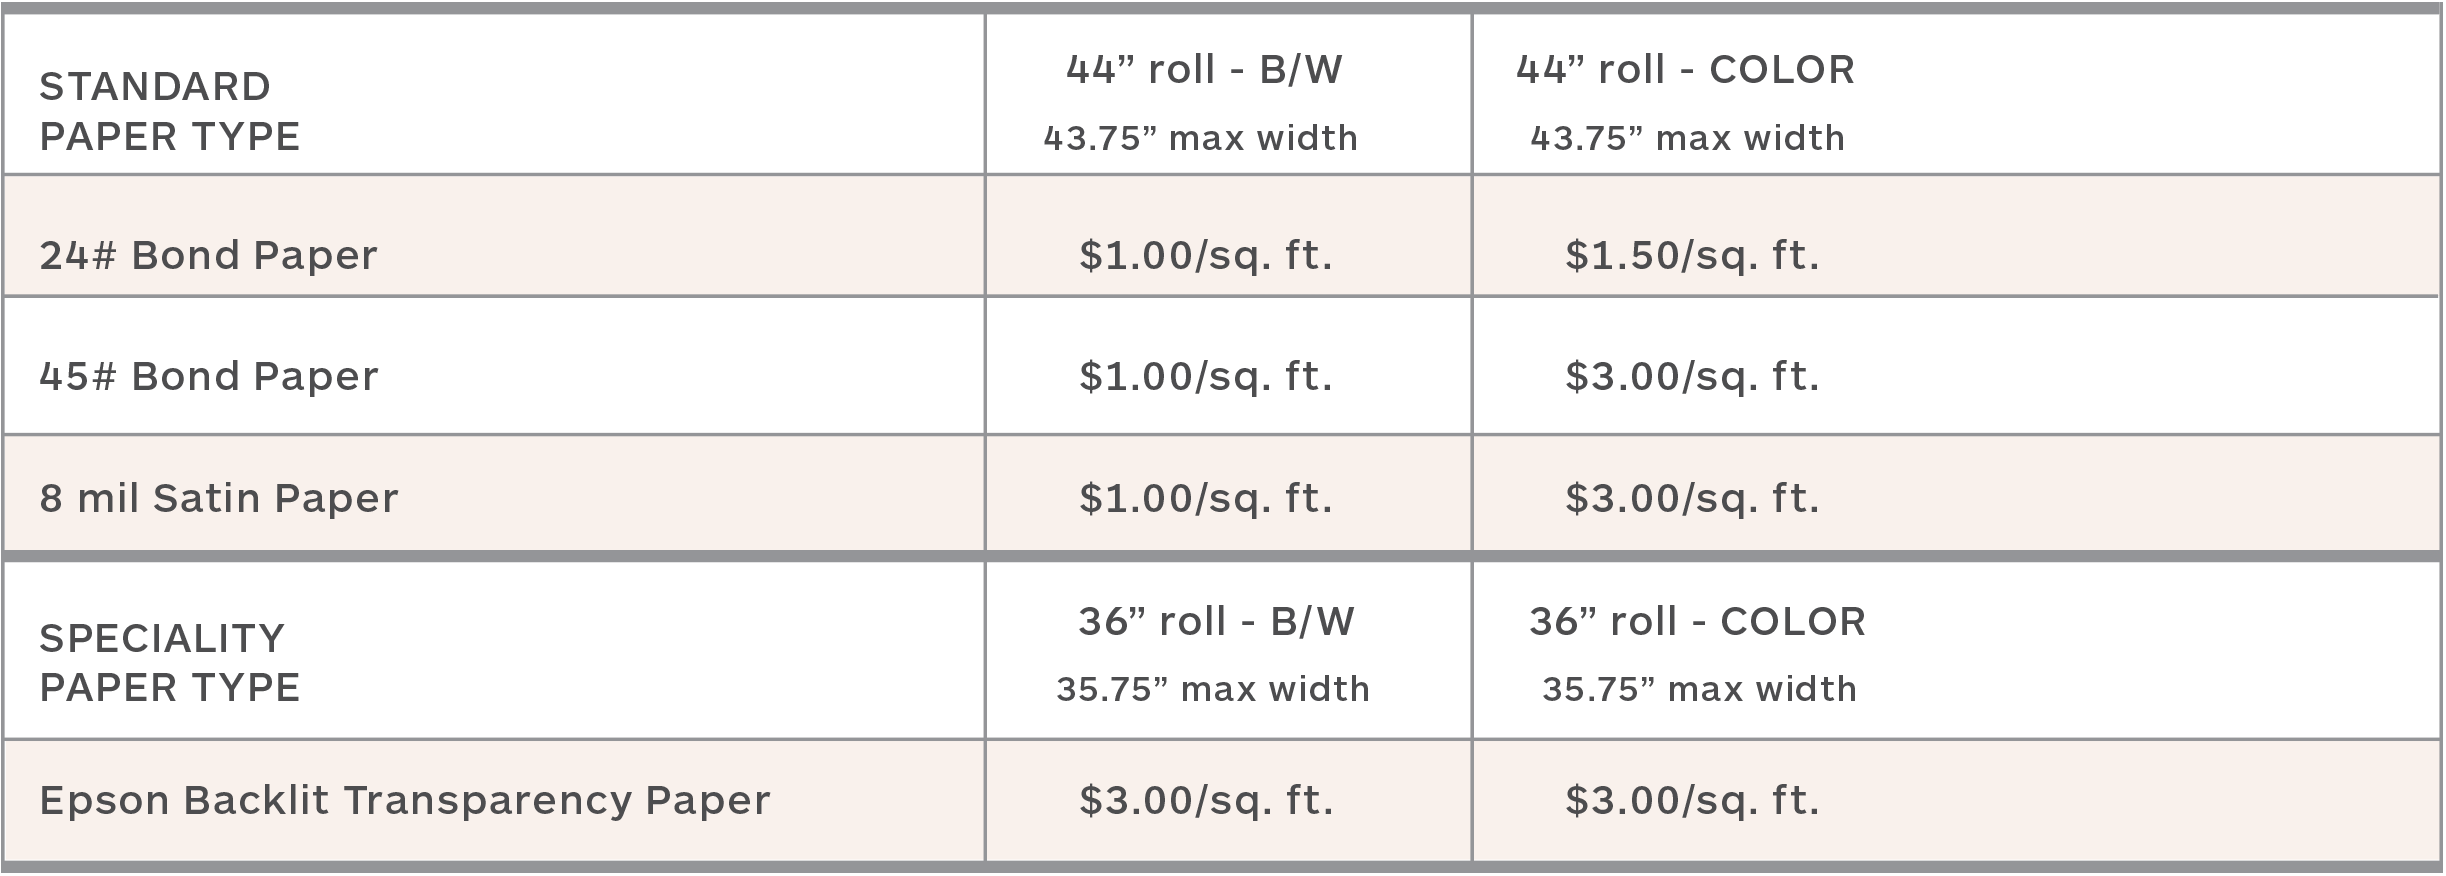
Standard Paper(s)
24# Bond Paper: 36″ & 42″ rolls
45# Bond Paper: 36″ & 42″ rolls
8 mil UV Microporous Photo Paper – 36″ & 42″ rolls
Specialty Paper(s)
Epson Backlit Transparency Paper: 36″ roll
For more information on our plotter printer, please visit HERE.
Standard Paper(s)
Enhanced Matte: 17″ roll
Watercolor – Radiant White: 13″ x 19″ sheets
Premium Luster: 16″ roll
Specialty Paper(s)
Exhibition Canvas Matte: 17″ roll
Hot Press Natural: 17″ roll
For more information on our desktop inkjet printers, please visit HERE.
Standard Paper(s)
Enhanced Matte: 24″, 36″, & 44″ rolls
Doubleweight Matte: 24″ roll
Premium Luster: 24″, 36″, & 44″ rolls
Premium Semimmate: 24″, 36″, & 44″ rolls
Specialty Paper(s)
Exhibition Canvas Matte: 24″ & 36″ rolls
Cold Press Bright: 24″ roll
Exhibition Canvas Satin: 24″ roll
For more information on our wide format inkjet printers, please visit HERE.
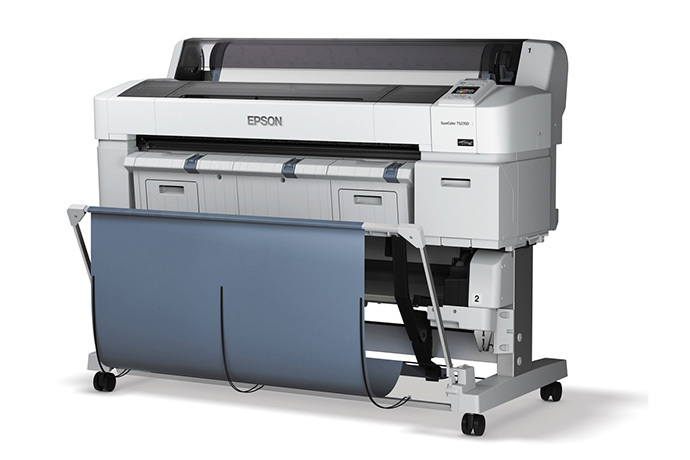
The T5270D plotter is a dual-roll plotter printer and copier with a multi-function scanner. The T5270D can scan or copy up to 35.75” wide and 96″ in length.
Original files to be copied must be a minimum size of 12” × 18”. Any files that are 12” × 18” or smaller can be scanned in the 24-hour lab (on the 2nd floor) on a flatbed scanner at no cost.
By default, the Imaging Center will copy/print your image in the center of the paper roll. We can not determine the white border on your image. If you need a 1” white margin on each side of your image, save that within your file. You will be charged accordingly.
To drop off materials, please make an appointment via our Calendly. Files will be shared with the student via a shared Google Drive folder labeled Imaging Center – Scanned Files.
Scanned images will only remain on Imaging Center servers for three (3) weeks. The IC is not responsible for the loss of images scanned after three (3) weeks.
Scanned images will be named: IC_lastname_scan.pdf/.jpg.
The Imaging Center does not resize any copy or scan requests. IC Techs will copy or scan images “as is”. The student will be responsible for resizing or color correcting each file.
Material to be copied or scanned must be submitted either rolled or wrapped in plastic.
Only paper-like materials will be accepted. Original material must be clean and free of dust, tears, and staples. See below for more information.
The standard turnaround time for the plotter/scanning process is 1 (one) full business day. Please be aware during midterms and finals, turnaround times can increase.
Students will be able to receive proof-of-concept or draft-quality large format prints at a reasonable price. Plotter prints are not considered final, production prints. Paper and print quality are suitable only for draft printing.
The plotter printer is a dual-roll plotter printer and copier with a multi-function scanner. It can print up to 43.75” wide on the short side of your piece. Printing on the plotter is a great option for prototype printing, 1st critique, graphic, or poster-type work .
Your print job will be completed in the order it was received.
The standard turnaround time for the plotter inkjet printers is approximately 1-2 full business days. This does not include weekends or holidays.
At this time, there are no “Rush” options available. Please be aware that during midterms and finals, turnaround times can increase up to 2-3 business days.
Information on test strips can be found HERE.