Business Card Printing & Cutting

New in Fall 2022! The IC can now cut standard-sized business cards! Students can submit one business card (front and back), and let us know how many they need. The Imaging Center can gang them up on a larger sheet and cut them with a machine so they are exact.

Business Cards in a Box

The business card template is available for download under our template page. This template allows the IC to do the heavy lifting and cut the cards for you!

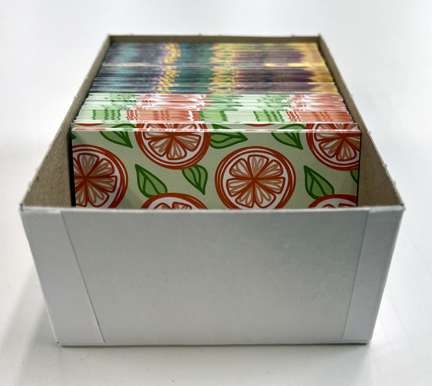
There is an added charge of $3 dollars (fall 2022 pricing) for this service. There is not currently a print minimum, subject to change. If you order more than 240 cards or more, we will box them up for you for no additional charge.

The Process

The IC has created a standard-sized business card template that allows us to cut your business cards. In order to have your order cut, we require your full cooperation to prepare the file correctly. The IC is not liable for reprints if you fail to follow any of these directions.

Our InDesign template is specific to the way that the IC process, prints, and applies the cutting to your order.

Using a template downloaded from another website will not work. This particular InDesign template is fine-tuned to the millimeter to work with our printing software and cutting machine.

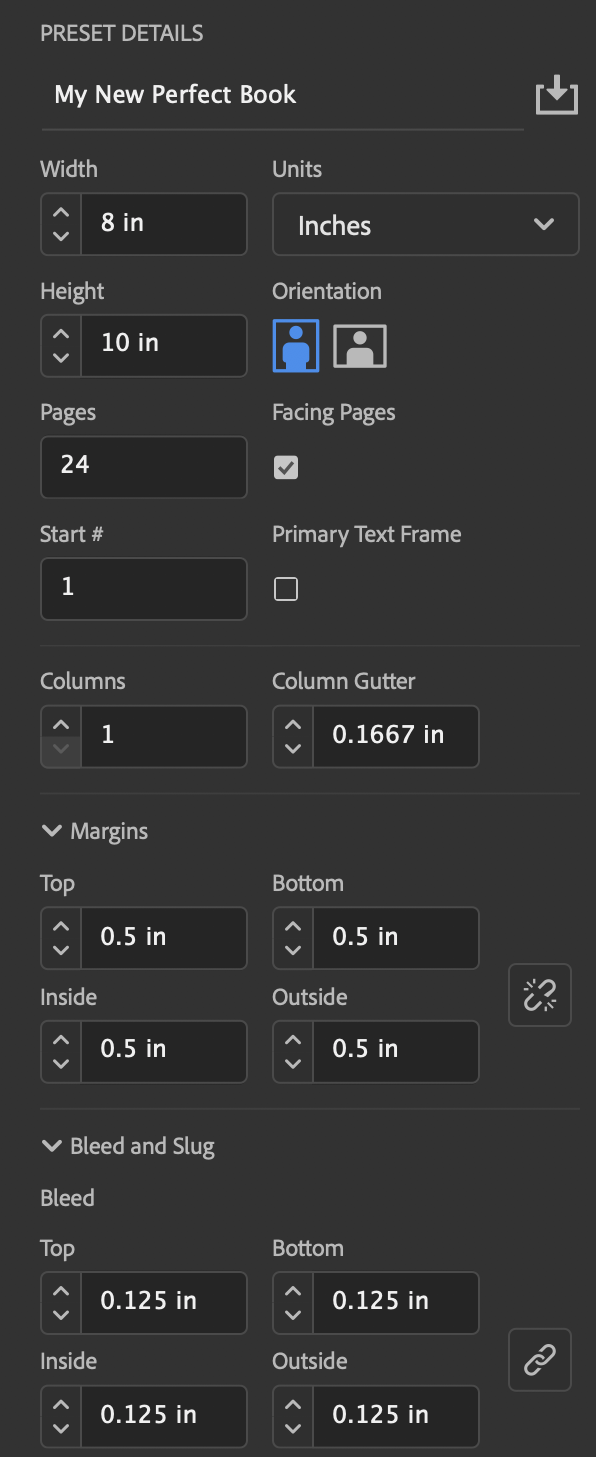
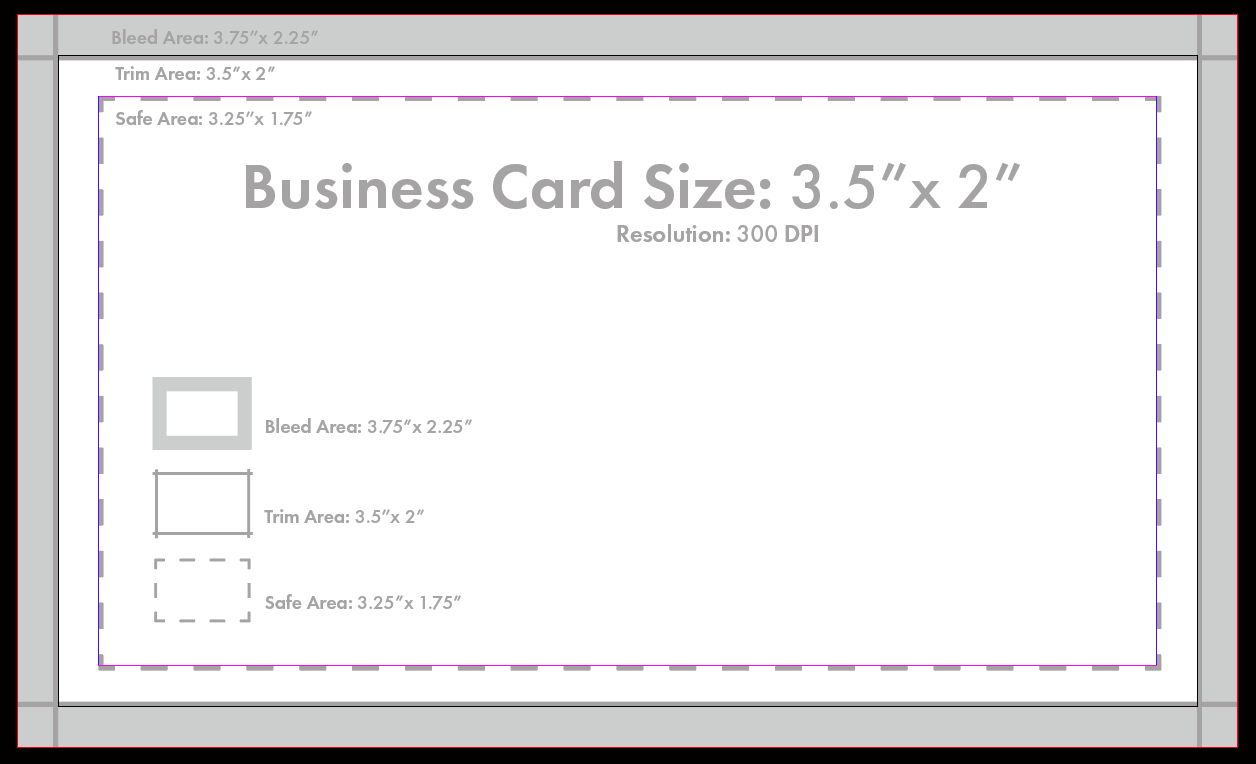
Standard Card: 3.5″ x 2.0″
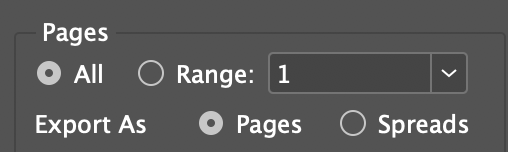
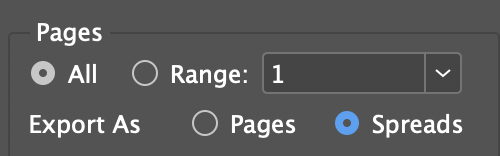
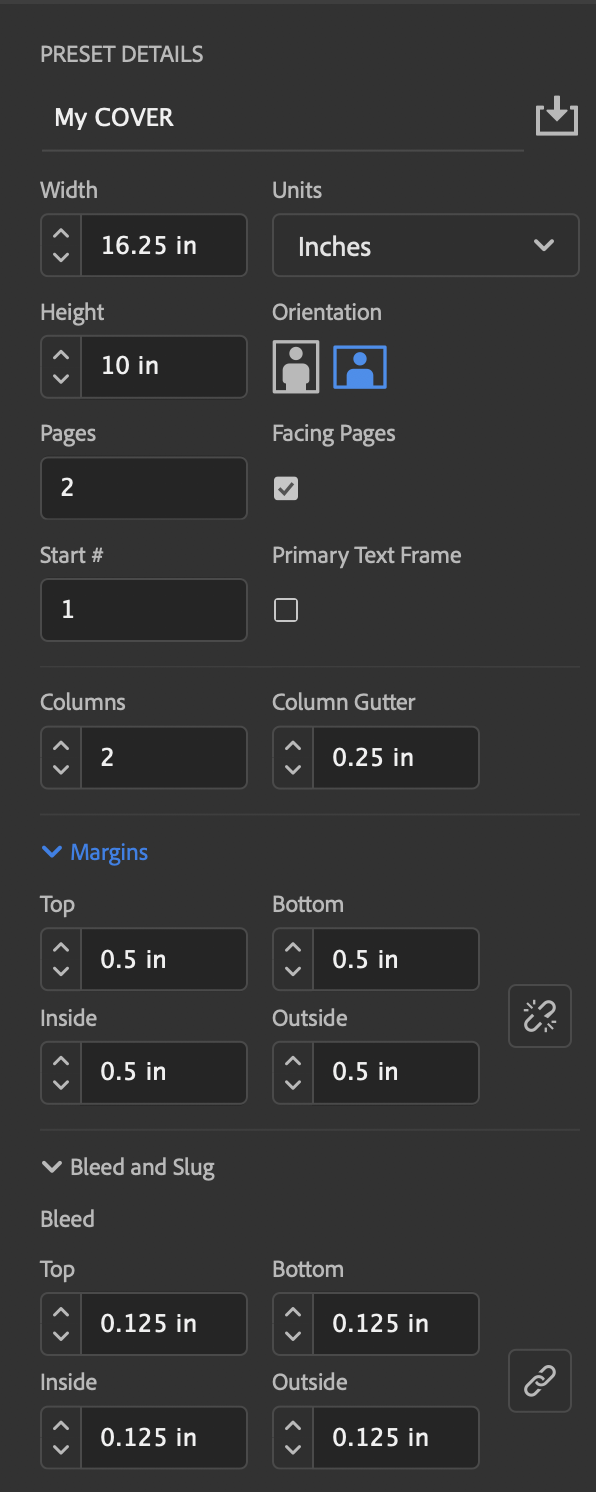
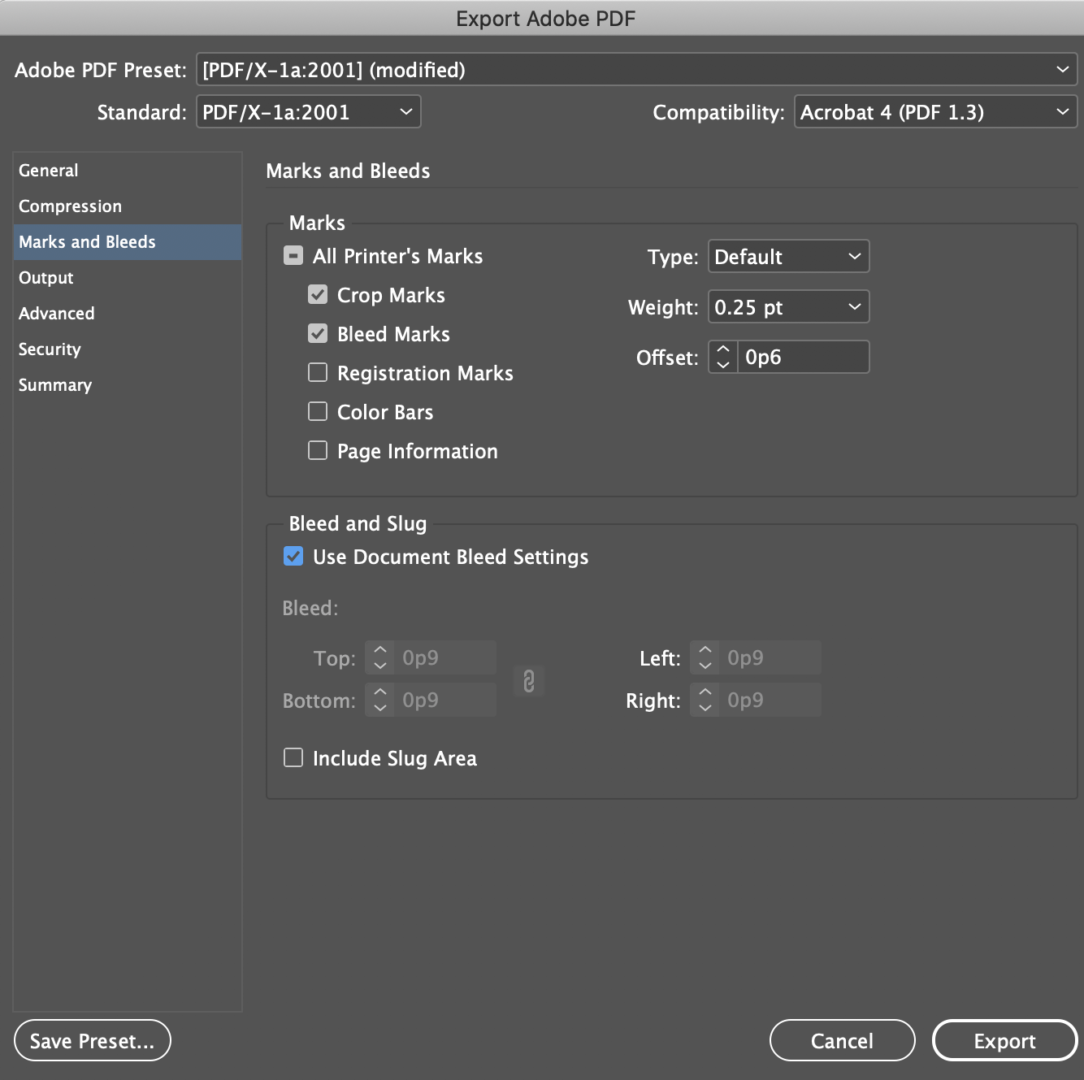
Final PDF size: 3.75″ x 2.25″

Bleed Area: 3.75″ x 2.25″
Trim Area: 3.5″ x 2.0″
Safe Area: 3.25″ x 1.75″

Your print & cutting job will be completed in the order it was received. The standard turnaround time for printing & cutting is 48 hours (two full business days). There are no “Rush” options. Please be aware that during midterms and finals, turnaround times can increase up to 2-3 business days. 

For example, if you submit a business card request at 6:00 pm on a Monday, the earliest you will receive the finished cut business cards, will be approximately 10:00 am on a Wednesday.

Design/Artwork Guidelines

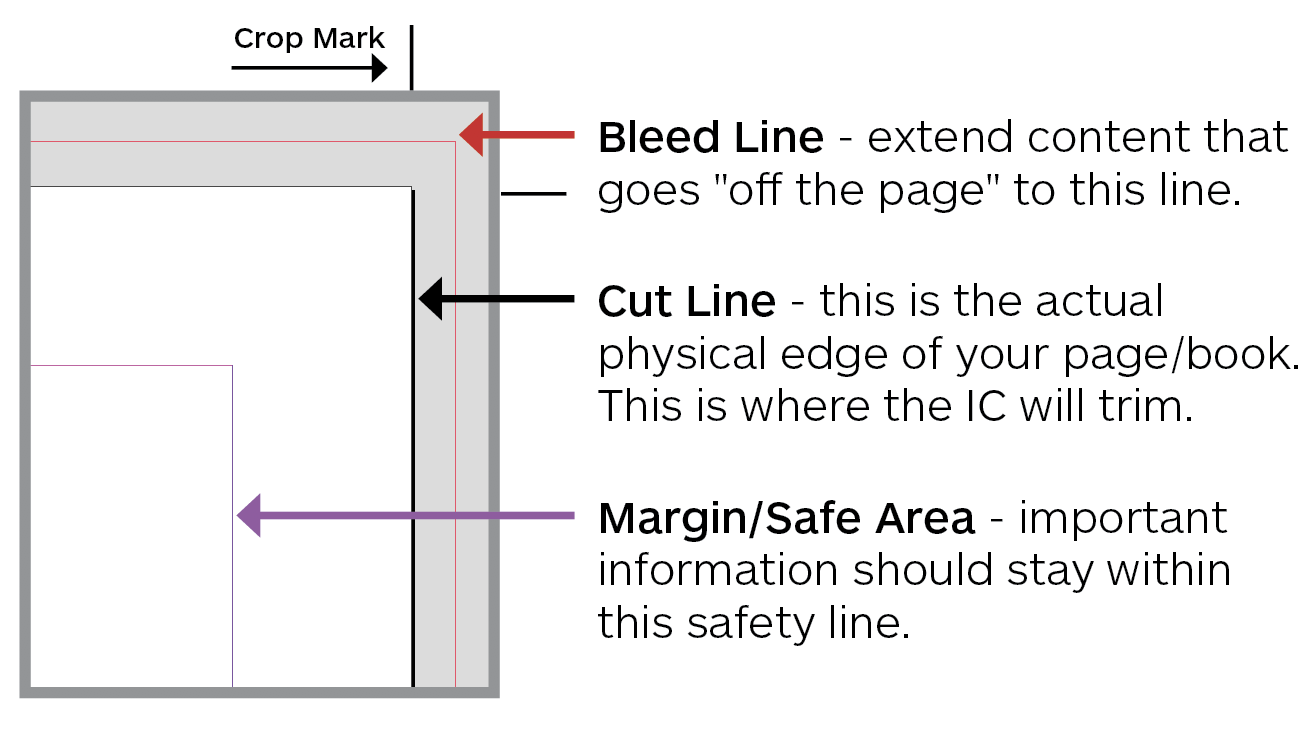
Make sure your text is inside the safe area.
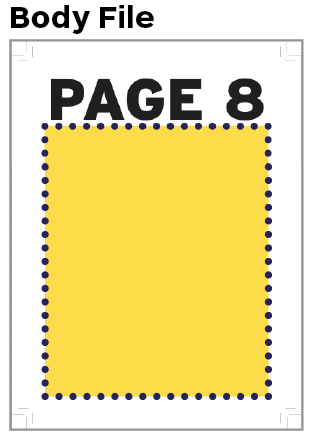
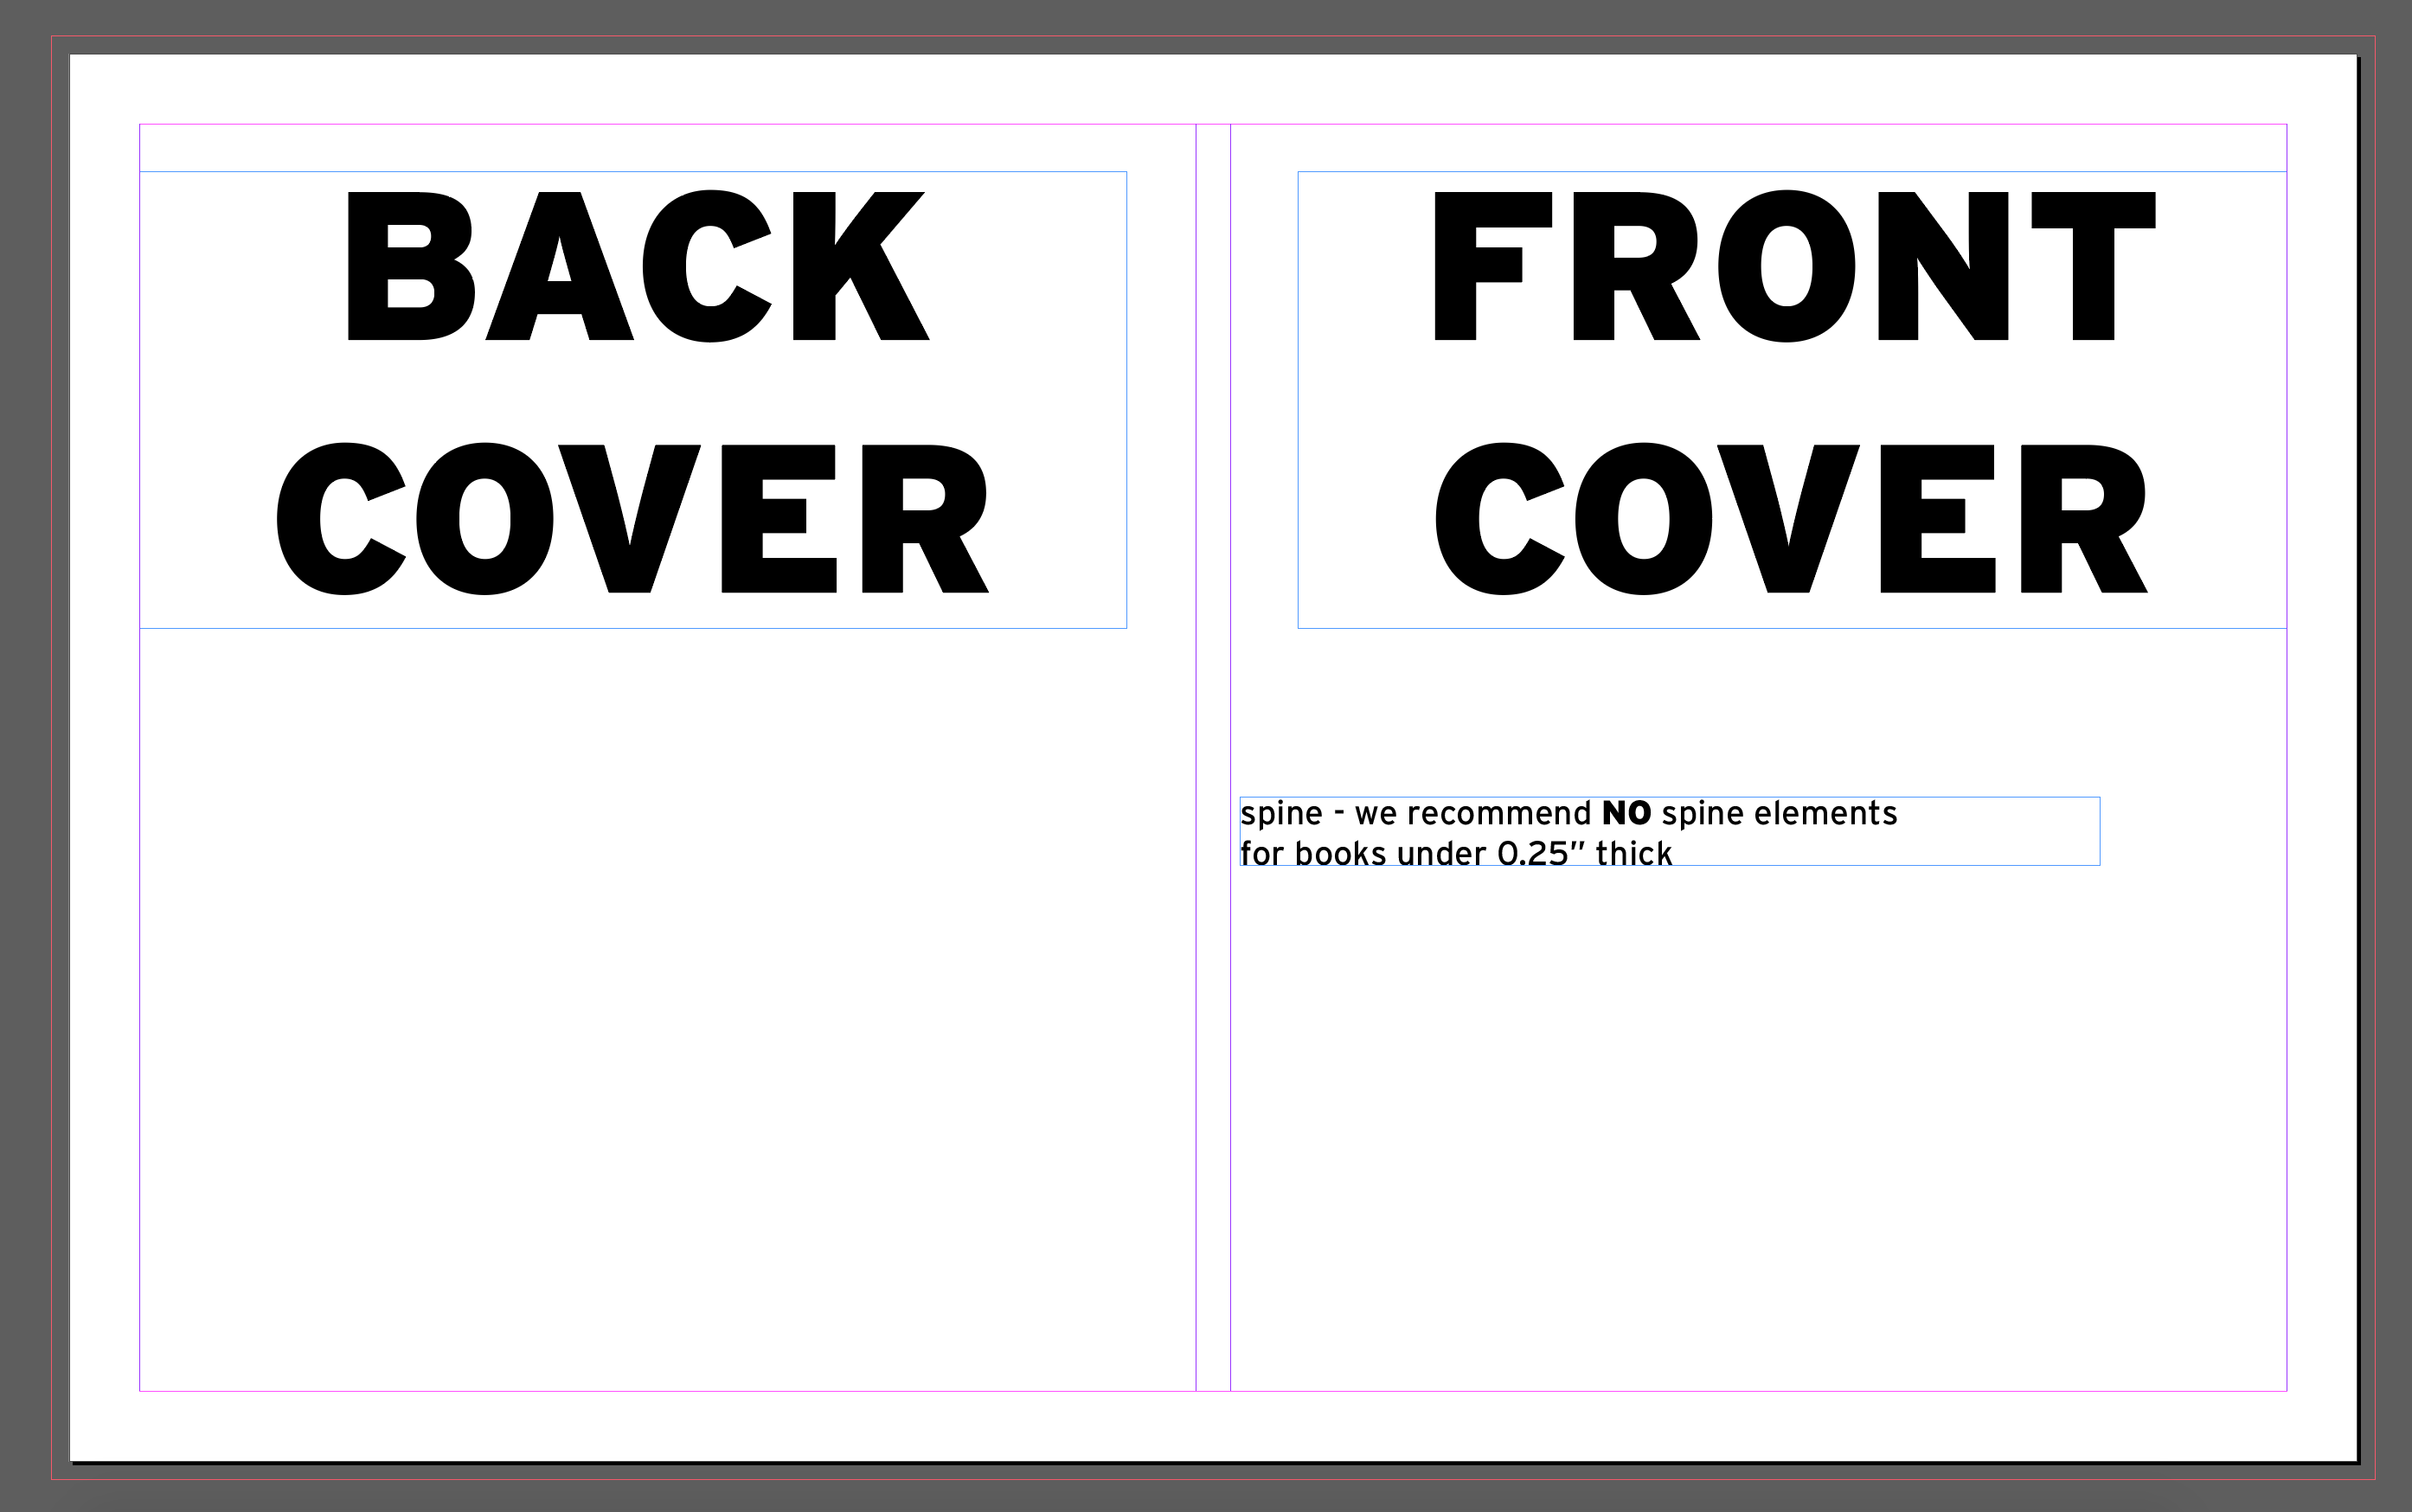
The “safe area” is designated using margins in our InDesign template and is shown by the purple/pink line. By putting text or design elements past this “safe” line, you run the risk of it being cut off or appearing too close to the edge of your business card.

Make sure that your image is full bleed.
If you have design elements that extend to the cut line, be sure that you extend them past the black cut line and all the way to the purple/pink bleed line to ensure that there is absolutely no white border on your trimmed business card.

Make sure that your business card is the correct size & resolution.
Confirm that your design is the correct size. This template will have a final size that is 3.75″ x 2.25″.

Exporting your Perfect Bound Book as a PDF File

File > Export > Adobe PDF (print)

Body File
Export your body/inside file as Pages

Cover File
Export your cover file as Spreads


Marks & Bleeds
Check Crop Marks, Bleed Marks, and Use Document Bleed Settings.

Offset
0.125″


Viewing
Check Video PDF after Exporting to be sure that your PDF file looks correct.

Make sure to open your PDF in Acrobat.

File Examples

When you open your two files in Acrobat, this is what they should look like

If you want the inside of your cover to be something other than the paper color, make sure your cover file has two pages. The inside of the front cover is on the left and the inside of the back cover is on the right.

Need Extra Help?

If you have further questions about file setup, please contact us by email or by scheduling a consultation.

File Preparation for Perfect Binding

Booklet Sizes

8″ x 10″ (portrait) or smaller are standard book sizes.

Covers larger than 12″ x 18″ must be printed on our inkjet printers. This costs more (we charge our inkjet by the square foot of your image) and this will add up to 1-2 business days to your turnaround time. Keep in mind that our inkjet papers also cannot print double-sided and depending on the paper selection may have a watermark on the backside of the paper. 

Spine Calculations

Below is an estimate of spine width calculations. Keep in mind this is just an estimate.

The dimensions of your spine will depend on the paper type you choose for your interior pages and the thickness of the paper stock.

We will do our best to adjust your cover file if needed. However, we may ask that you edit and resend your cover file once the binding process is underway. Please keep an eye on your CCS email.

File Preparation

You will need to create 2 InDesign files. There will be a Body/Insides file and a Cover file.

Body File

The interior pages must be laid out in InDesign, as facing pages, with a bleed included in the document.

Document Size is the dimensions of your final book in inches.
Bleed set to 0.125″ on all sides
Margins set to at least 0.25″ on all sides


Cover File

The interior pages must be laid out in File > New Document…

Height = Page Height
Width = Spine Width + (Page Width x 2)

Give your cover file 2 columns and set the column margin to be the spine width. You now have guides for your spine. 

Set your Documents Margins & Bleeds to 0.125″ (to match your body file)


Gutter

Perfect bound books are glued at the spine which results in approximately a 1/4″- 3/8″ of the inside edge of your pages to be less visible since a perfect bound book cannot lay completely flat without the spine breaking. 

There will be a portion of each inside page that will lose visibility (or be swallowed) into the spine. Be mindful of this while designing and adding an extra cushion to the binding-side margin of each page. We recommend approximately 1/2″ of a cushion. 

For this reason, we highly recommend printing a proof copy before submission. 

How to design for images & text across a two-page spread

The gutter can be problematic when you are placing an image across the center spine. 

When an image or text covers a two-page spread, the inside 1/4″ on both pages will be obscured. This amounts to approximately 1/2″ in the center of the image or book. Text and images may not line up correctly across the spine. This is a natural occurrence with a perfect-bound booklet. 

Generally speaking, 1/2″ for your gutter margin is the best recommendation for most books.

Need Extra Help?

If you have further questions about file setup, please contact us by email or by scheduling a consultation.

Pricing & Paper Information

The Imaging Center offers a bulk discount on select “body” papers for perfect-bound books.

The Imaging Center offers a variety of papers for discounted perfect-bound books. If you intend on using a paper not included in the available paper list, the cost per sheet will be outside of the discounted pricing we offer for perfect binding. This can increase the cost of your job considerably.

Pricing chart for Imaging Center supplied paper

We encourage students to provide their own paper. Students can supply their own paper or work already printed, but some papers won’t work in our printers or perfect binder, so check with an Imaging Center Technician before submitting your job. 

Pricing chart for student supplied paper (BYOP)

Please make an appointment via Calendly to drop off the paper or to chat with an IC staff member about what would work best for your project.

Perfect Binding

Perfect Binding is a form of bookbinding in which the book pages are bound by gluing together single sheets. With this binding method, the pages and cover are glued together at the spine with a strong yet flexible glue. The other three sides of the book are trimmed as needed to give them clean “perfect” edges. Because of this gluing process, creating the square spine, the pages do not lay flat while you are flipping through them. 

Perfect bound books look clean and professional. They are ideal for catalogs, portfolios, photo albums, small-run comics, and self-published artists’ books.

Perfect binding works best for books that are 20+ printed pages. If less, it might be cheaper and more ideal to either saddle-stitch or wire/plastic bind your booklet.

Turnaround Times & Proofing

The standard turnaround time for the entire perfect binding process is 8 business days, not including weekends. The IC can have a proof copy ready in three (3) days, and the finished book(s) (5) five days after the proof is approved. This does not include weekends. 

If you do not want a proof copy, your final book(s) will still take 5 business days. 

We highly recommend getting a proof of your book. Proof copies are printed on the papers that you have selected at the sizes you submit. If you are supplying your own media, make sure to supply the IC enough paper for the proof & final copies. 

Proofs are 1/2 price if you approve the order. If you decide to cancel the order, the proof copy will remain at full price. 

Proofs are labeled with a sticker on the inside cover. 

The perfect binding process at the Imaging Center is done all by hand and takes a considerable amount of production time which pulls trained staff & management away from their other duties. For this reason, the IC does reserve the right to deny certain amounts of perfect binding requests. We may recommend other options for booklet binding (saddle-stitch or wire/plastic coil)


Quick Tip #3

PDF Export Preset & Settings 

PDF documents can be exported using many different settings depending on the desired output destination (print, web, working file, etc.).

PDF Tips 

There are many ways to create a PDF file, but not all of them work well for professional printing and/or file sharing. The way in which you create a PDF can dramatically alter the quality of your printing.

The Imaging Center recommends using PDF/X-1a for most print submissions.

PDF/X-1a 

  • All transparency and layers are flattened
  • Spot colors are maintained
  • RGB content is converted to CMYK

PDF/X-4 

  • This is a newer PDF standard that takes advantage of modern prepress processes.
  • Retains live transparency & layers
  • Retains CMYK, RGB, LAB, and spot colors
  • Intended for workflows that support live transparencies
  • Definitely worth trying to use!

Recommended Changes to Settings

Marks & Bleed: Only include crop & bleed marks if the file set up for that item requires it. Click ‘Use Document Bleed Settings’ to include previously setup bleed, usually should be set to 0.125″(1/8″)

Output Color Conversion: Change to No Conversion & Include all Profiles

Buttons

The Imaging Center can make 1.25” buttons. 

Each button costs: $0.35 with a maximum of 100 buttons/order. 

Templates can be found on our Campus Office site on Blackboard.

Please keep in mind that each template is slightly different. There are specific application directions in each version. Pay attention if there are layers to be deleted. 

Remember that because the buttons are small (1.25”), any text that you include on the edges may be difficult to read and/or folded over once the button is made.

By default, the IC prints all button orders on our Hammermill 28# color copy paper. 

If you’d like something different, keep in mind that paper must be 28# bond (or 70# text) or less. We will not be able to print on card stock. 

General turnaround times for button making is 4 business days. 

CCS Pride Buttons for an event in June 2021

Stack Cutting

The Imaging Center can cut up to 3” in sheets of paper at one time.

The standard turnaround time for the cutting & binding processes is 24 hours (one business day). During midterms and finals, turnaround times may increase. Your job will be processed in the order that it was received. 

Make sure to save your file with crop marks and bleed to ensure that your type or image isn’t trimmed off. The Imaging Center has a cutting tolerance of 1/16”. Anything that comes within 1/16” (0.063”) of the edge of the trim line could potentially be cut off. Be sure to place all elements more than 1/16” (0.063”) away from the edge of the design. 

There is a minimum count of 15 sheets of paper in order to use this service. 

The IC will not use the stack cutter to trim tiling jobs, business cards, or stickers.

The Imaging Center will not stack cut books printed off-site (blurb, lulu, etc.). The IC will also not stack cut-through mat board, foam core, cardboard. If off-site material is cut or bound incorrectly by an IC Tech, the IC will reprint materials on Imaging Center stock at no cost. 

All pages must be the same length; the Imaging Center cannot guarantee that the binding machines can evenly punch through sketchbooks and/or tracing paper.    

The IC does reserve the right to deny submitted collections of various papers and sizes. 


Plastic Coil & Wire Binding

The Imaging Center also offers spiral or wire binding up to 11” in length. Your booklet must be submitted with the pages in the correct order and orientation from front cover to back cover. 

Make sure to save your file with crop marks and bleed to ensure that your type or the image isn’t trimmed off. The Imaging Center has a cutting tolerance of 1/16”. Anything that comes within 1/16” (0.063”) of the edge of the trim line could potentially be cut off. Be sure to place all elements more than 1/16” (0.063”) away from the edge of the design. 

Covers must also be trimmed to size. If you are submitting an already printed book, IC staff can give you covers to trim to size. If the booklet is being printed in the IC and then trimmed, the IC will include the covers in the stack. 

Give yourself an extra 1/4” (0.25”) margin on the bound edge when designing booklets. 

The standard turnaround time for the cutting & binding processes is 24 hours (one business day). During midterms and finals, turnaround times may increase. Your job will be processed in the order that it was received. 

All pages must be the same length; the Imaging Center cannot guarantee that the binding machines can evenly punch through sketchbooks and/or tracing paper.    

The IC does reserve the right to deny submitted collections of various papers and sizes. 

Visual Guide to a Binding Edge

Plastic Coil | Standard Colors 

Black

Clear

Plastic Coil | Speciality Colors 

Wedgewood Blue

Tan

Neon Orange

Neon Yellow

Neon Red

Dark Teal

All of our color coils come in a 10mm or 14mm size — so a max of 115 sheets of 20# bond paper — the thicker the paper, the less we’d be able to fit. 

Wire 2:1 & Wire 3:1 | Standard Colors 

Black

Silver


Illustrator Overview

When designing artwork in Adobe Illustrator, make sure you are only using the Pantone spot color swatches. Do not try to create your own spot colors. The automated color separations consistently recognize Pantone spot colors. The swatches that we have available also are clearly labeled so you’ll always know what colors you are using.

Pull up the print menu in Illustrator:  File > Print or ⌘P

Mac Users: For the Printer, select Adobe PostScript File. This will allow you to “print” to a pdf.

Set Media Size to 11″ x 17″ or 8.5″ x 11″, depending on the size of your document.

For the PPD, select any printer that you have installed on your computer. If you don’t have any printers on your laptop, (or you don’t have an 11×17 printer installed on your laptop) install the Xerox Print Driver found on our Drives & Downloads page

PC users: For the Printer, select Adobe PDF. This will allow you to print to a pdf.

Set Media Size to 11″ x 17″ or 8.5″ x 11″, depending on the size of your document.

Marks & Bleeds Menu

Check “All Printer’s Marks”

Select “Use Document Bleed Settings.”

If you use the Illustrator template, your document should be exactly 11”x 17” or 8.5” x 11” with bleed. This depends on the template size you chose to make your work. Template files have a 1/2” bleed on all sides.

Output Menu

Change the Mode from Composite to Separations (Host-Based).

In the Document Ink Options, make sure that the print icon is on for the Pantone spot colors you are using and off for all of the Process/CMYK colors. 

If the process colors are checked on, this means you have something in your file that is set up for CMYK. This is not a viable printing option for the Risograph. 

Advanced Menu

Change the Overprints option to Preserve. 

Check on “Discard White Overprint.”. Click Save

This will create a postscript or .ps file. Open in Acrobat Distiller or Preview to convert the file to a pdf.

Save the file as a pdf. Your colors should be separated into black and white pages with the Pantone number listed at the top of each page. 

For More Information