Troubleshooting

Common Questions

If I want to switch out the color of a plate (print on a blue plate using the teal drum), do I need to alter and re-save my file?

No. The printer reads your plate as a grayscale file and prints in whatever color is loaded into the machine.

Is this the only way to save a Photoshop file?

No. There are a lot of ways to prepare a Photoshop file. You are welcome to research and use other methods on your own.

Troubleshooting

I can’t add a new adjustment layer to my file

Once you add spot colors and/or switch to Multichannel mode, you cannot add any more adjustment layers. However, you can make channel adjustments using Image > Adjustments > Levels (or Curves).

If you want to make major adjustments to your file, go back to CMYK or RGB mode and make the adjustments. Note that this will delete the spot colors that you’ve already made. But if you are making drastic changes, it is better to do so in CMYK or RGB. After you’ve made your changes, repeat your preferred process of color separation.

The Multichannel or CMYK mode is grayed out

Some of the color modes won’t convert between each other. You may need to switch to grayscale first, and then switch to your chosen color mode. Grayscale will discard color information, so you will need to re-color if you use it as an in-between mode.

Tips

Double-sided printing tips

There will always be roller marks when double-siding. But they can be minimal if you take the following steps

  • Print the side with the least amount of ink coverage first.
  • Bring back your opacity to 80% across the board.
  • Roller marks tend to appear towards the top and center of the page. The more ink in that area, the more prevalent the roller marks.

Interactive Pieces

Anything that is being handled a lot (like a flipbook or resume) should be at 80% max.

How to Split Channels in Photoshop

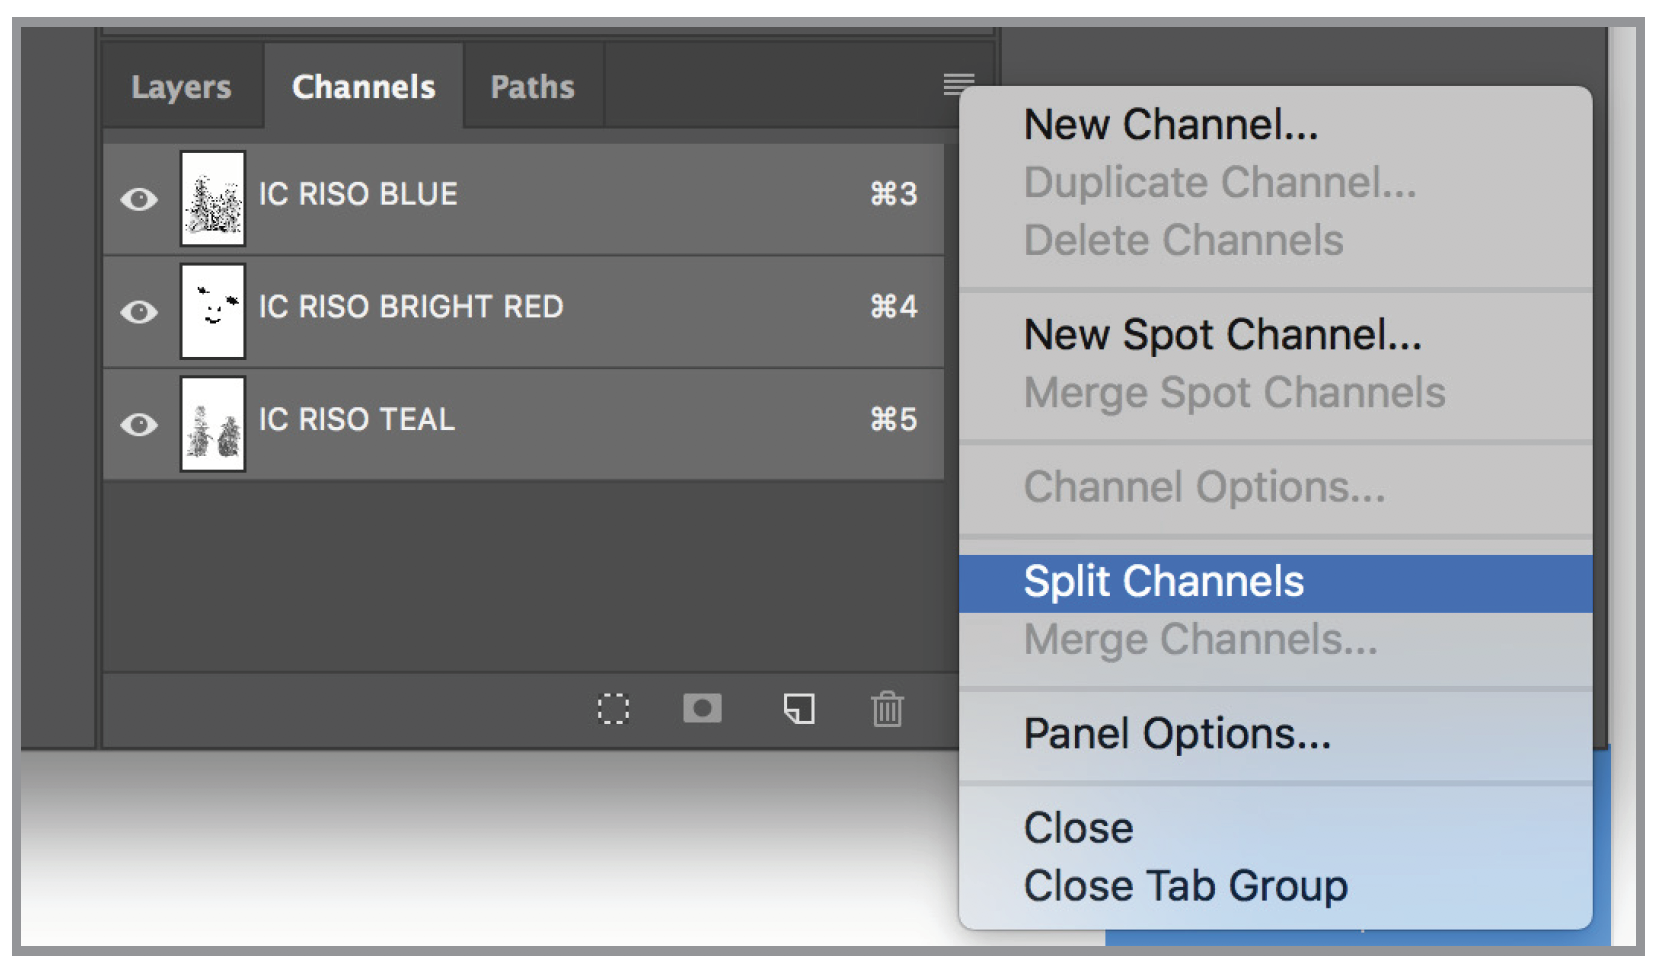
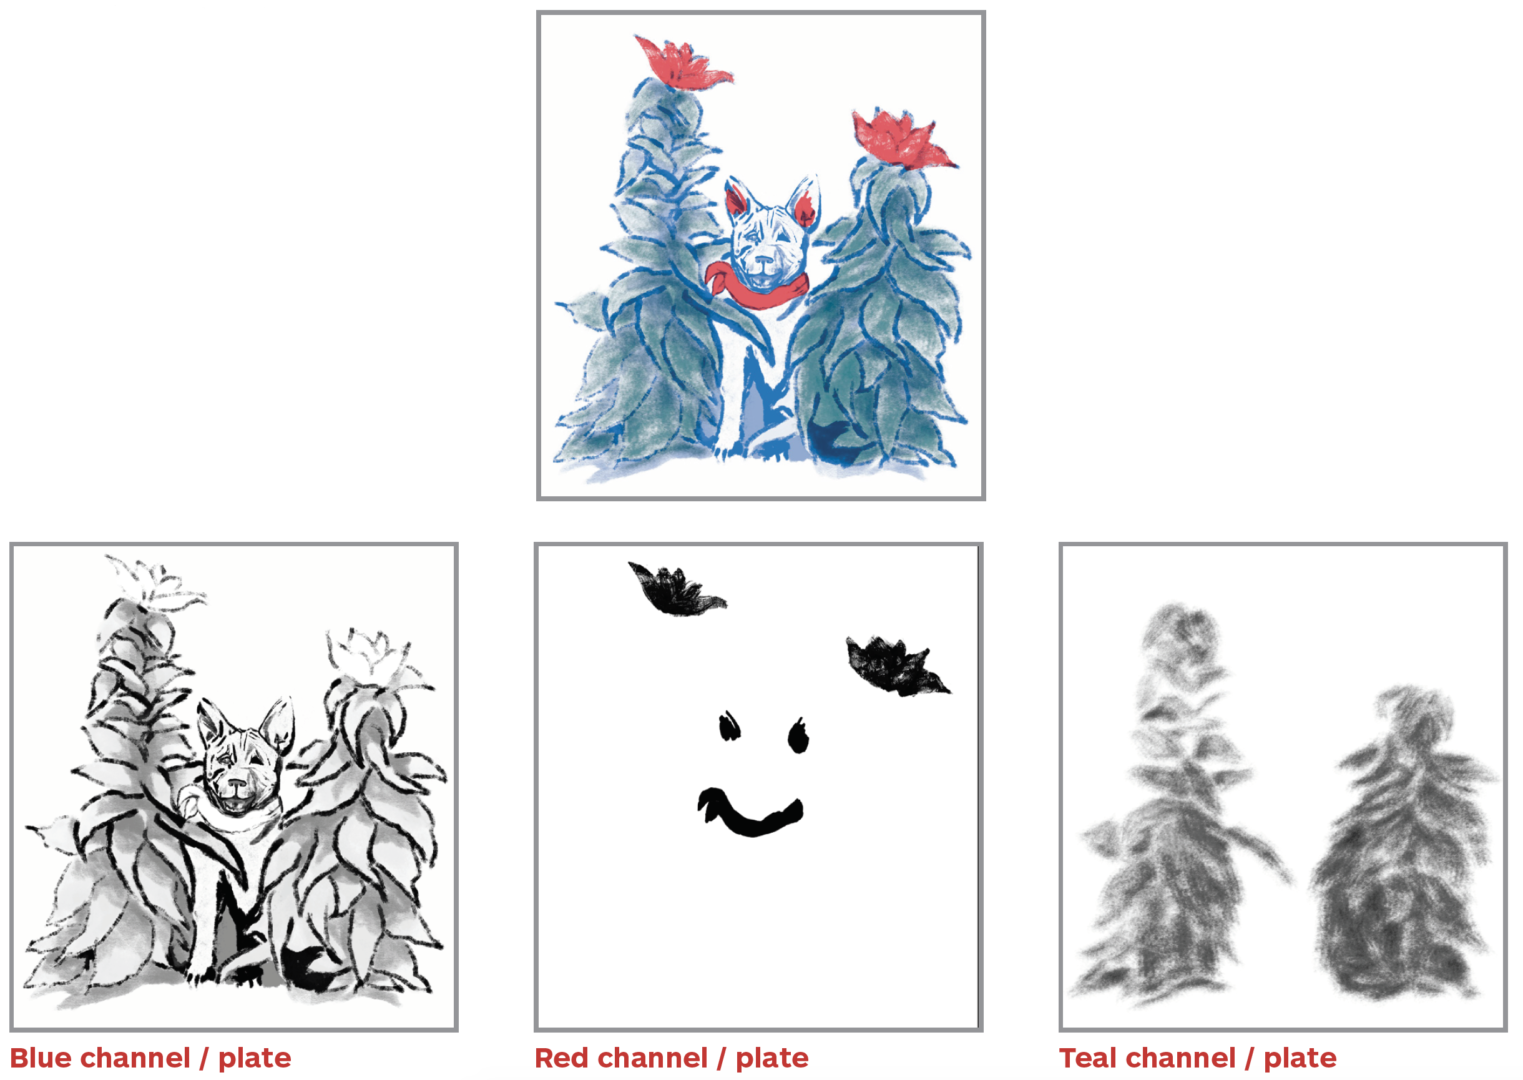
Each channel needs to be its own separate pdf file. The easiest way to do this is to split the channels. First, save your work.

Split your channels using the Channels menu

Photoshop will generate 3 separate grayscale files.

Save each as a pdf.


Combine these newly separated pdfs into one single pdf file with a screenshot of your composite image. You are now ready to print in the Imaging Center!

Photoshop Overview

Introduction: Before you Begin

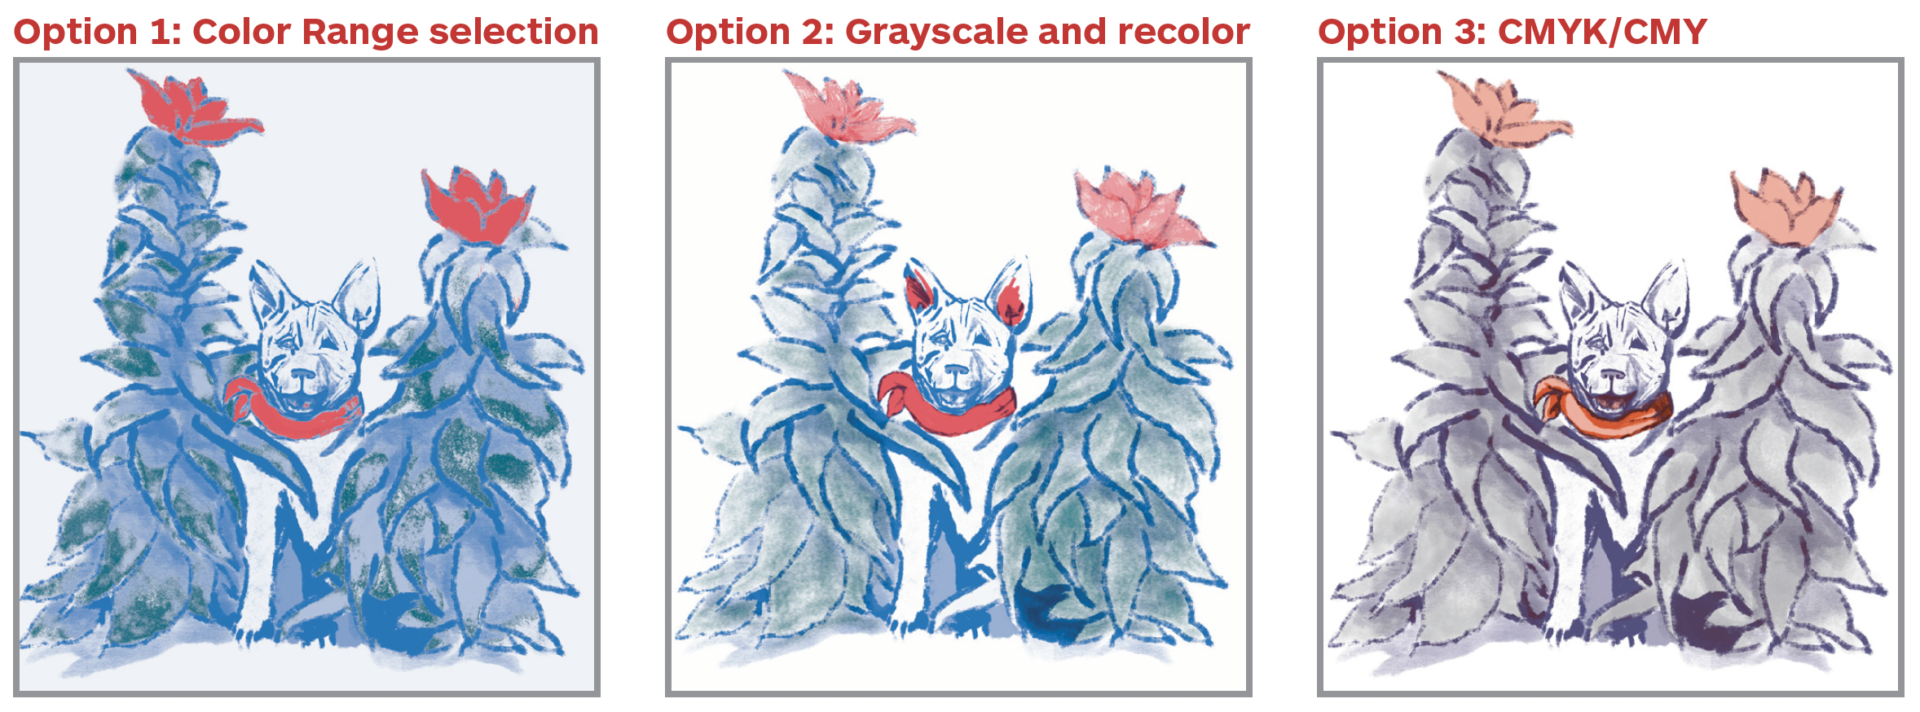
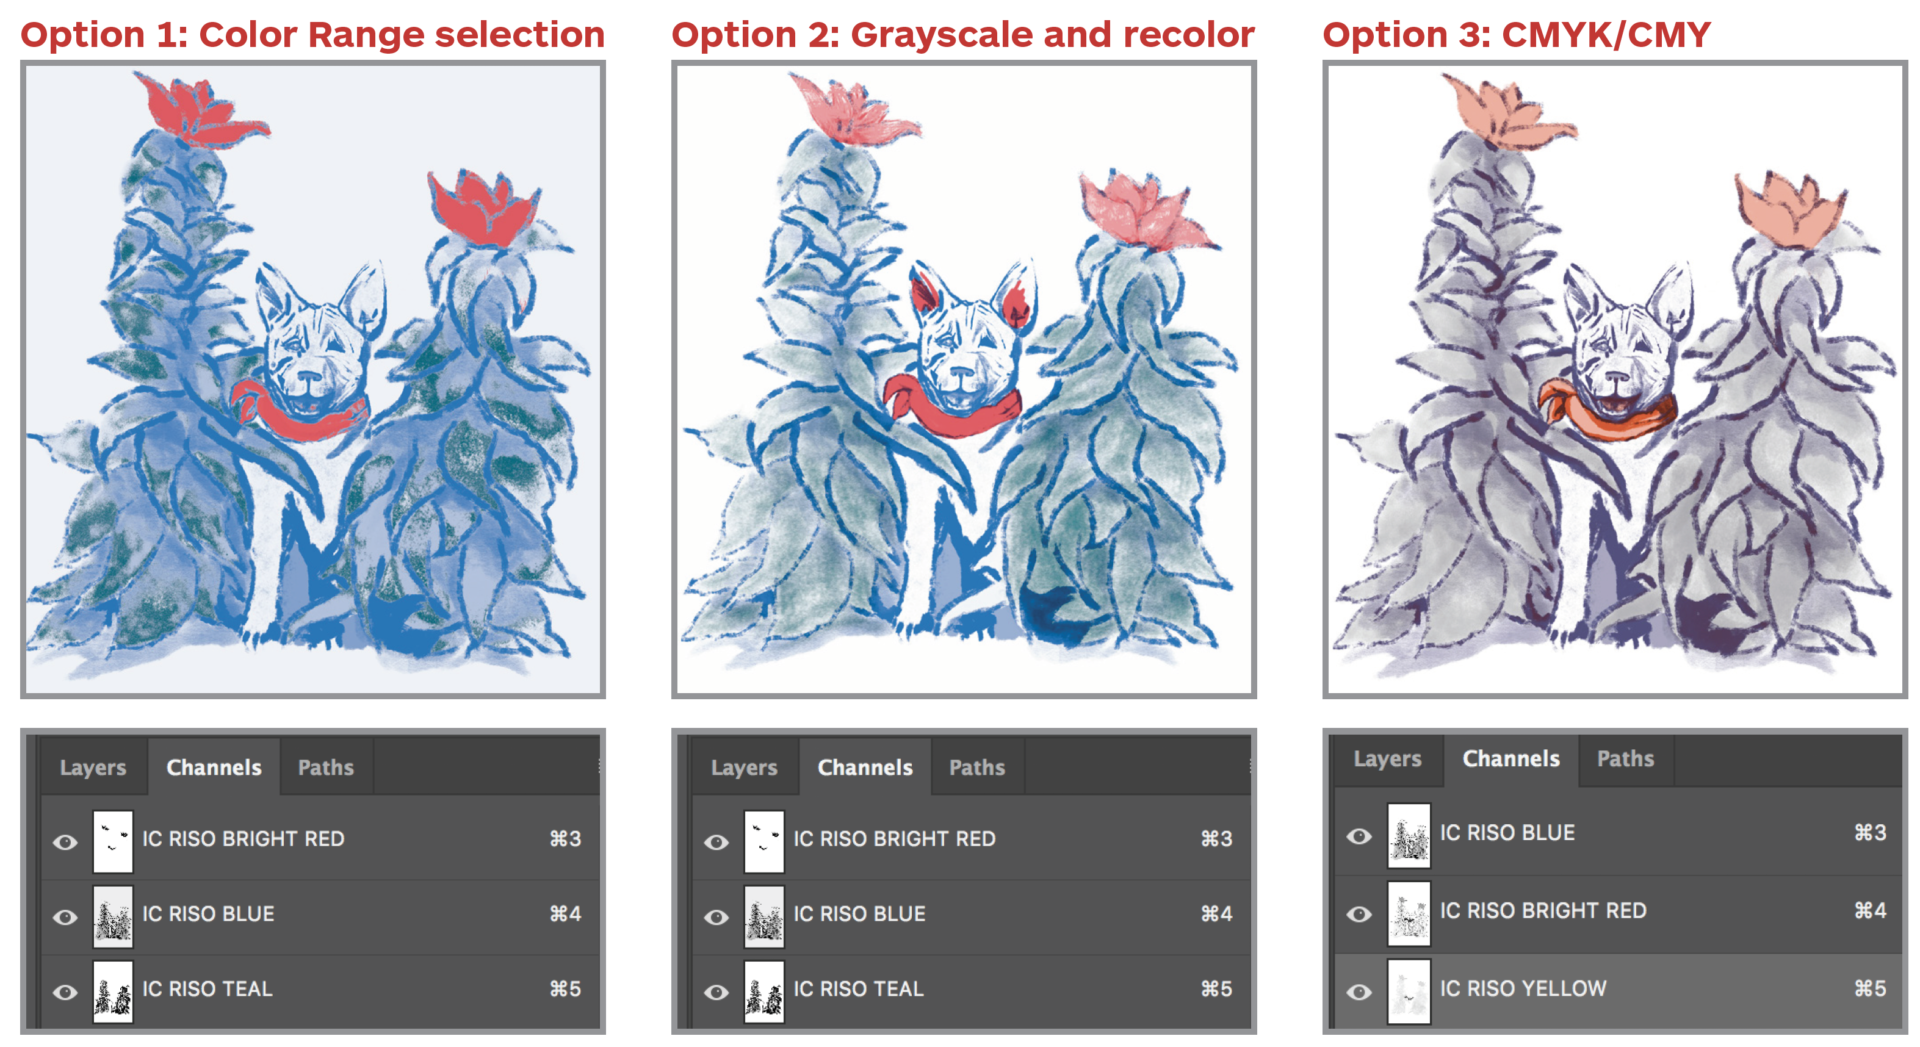
If you didn’t separate your colors into layers while you made the piece, you have a few options:

  • Option 1: Separate out the colors using the Menu > Select > Color Range (try a few different tolerances) and make spot channels with that.
  • Option 2: Convert the whole image to Grayscale, and re-color the whole image using the multi-channel color space.
  • Option 3: Simulate a four-color process print (CMYK) by using the channels as they are.

Adjust your document setup by checking the following:

  • Check your image size
    • The maximum printable area is 10” x 16″.
    • This allows room for crop and registration marks.
  • Set your resolution to 600 dpi
    • Menu Bar > Image > Image Size > Resolution: 600
  • Set your color space to Adobe RGB (1998)
    • Menu Bar > Edit > Convert to Profile > Destination Space: Adobe RGB (1998)
  • Download the IC Riso swatches HERE
    • If you prefer to add the Riso colors manually, be sure to add them as SPOT PANTONE colors
    • Save your document as a new file.
      • Note: these methods all require switching your color mode and deleting channels, which can be a destructive workflow (e.g., layers get flattened or color information is discarded). When working with channels, it is difficult to revert back to the previous look. It is best to keep your final piece, with all its layers and edits, as a separate file.
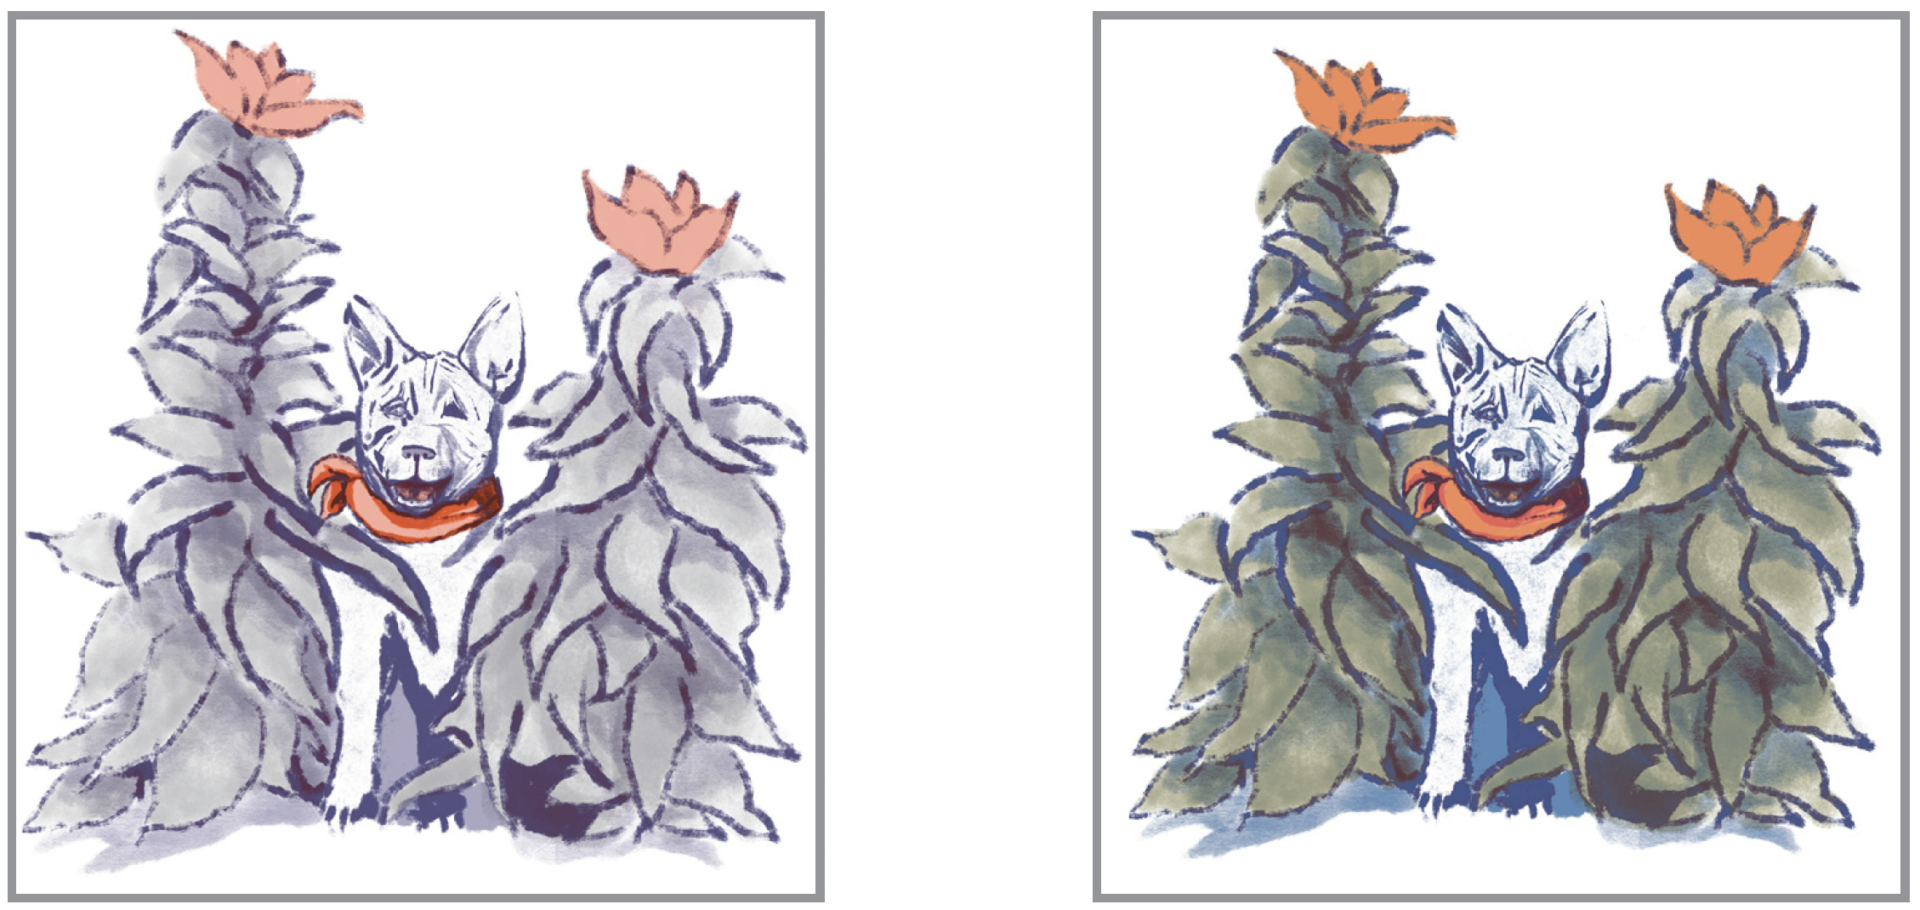
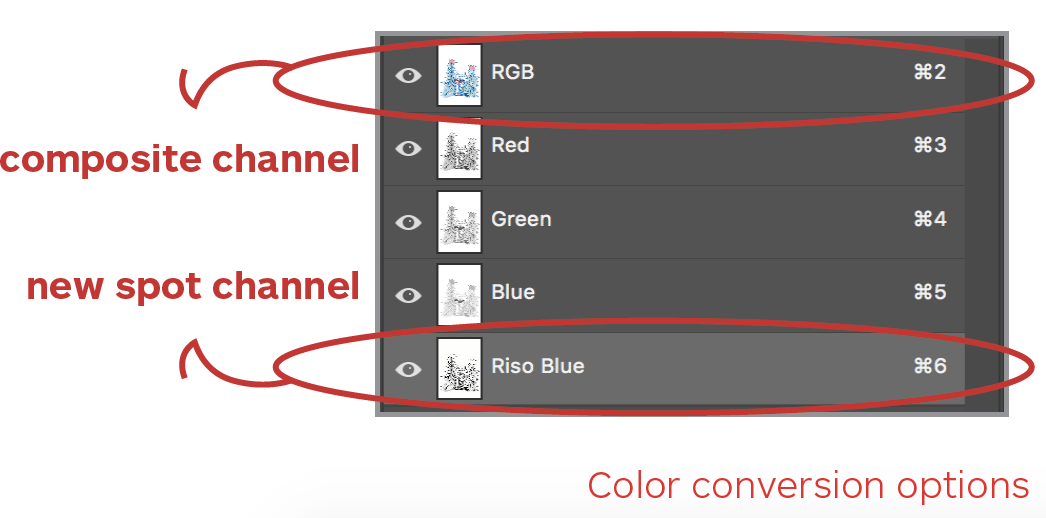
Examples of different conversion options

All Information Can be Found Here

Color Systems & Color Spaces

Understanding RGB vs. CMYK vs. CMY The primary colors of light RGB (Red, Green, and Blue), represent a visual range that, in
Read More

Additional Image Adjustments

At this point (one way or another) all your colors should be divided into channels: None of these is a perfect conversion, so
Read More

Photoshop Overview

Introduction: Before you Begin If you didn’t separate your colors into layers while you made the piece, you have a few option
Read More

Troubleshooting

Common Questions If I want to switch out the color of a plate (print on a blue plate using the teal drum), do I need to alter
Read More

Additional Image Adjustments

At this point (one way or another) all your colors should be divided into channels:

None of these is a perfect conversion, so you may want to make some adjustments directly to the channels.

If you are happy with your conversion, skip to Split Channels!

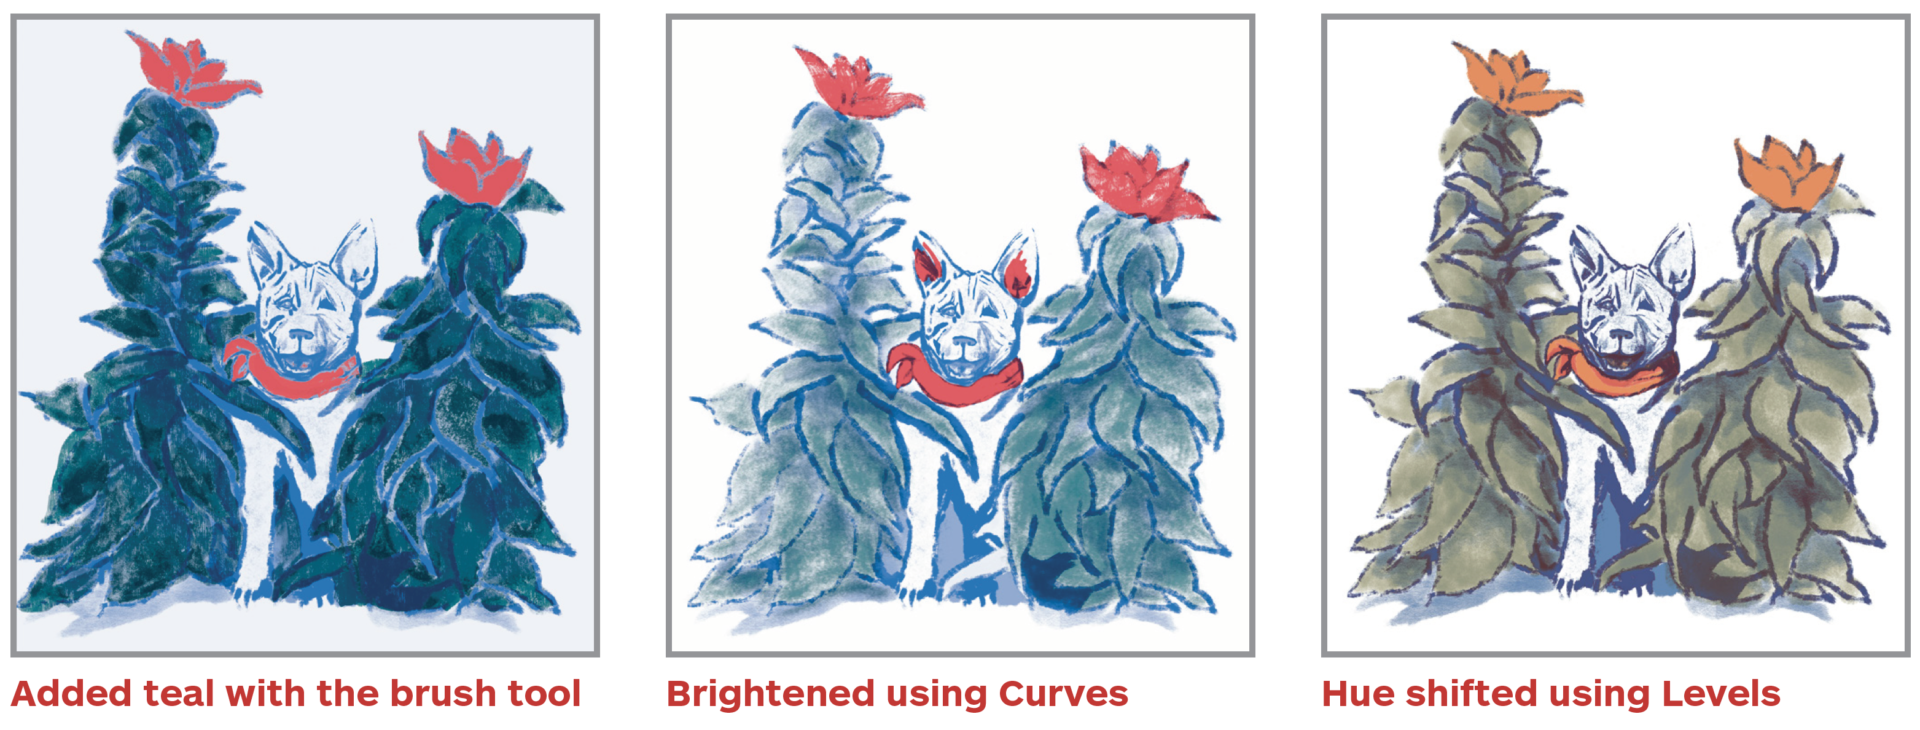
Adjust Color Using the Brush Tool

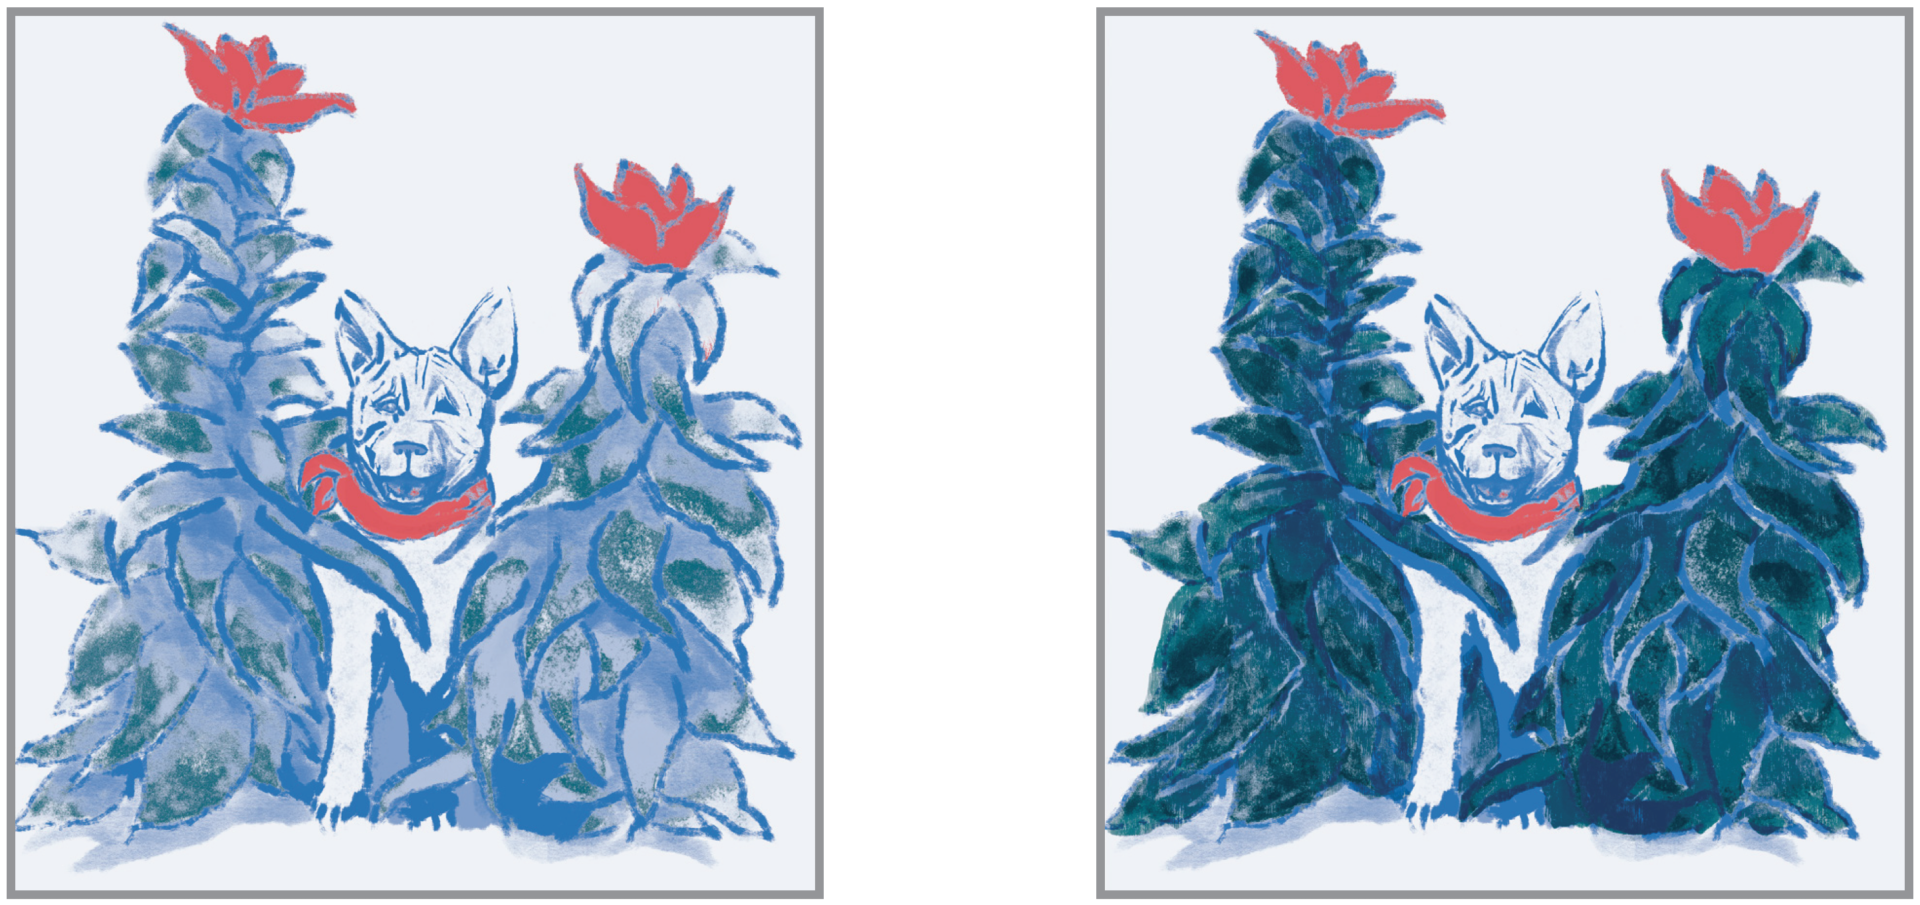
Color range selection doesn’t deal with blended or overlapped colors very well. You may want to go back in with a brush and fill in (or remove) areas on each channel. 

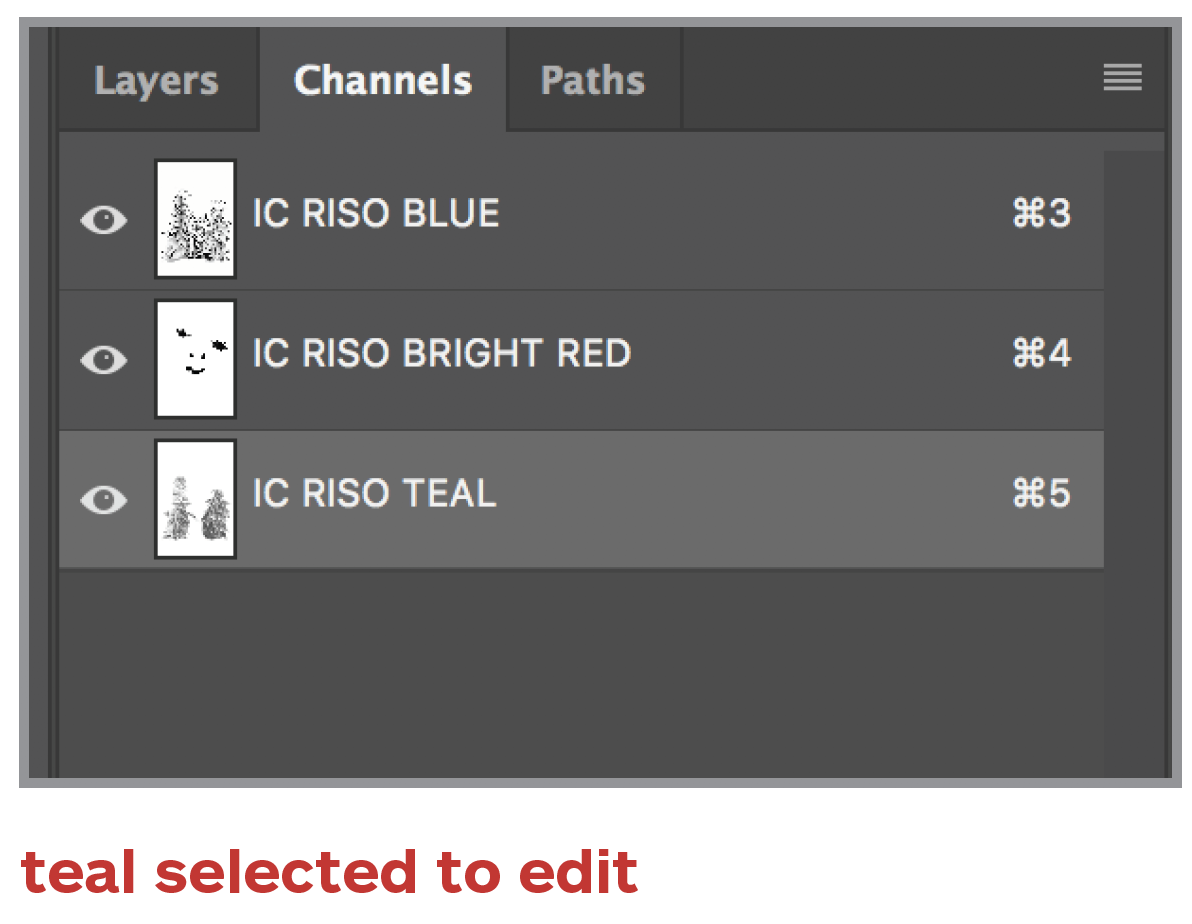
Select the spot channel you want the change. 

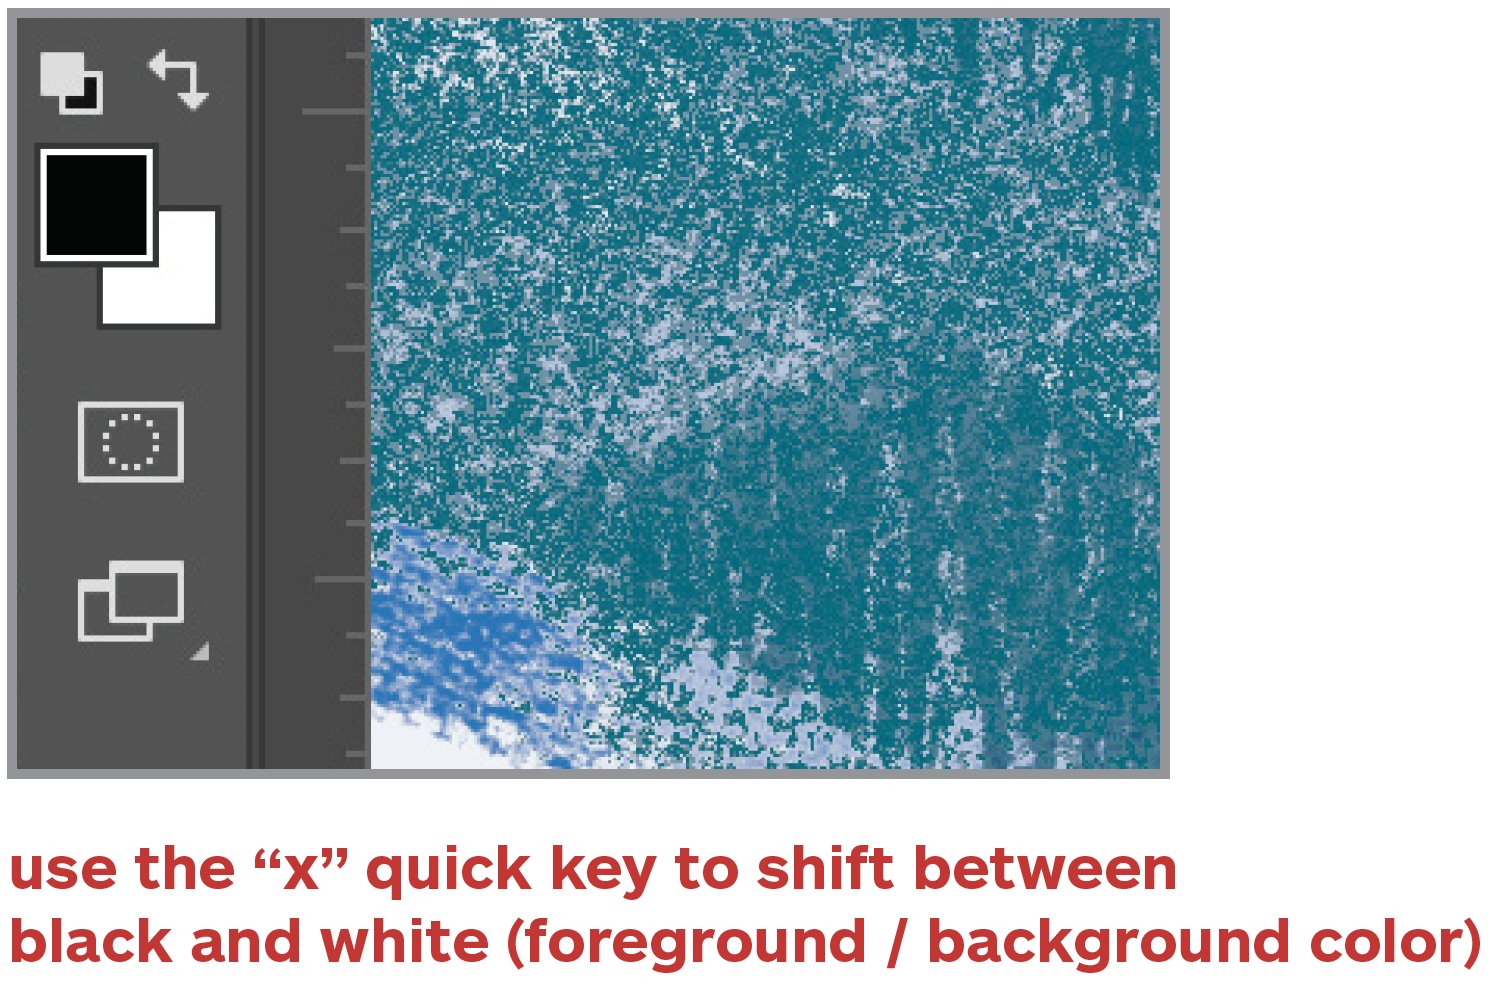
Set your foreground color as black and background color as white.

Use the brush tool to paint in or remove color.

Black adds color and white erases. Grey can be used to paint in a lower opacity.

Example: we added teal with the brush tool

If you are happy with your conversion, skip to Split Channels!

Change the Value Using Curves

Select all your channels and open up the Curves Adjustment. Sometimes the grayscale image is too light. This allows you to control the luminosity of each color.

Menu Bar > Image > Adjustments > Curves…

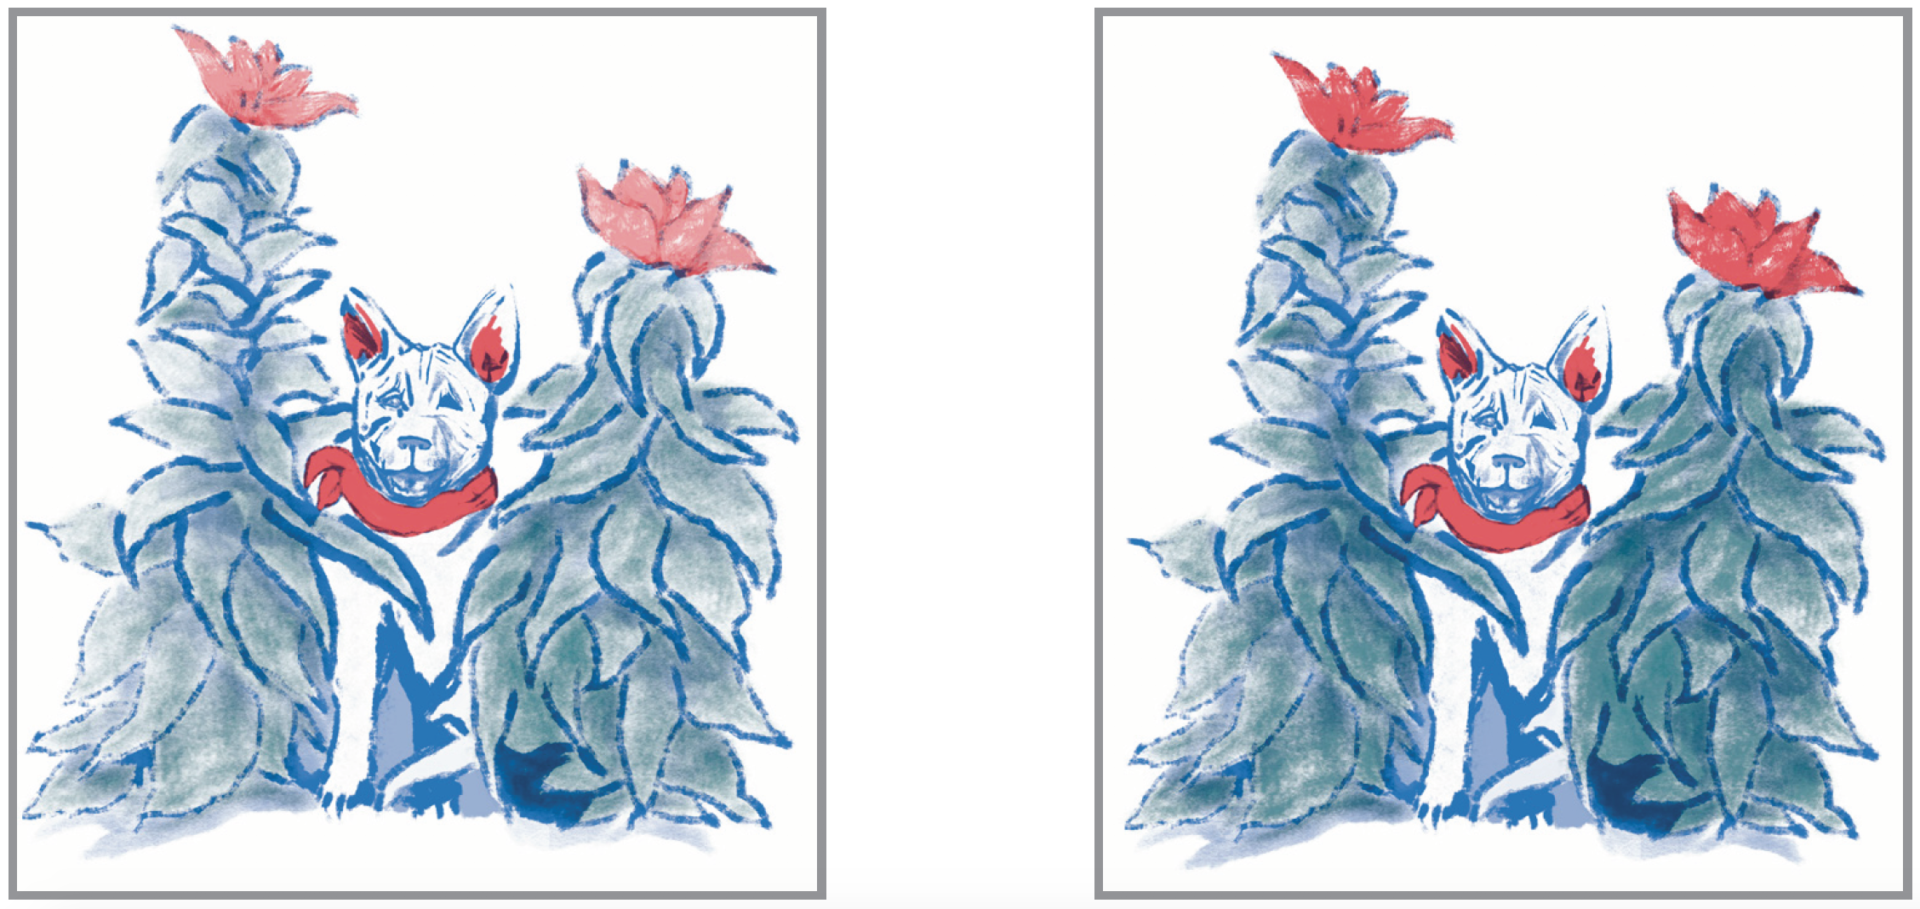
Example: we brightened our image by adjusting the curves

If you are happy with your conversion, skip to Split Channels!

Change Hues Using Levels

Select all your channels and open up the Levels Adjustment. This allows you to control the intensity of each color. You can adjust your hue by adjusting the levels. The color usually needs to be adjusted when converted from CMY to BRY:

Menu Bar > Image > Adjustments > Levels…

Example: we shifted the hue of this image by adjusting the levels

If you are happy with your conversion, skip to Split Channels!

Option 3: Convert to CMYK (or CMY)

Option 3 | Convert to CMYK (or CMY)

This version involves working with color systems. Rather than print every single color in your image, most printers use process colors, such as CMYK.

Set your color space to Working CMYK
  • Menu Bar > Edit > Convert to Profile… >
  • Destination Space: Working CMYK – U.S. Web coated (SWAP) v.2

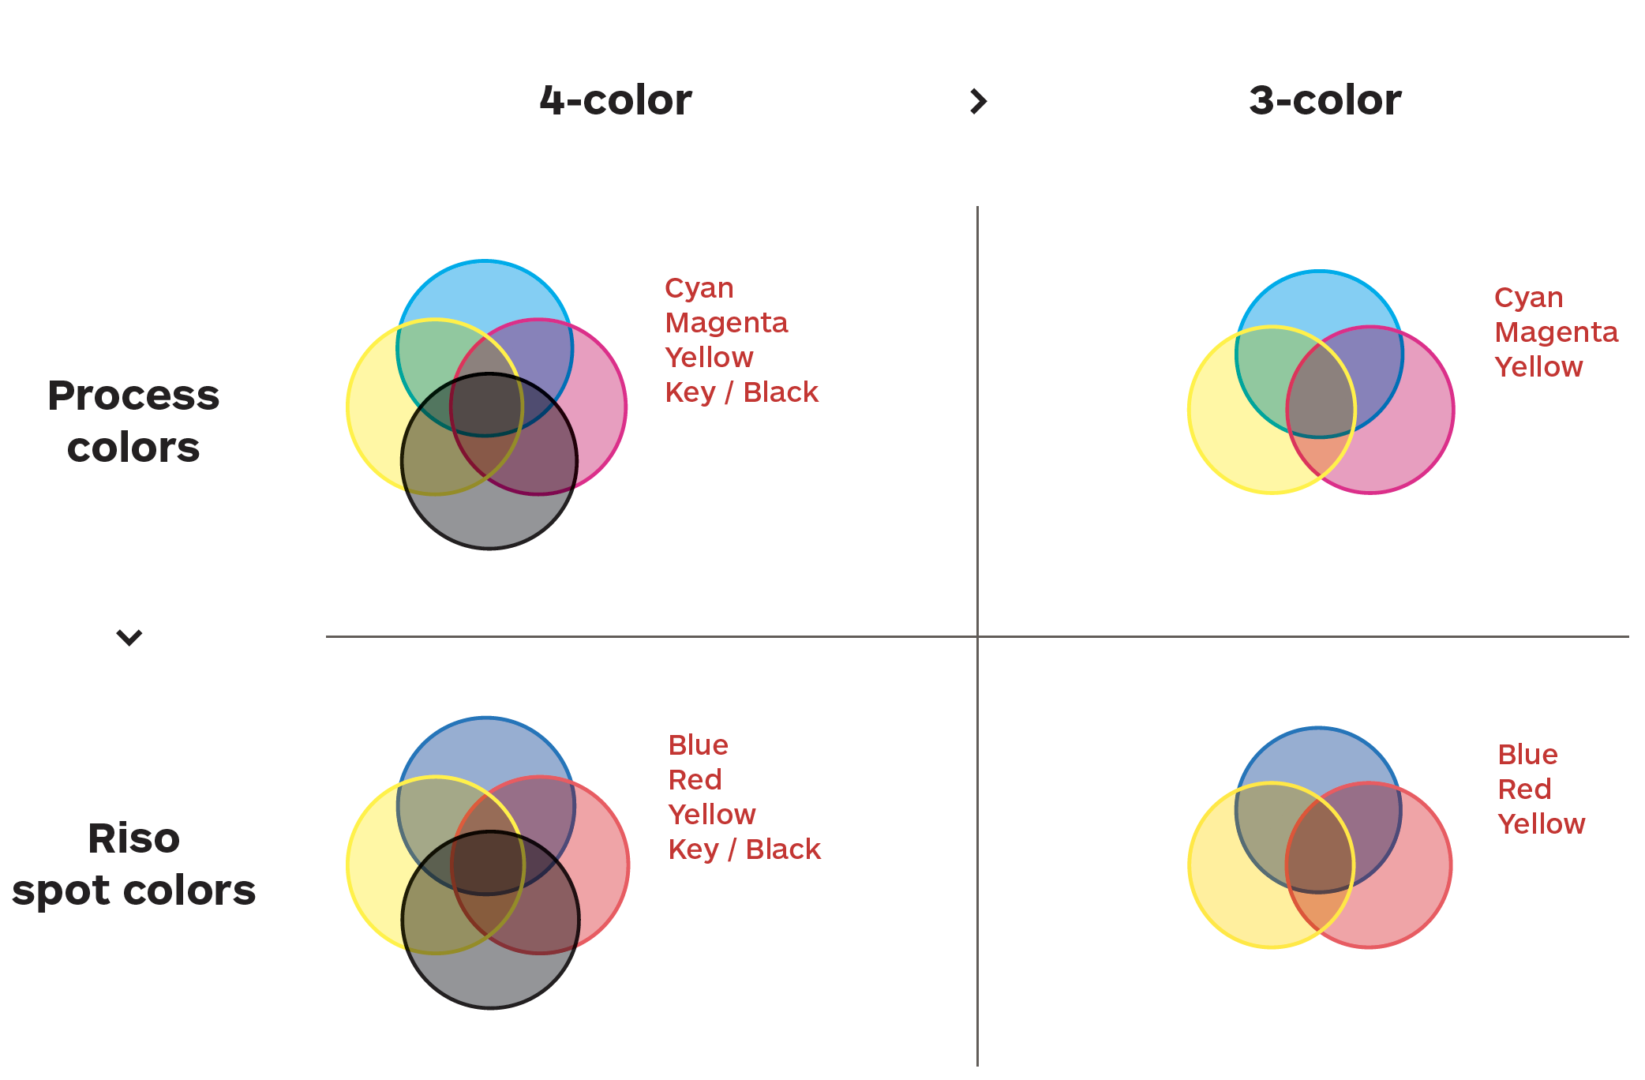
You can print with CMYK channels by using Blue, Red, Yellow, and Black (BRYK). However, we recommend eliminating the Black channel through the following method. This will leave you with a three-color CMY (or BRY) print.

CMY / BRY printing

CMYK process printing creates roughly half of its blacks using the color black, and the other half using a combination of the other three colors. We can use the CMY channels to cover part of the shadows and black portions of the print.

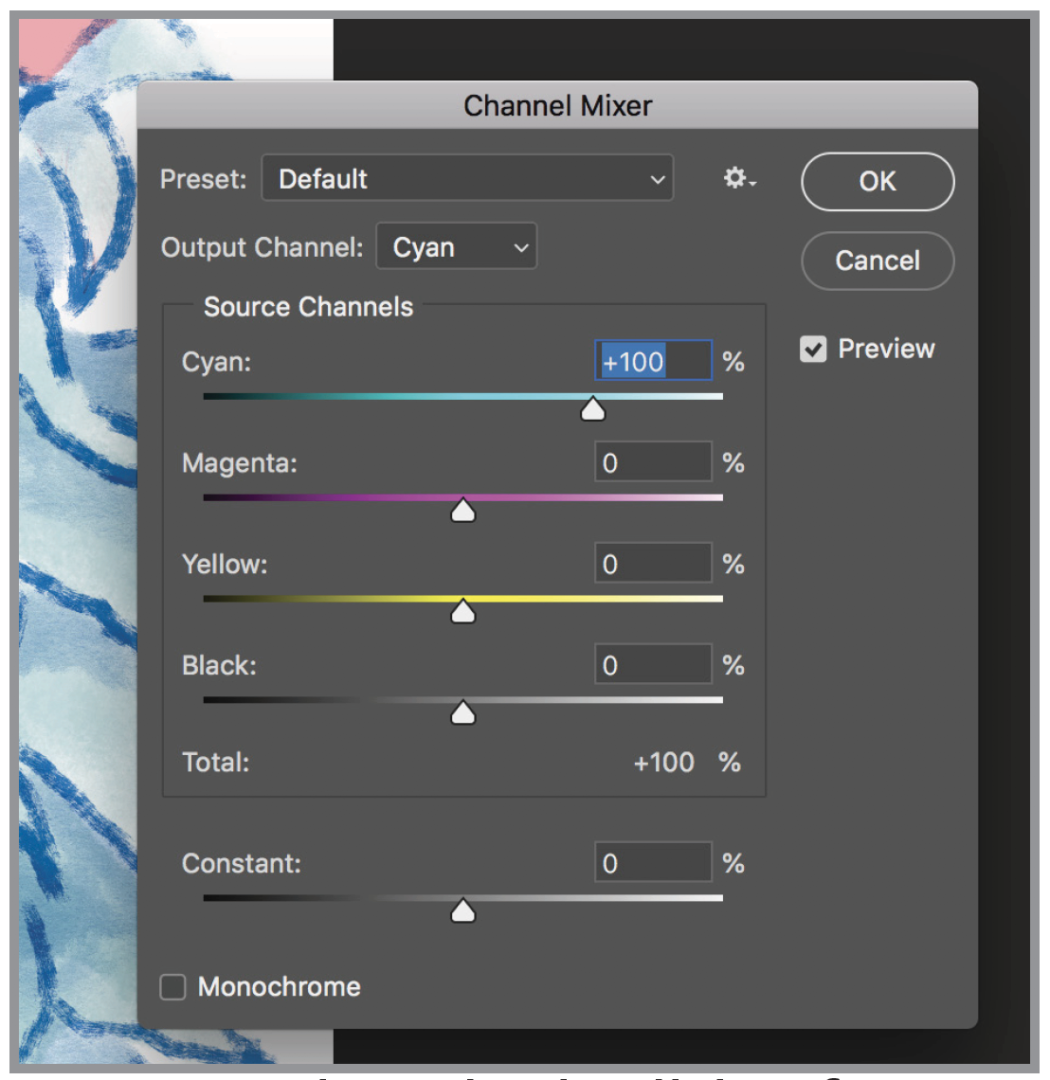
Using the Channel Mixer, you can increase the amount of black information covered by each of the three channels.

Channel Mixing

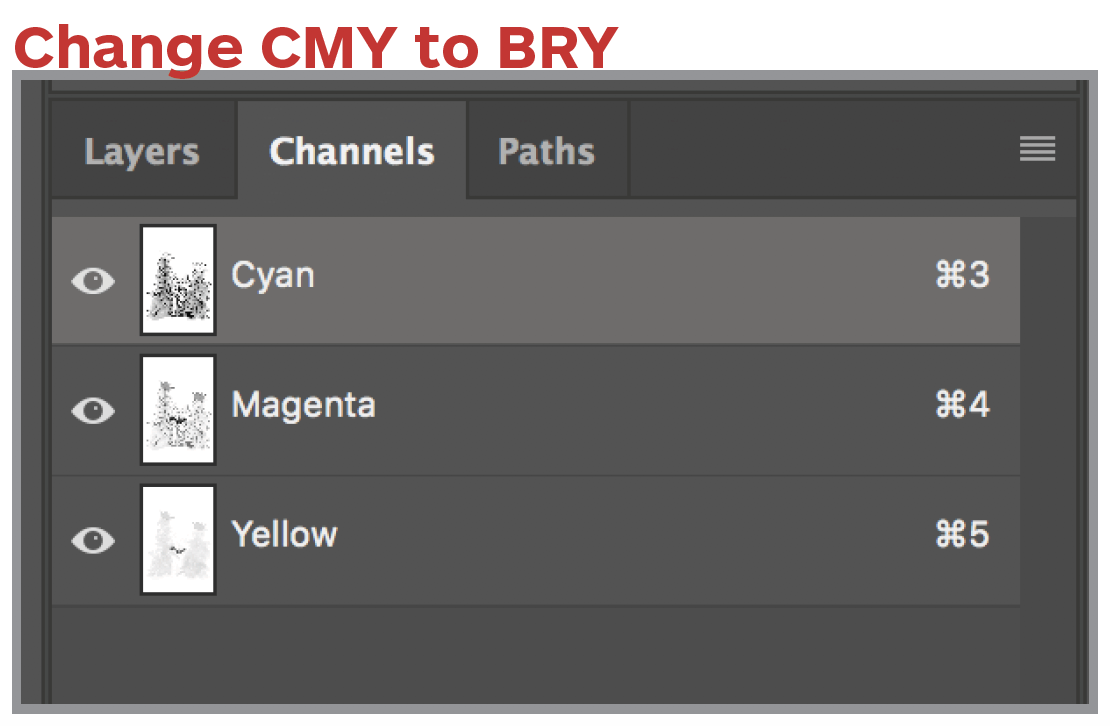
Select all your channels. While keeping all channels selected, turn off the visibility for the black channel. Notice the value difference when you turn it off the black channel. You will try and simulate this value level using the other three channels.

Open the Channel Mixer
Menu Bar > Image > Adjustments > Channel Mixer… >

Output Channels
Switch between the different Output Channels (Cyan, Magenta, Yellow) to see how the Source Channels change with each color.

You can see that the sliders are all set to 0% for all colors except their own. For example, on the Cyan Output Channel, the sliders are set as follows: Cyan 100%, Magenta 0%, Yellow 0%, Black 0%)

Adding Black information to your CMY colors

Starting with Cyan, move the black source channel slider up. (e.g. Move the Black slider from 0% to 50%. This will increase the black content printed on the Cyan channel. You will see the color mix into your piece in the background.

Repeat this step with Magenta and Yellow.

Convert CMYK channels to BRY Spot Colors

Change your mode to Multichannel

  • Menu Bar > Image > Mode > Multichannel
  • Delete the black channel from the Channels panel.

Convert CMY channels to Riso BRY spot colors

  • Double-click on a channel, and use the eye dropped to select the corresponding Riso color.

Cyan > RISO BLUE/3005 U | Magenta > RISO RED/185 U | Yellow > RISO YELLOW/Yellow U

If you are happy with your conversion, skip to Split Channels

Option 2: Convert to Grayscale & Re-color

Option 2 | Convert to Grayscale & Re-Color

This method changes your piece to grayscale. You will manually add the colors back in by painting on Spot Channels. This can be time-consuming if you have a detailed color image.

Change your mode to Grayscale
  • Menu Bar > Image > Mode > Grayscale 
  • Click OK through the “Discard other channels?” warning. This process will also flatten your layers.

Your piece will be in black and white without any color information. You should only have one Gray channel.

Change your mode to Multi-channel
  • Menu Bar > Image > Mode > Multichannel
  • Click OK through the “Flatten layers?” warning. (This process will flatten your layers.)

Your single Gray channel should change to Black.

Change your Black Channel (your first color) to a Riso spot color 
  • Double-click on your black channel.
  • Use the eyedropper to select your desired spot color from the Riso swatches panel.
If you did not download the swatches file, you can find and add the Pantone equivalent color.
  • Click on the black swatch to pull up the Color Picker box. 
  • Click on Color Libraries and type in your desired Pantone color using the Riso color guide.

Because you only have one channel, the content in your piece will appear in grayscale. Click OK.

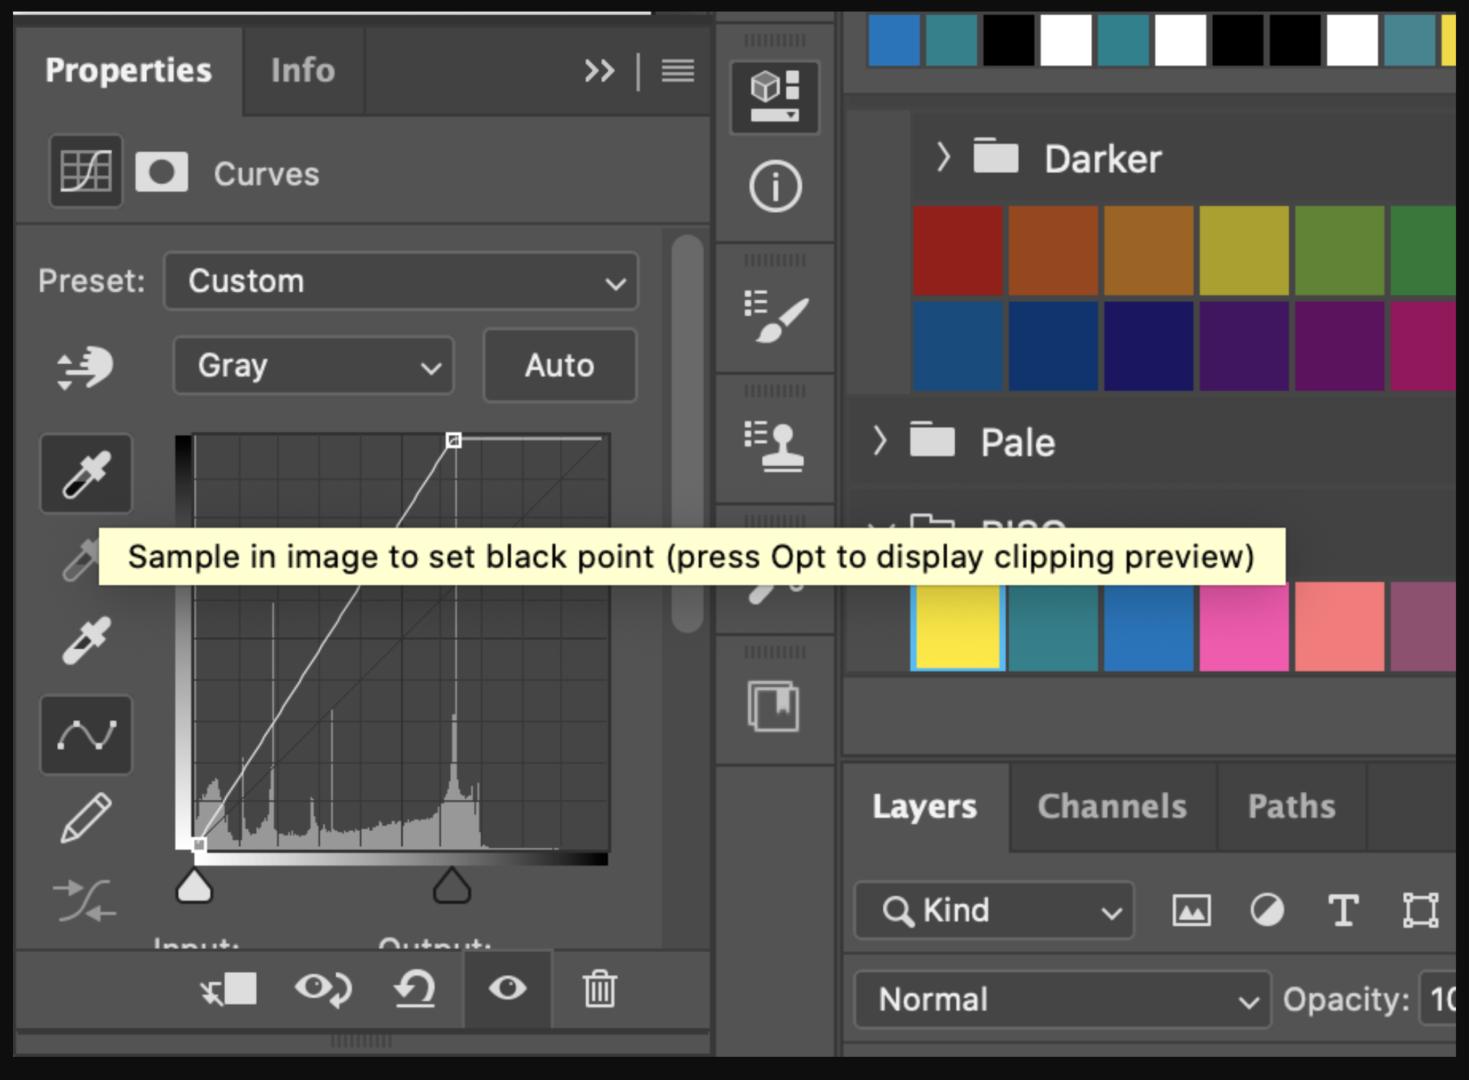
If your image appears washed out, feel free to change the values using Curves, Levels, or your own favorite method of adjusting Luminosity. I would suggest re-setting your black point using Curves:

Menu Bar > Imaging > Adjustments > Curves

Select the black point dropper and click on the darkest point in your image.

Add a second (or third or fourth) spot color as desired for your piece:
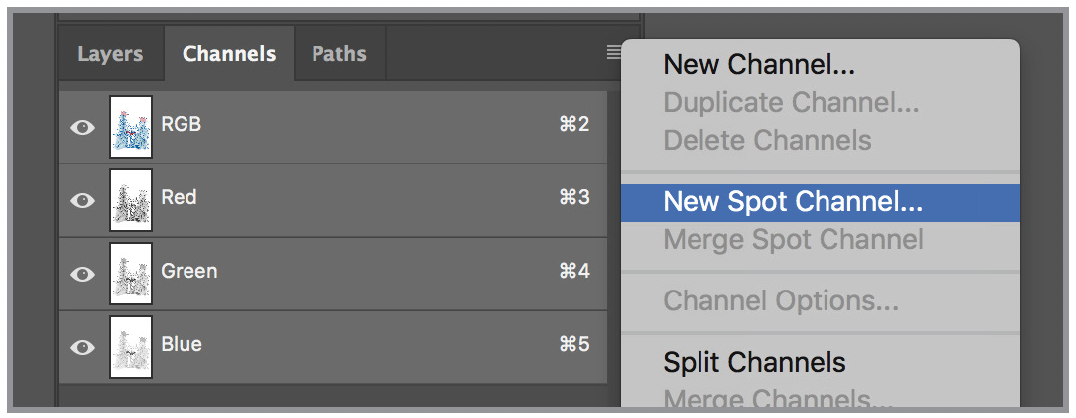
  • Go to the Channels menu panel.
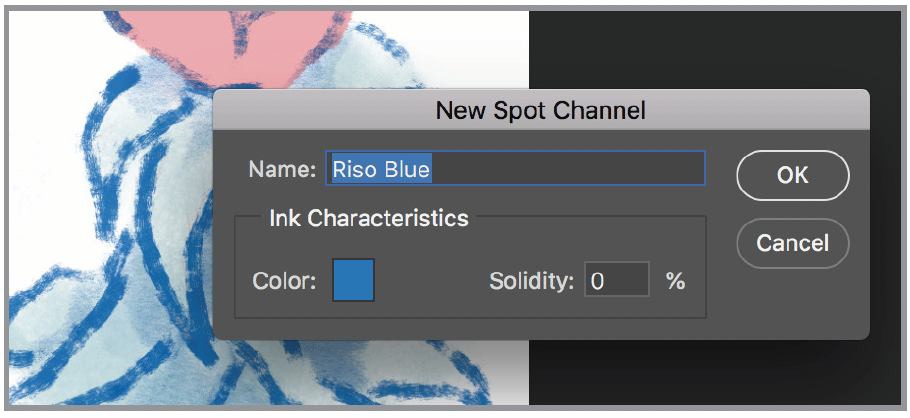
  • Select “New Spot Channel…” from the drop-down menu.
  • Use the eyedropper to select your desired spot color from the Riso swatches panel. (Your first channel will now show up in color) 
  • Click OK

With your new channel selected, use the paintbrush tool to add in your new spot color. (Use a black swatch.)

Add a channel for each color you want to print.

If Option 2 color conversion works for you, skip ahead to Additional Optional Adjustments.

Option 1: Color Range Selection

Option 1 | Color Range Selection

Color range selection works best for pieces that are graphic and have only a few clear colors.

Select and convert a color to a Spot Channel
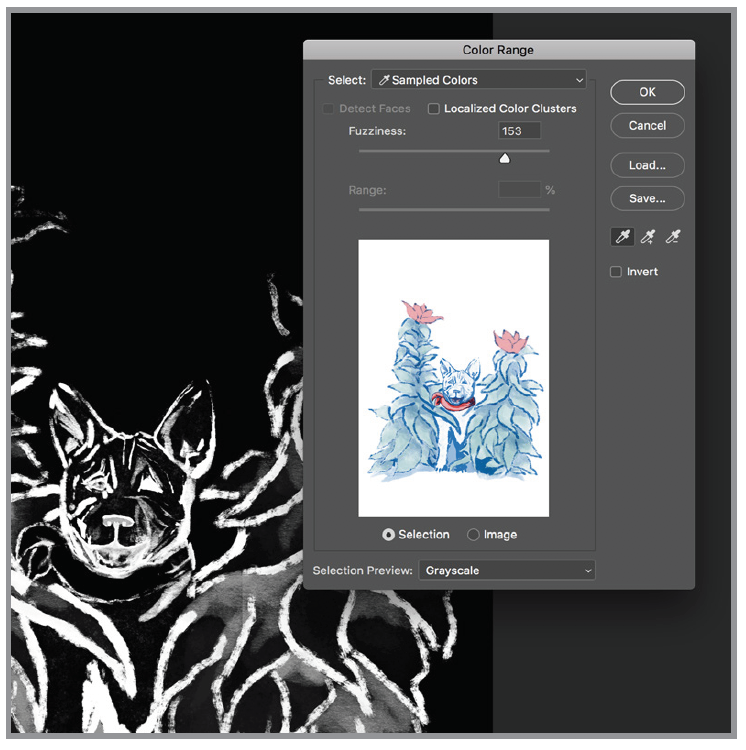
  • Select your first color range:
    • Menu Bar > Select > Color range…
  • Sample one of your colors using the eyedropper tool.
  • Use the Fuzziness slider to select more or fewer pixels. The white areas are the pixels selected. 
  • Click OK
  • With selected pixels loaded, go to the Channels menu panel. 
  • Select “New Spot Channel….” from the drop-down menu. 
  • Use the eyedropper to select your desired spot color from the Riso swatches panel.
  • Click OK

Your new Spot Channel will show up with your selected area as a mask. 

Repeat for every color. 

Make sure your composite channel is selected.

Change your mode to Multi-channel 
  • Menu Bar > Image > Mode > Multichannel
  • Delete all non-spot channels

If Option 1 color conversion works for you, skip ahead to Additional Optional Adjustments.

Color Systems & Color Spaces

Understanding RGB vs. CMYK vs. CMY

The primary colors of light RGB (Red, Green, and Blue), represent a visual range that, in theory, can produce any color that can be seen by the human eye. Mixing with light is an additive process. (When you add all the colors together, they make white.)

Printing is a subtractive color process and uses the opposite colors, CMY (Cyan, Magenta, and Yellow) to mix and produce an image. Working with physical colors (i.e. dyes, pigments, inks) brings with it the limitations of your materials. In theory, cyan, magenta and yellow, all together should produce black. But in reality, the pigment usually turns to a muddy, inconsistent brownish-black. (The shade of brownish-black is dependent on your materials.)

This is why Black (or K for Key) is added in addition to the CMY gray-blend, giving you a sharper, richer, darker black.

So, when you are printing in CMYK, about half of your grays and blacks are made with an even blend of CMY, and the other half is a layer of black printed on top. In theory, all of your CMY channels should have the same information as your black channels, just at a lighter value.

Overall, subtractive color spaces tend to have a wider spectrum of colors to offer. This is why most people work in an RGB color space such as Adobe RGB 1998 or ProPhoto RGB, instead of CMYK. Side note: All screens use additive color.

What is a Color System?

A color system is a set of colors that represent a specific visual spectrum.* These few colors are mixed together to create a limited usable range, and that range is called a color system. Examples of a color system include RGB, CMYK, and Lab.

* “Appendix A.” Understanding Digital Photography, by Joseph A. Ippolito, Thomson/Delmar Learning, 2003, p. 372.

What is a Channel?

Photoshop organizes your chosen set of colors (e.g. RGB or CMYK) into channels, dividing up your image information by color. For RGB and CMYK, Photoshop also includes a composite channel. Each channel is in grayscale and uses a mask to store each color’s information. You can edit this mask to alter the look of your image and how the channels are mixed.

In RGB and CMYK, you can use the Channel Mixer to change the amount of color information on each channel.

What is a Spot Color?

An additional color that is not a part of an established color system or mode.

For More Information

Linkedin Learning: Understanding CMYK vs. RGB
Linkedin Learning: Understanding Spot Colors
Linkedin Learning: Spot Colors