Have you ever encountered an issue in your Canvas course(s) where you (as the instructor) are able to access course links but your students cannot? One of the main reasons this might be the case is because of how the links were originally created in your course(s). Let’s look at an example:
A link to a course page, “Online Course Resources”, was copied and pasted from one course to another. When the instructor clicks on the link to make sure it works properly, the instructor does not experience any issues. When students click on the same link, they see a “Page Not Found” message.
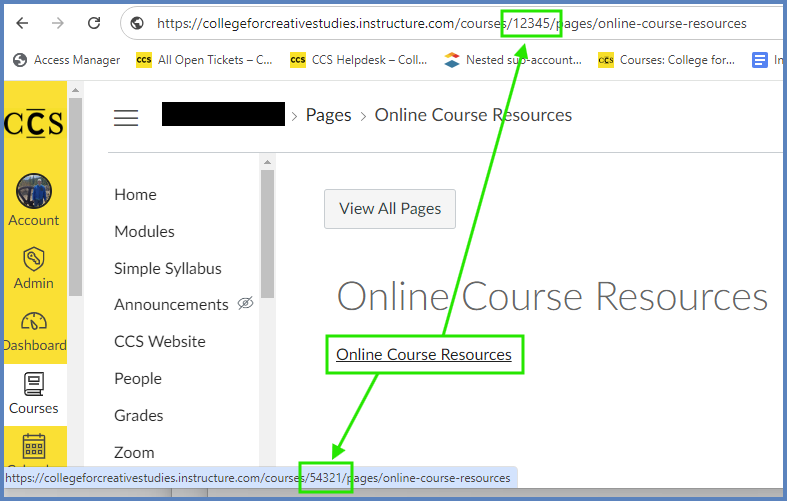
In the below example, the instructor hovers over the “Online Course Resources” link. The URL at the bottom of the browser window appears as the instructor hovers over the link. But, the CourseID number displayed in the bottom URL does not match the CourseID number in the browser’s address bar at the top of the screen. Students who are enrolled in CourseID 12345 cannot access the “Online Course Resources” linked page because they are not enrolled in CourseID 54321.
To summarize: Copying and pasting links from one course to another is not encouraged…as it creates issues for your students that will need to be manually fixed.
Validate Links in Content
As detailed in Validating Links in a Canvas Course, it is important to ensure that all links in your course(s) are working properly for you and your students. The Canvas Course Link Validator helps you identify links that are broken and/or point to other course content.
Fixing Broken Links
The following options are available to help get your links fixed in your course:
Use the RCE (Rich Content Editor) available on most Canvas content pages to correct the links yourself. The following Guides will show you how to create links to course content and files within your course:
00:07: How do I create hyperlinks to course or group content in the Rich Content Editor?
00:12: When using the Rich Content Editor, or RCE, you can insert links to previously created course or group content. To add group content open the RCE from within a group.
00:24: Place your cursor in the RCE location where you want the link to appear or select the text that you want to link.
00:31: In the toolbar, select Link Options and select Course Link or Groups Link.
00:36: Use the Add menu to select the linked content. Content items are grouped by content type. Click the arrow icon next to the content type to expand it.
00:46: Click the item you want to link. The text will flash before turning into the hyperlink.
00:52: To search for content, type at least three characters in the Search field.
00:57: With the Add menu open, you can select additional text to link using your cursor.
01:02: Click the name of the item you want to link.
01:05: You can also drag and drop content links by dragging and dropping an item to the desired location in the RCE.
01:12: To insert a link displaying the name of the content item, place the cursor in the location where you want the link to appear.
01:19: Inserted Course Navigation links inserted will navigate users to that course feature page when clicked.
01:25: Click the X to close the Add menu.
01:28: Click the “Save” button when you are done editing.
01:31: This guide covered how to create hyperlinks to course or group content in the Rich Content Editor.
00:07: How do I create hyperlinks to user, course, or group files in the Rich Content Editor?
00:13: You can use the Rich Content Editor, or RCE, to insert hyperlinks to document, image, and media files stored in Canvas.
00:22: Click the text or image that you want to turn into a hyperlink.
00:26: Select Link icon from the toolbar and then either “Course Link” or “Group Link”..
00:31: The Add menu displays links by default. To view available course, group, or user files, select “Files” from the dropdown.
00:40: Select the folder for the type of file you want to link. When using the RCE in a course, “Course files” will display. If using the RCE in a group, “Group files” will be listed instead.
00:54: Click on subfolders to see their contents.
00:57: Select the file you want to link to from the list.
01:01: The text will briefly flash before becoming a hyperlink.
01:05: To search for a file, enter the file name in the Search field.
01:09: To insert a link displaying the name of the file, place the cursor where you want the link to appear.
01:15: Select the file you want to link to from the Add menu.
01:19: The file name will appear as a hyperlink in the cursor location.
01:23: Click the X to close the Add menu. Click the Save button when you have finished editing.
01:29: This guide covered how to create hyperlinks to user, course, or group files in the Rich Content Editor.
00:07: How do I link to a document from canvas in the rich content editor?
00:12: Open the rich content editor when creating or editing an announcement assignment
00:16: discussion page quiz or syllabus.
00:21: To insert a link displaying the name of the file click to place your cursor in the location
00:25: in the rich content editor where you want the link to appear.
00:28: To insert a hyperlink to a course content item select the text for your
00:32: hyperlink.
00:35: In the toolbar click the documents icon to view the documents icon.
00:39: You may have to click the options icon. To view course or group
00:43: documents click the course or group documents option.
00:48: To view your user documents click the user documents option.
00:52: By default the add menu displays all files in your selected file source.
00:58: To sort the displayed files by image document or media file
01:02: type. Click the type drop-down menu.
01:05: To sort the displayed files by date added or alphabetically click
01:09: the sort by drop-down menu.
01:12: To search for a document enter the file name in the search field.
01:16: You must enter at least three characters for search results to display.
01:21: Click the name of the file. You want to link in the rich content editor?
01:25: View the link displaying the name of the file or the hyperlinked text.
01:29: To manage options for the link click the link title and click the link options
01:33: link.
01:35: You can edit the link text in the text field or link URL in the Link Field.
01:41: To disabled users from seeing a file preview select disable preview
01:45: option.
01:47: You can choose to display a file preview in a pop-up window or inline preview
01:51: when the link is clicked. You can also choose to expand an inline preview
01:55: by default. To allow users to view a file preview in a pop-up
01:59: window when the link is clicked select the preview in overlay option.
02:05: To allow users to view an inline preview when the link is clicked.
02:08: Click the preview inline option.
02:11: To expand the inline preview by default.
02:13: Click the expand preview by default checkbox.
02:18: To save link options. Click the done button.
02:21: Click the reply or save button.
02:24: This guide covered how the link to a document from canvas in the rich content editor.