Sharing and Importing Course Content in Canvas Commons

Sharing and Importing Course Content in Canvas Commons

Canvas Commons is the perfect way to share content across varying courses. Content shared to Commons can be shared by any Canvas user. Content already shared to Commons can be imported into any user’s Canvas course. You can share a single page, an assignment, a full module, or even an entire course using Commons.

check_circle

Commons Availability

Canvas Commons (or Commons) is only available to instructors and Canvas administrators. It is not available for students. Therefore, students will not have the Commons icon displayed on their left-hand global navigation menu within Canvas. However, once you have imported content from Commons into your own course, you can choose how you want to make that imported content available to your students.

Sharing Content to Commons

These instructions work for Modules, Assignments, Pages, Files, Discussions, and Classic Quizzes.

  1. In Canvas, navigate to your Modules, Assignments, Pages, Files, Discussions, or Quizzes index page. (Example: In Course Navigation, click the Modules link.)
  2. Find the piece of content you would like to share to Commons.
  3. On the far right-hand side of the page, click on click the Options (three vertical dots) icon for that item.
  4. Select Share to Commons.
  5. On the Share Resource screen, make sure to select the All of College for Creative Studies checkbox. Fill in as much information as you can related to the content you are sharing including the Title, Description, Tags, and Grade/Level. This will help you and others easily search for your content once it has been shared to the Commons repository.
  6. Click the Share button to submit your content to the Commons repository.

It may take 30 minutes for your content to process and appear in Commons.

Sharing an Entire Course to Commons

You can share an entire course to Commons for others to import into their own course(s).

  1. In Course Navigation, click the Settings link.
  2. Click the Share to Commons link on the right-hand side of your screen.
  3. On the Share Resource screen, make sure to select the All of College for Creative Studies checkbox. Fill in as much information as you can related to the content you are sharing including the Title, Description, Tags, and Grade/Level. This will help you and others easily search for your content once it has been shared to the Commons repository.
  4. Click the Share button to submit your content to the Commons repository.

It may take 30 minutes for your content to process and appear in Commons.

Importing Content from Commons to Your Course

The Commons repository allows you to search for and import a wide variety of content into your Canvas course(s). You can import something as small as a file or as large as an entire course. You can even mark content as a “favorite” so that you can easily find it later to import into your course(s). To import content from Commons into your own Canvas course(s):

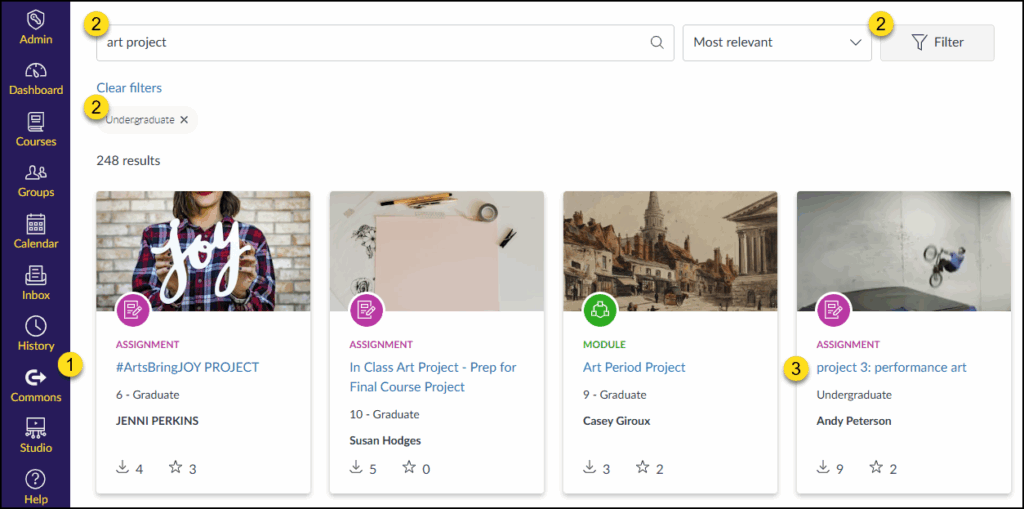
  1. In Global Navigation, click the Commons link.
  2. Use the Search by title, name, institution or tag 🔍 box to search for an item of interest. Click the Filter button to further narrow down your search. In this example, we’ll search for the words art project and filter to only see Undergraduate results.
  3. Click on the name of the item to view additional details about it. In this example, we select the project 3: performance art assignment.
Click on the name of the item to view additional details about it. In this example, we select the project 3: performance art assignment.
  1. On the next screen, view the details about the shared resource including a Preview of the resource, Details of the shared resource (including an area to leave a comment for the author of the shared resource), and any Version notes the author has included.
  2. Click the Import/Download button on the right-hand side of the screen. A fly-out menu will appear on the right side of the screen.
  3. Place a ✅ checkmark next to one or more of your Canvas courses where you would like to import the Commons resource into, and click the Import into Course button.

Check the Status of Your Imported Content from Commons

You can easily check the status of the content you’ve chosen to import from Commons.

  1. Navigate to your Canvas course.
  2. In Course Navigation, click the Settings link.
  3. Click on the Import Course Content link on the right-hand side of your screen.
  4. Look under the Content imports heading. Items labeled Canvas Common Cartridge with the date/time you imported the item from Commons will show at the top of that list with a status label.
Look under the Content imports heading. Items labeled Canvas Common Cartridge with the date/time you imported the item from Commons will show at the top of that list with a status label.

Additional Resources

Using Canvas Commons to Share Content
Using Commons

How do I use Commons?

00:07: How do I use comments? 00:09: In global navigation, click the comments link. 00:13: A resource in common can be a course. 00:15: Module quiz assignment discussion page, 00:19: document video, image or audio file. 00:24: Each resource type has a unique icon. 00:26: Look for these related colors and icons. 00:28: When searching for resources to find resources, in Commons, use 00:33: the search field you can search for keywords, such as author, institution, 00:37: or title. You can also search by outcome, Consortium 00:41: or group. 00:44: To sort search results, click the sort by drop-down menu. 00:49: To apply search filters to your search. Click the filter button. 00:54: Based on your selected filters. The number of results are displayed in the page. 00:58: To search everything available to you in Commons, leave the search field and 01:02: filters blank. 01:05: You can also view featured content in the results page featured content 01:09: includes high-quality content. That is featured in the common search page. 01:13: Featured content can be imported or downloaded like any other content in 01:17: Commons. 01:19: To narrow your search or to search by filter, use one or more of the filter 01:23: options. 01:25: A proof resources if your admin has enabled approved resources, you 01:29: can filter results to only show approved resources. 01:34: Type, you can filter by resource type such as courses, modules 01:38: assignments, quizzes, discussions Pages, documents 01:43: images, videos, or audio. 01:48: Content types, you can filter by template or open textbook. 01:53: Grade levels. You can select specific grades or level of Education, 01:57: to narrow your search example K-12 undergraduate 02:01: graduate. 02:04: Shared with you can filter results by resources, shared publicly in 02:08: your account in a group or in a Consortium. 02:12: When search results are displayed in, cardview resource, details are displayed 02:16: on content cards. Each card displays the following details. 02:21: A proof resource icon, identify institution approved resources, 02:25: note that the approved resources feature must be enabled by an account 02:29: admin. 02:31: Resource icon. Identify the resource type. 02:35: Title to preview a resource view more details or 02:39: import a resource. Click the resource title. 02:43: Grade level view, the grade level of the resource. 02:47: Author, view the author of the resource. 02:50: Downloads and favorites. Icons view the number of times a resource 02:54: has been downloaded and imported or added as a favorite. 02:58: To view resources in a list, click the Switch to list view link. 03:03: In the list view, resources, display in a list format. 03:07: To sort the list in alphabetic or reverse alphabetic order click, the title 03:11: sort icon. 03:13: To sort the list in alphabetic or numeric order for additional parameters. 03:16: Select a parameter and click the sort icon. 03:21: To preview a resource view more details or import a resource. 03:25: Click, the resource name link. 03:28: To designate a resource as a favorite. 03:30: Locate the resource in the list and click the favorite icon. 03:35: The resource added to favorites, message displays 03:39: To browse the resource list, click the page forward and page back icons. 03:45: The content overview page, loads the preview tab by default. 03:48: The sidebar contains further information and links 03:53: Favorites and downloads displays. 03:55: The number of times. A resource has been added as a favorite or downloaded 04:00: Date of last update date when content was last updated by an 04:04: author. 04:06: License displays either, the copyright or Creative, Commons content, 04:10: license. 04:12: Thumbnail and approved icon resource thumbnail. 04:14: And if applicable the approved resource icon, 04:19: Import download button button to download or import the 04:23: resource. 04:25: Size and type size of resource file, and the type of content. 04:30: Favorites button. Add the resource to your favorites. 04:34: Copy resource, link button, copy the resource link to your clipboard. 04:40: To preview resource content, click the preview tab. 04:43: The preview tab is shown by default. 04:47: In the details tab, you can view a summary of the resource and related information. 04:53: Description, a brief explanation or summary of the resource. 05:01: Account the account from which the resource was shared. 05:05: Great level, the suggested grade level for the resource. 05:09: Tags. Relevant tags are keywords to identify the resource. 05:14: Duration duration of an audio or video file only applicable 05:18: to audio or video resources outcomes outcomes linked 05:23: to a resource. Only applicable to Resources with linked outcomes. 05:28: Shared with sharing settings, such as account group, Consortium 05:32: public, private. 05:35: Reviews reviews by other users. 05:38: When you are ready to import a resource, click the import download button 05:42: and select a course. 05:45: To view any updates made to the resource, click the version notes tab. 05:50: Updates are sorted by date and time and may include a description of changes made. 05:56: You can share a variety of resources to comments from your canvas course, including 06:00: a canvas, course course, content and files. 06:05: To view a list of helpful comments, guides, click the guides link. 06:10: To access all the commons guides, click the canvas Commons guides 06:14: link. 06:15: To access a specific. Commons guide, click the link of the corresponding guide. 06:21: You can access the terms of use privacy policy and help in the footer 06:25: in any page in Commons. 06:28: This guide covered how to use Commons.