It is necessary to have your Canvas Gradebook configured properly prior to setting up your Simple Syllabus. In this Guide, we’ll take a look at weighted assignment groups, the assignments within those assignment groups, and the integration with Simple Syllabus.
NOTE: All assignments listed in your Canvas Gradebook are listed on your Assignments index page.
In Canvas, you can create Assignment Groups to group all similarly-typed assignments together. Additionally, you can weight those Assignment Groups (see below) for use in your Canvas Gradebook.
In your Simple Syllabus document for your course, look at the Basis for Final Grade section. The names and percentages listed here should match the Assignment Groups names and weighted percentages in Canvas.
For example, you might have three Assignment Groups for your course: Assignments, Exams, and Discussion Topics. By default, every Canvas course has a minimum of one Assignment Group (called Assignments), but you can re-name all Assignment Groups to meet your course needs.
Creating Additional Assignment Groups in Your Canvas Course
check_box
Enable Assignment Group Weighting
These steps assume that the option to Weight final grade based on assignment groups has been enabled in your course. To verify this, skip to the next section on this page, Verify Weighting. Then, return to this section if you need to add additional Assignment Groups to your course.
In Course Navigation, click the Assignments link.
Click on the ➕ Group button on the upper right corner of your screen.
In the Add Assignment Group window that appears, add a Group Name.
If you are weighting your Assignment Groups, add a number to the % of total grade text box.
Click the Save button.
Your new Assignment Group will be added to the bottom of your Assignments index page.
Once your Assignment Groups have been created, you will want to verify that your Assignment Groups are properly weighted.
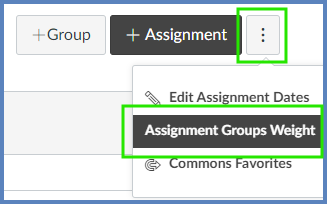
In Course Navigation, click the Assignments link.
Select the Options (three vertical dots) icon on the upper right corner of your screen.
Select Assignment Groups Weight.
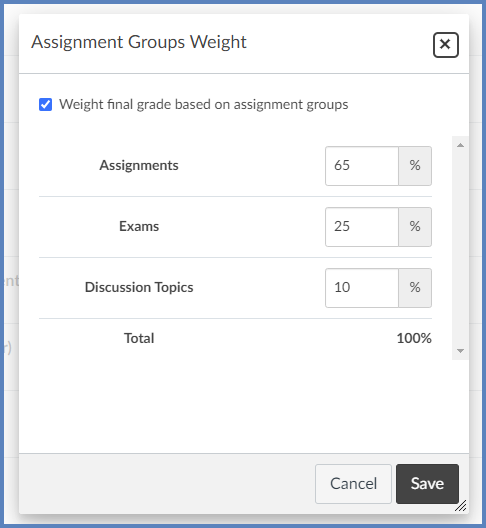
Select the Weight final grade based on assignment groups checkbox (if not selected already).
Verify that the percentages for each of your Assignment Groups adds up to 100%.
Click the Save button.
Each weighted percentage will display on the right-hand side of the Assignment Group name on the Assignments index page.
Verify Assignments
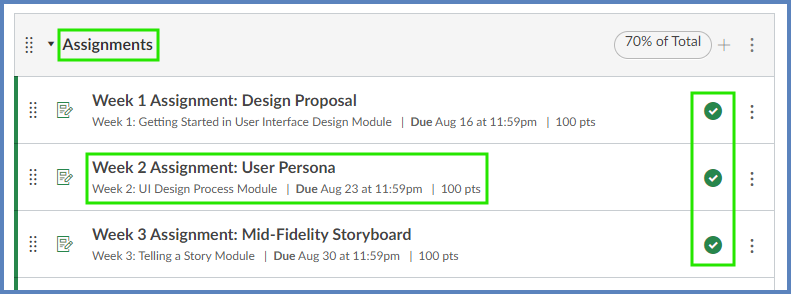
To verify your assignments are set up properly in your Canvas Gradebook:
In Course Navigation, click the Assignments link.
Check that each assignment is:
within the appropriate weighted group.
properly titled, has a due date, and is set to 100 points.
published.
Simple Syllabus
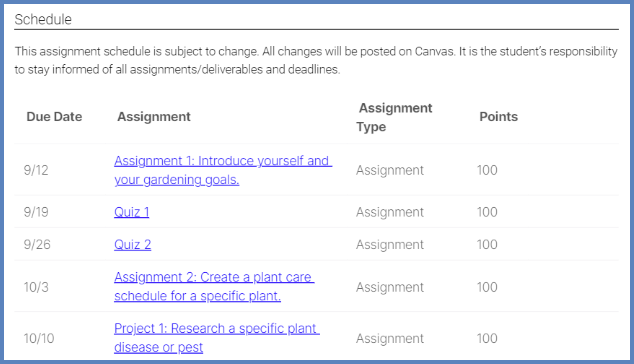
Any changes made to assignments may take up to 24 hours to synchronize with Simple Syllabus. However, we’ve found that Simple Syllabus synchronizes almost immediately with Canvas. The Schedule section of Simple Syllabus will automatically list all assignments and include links to those assignments.
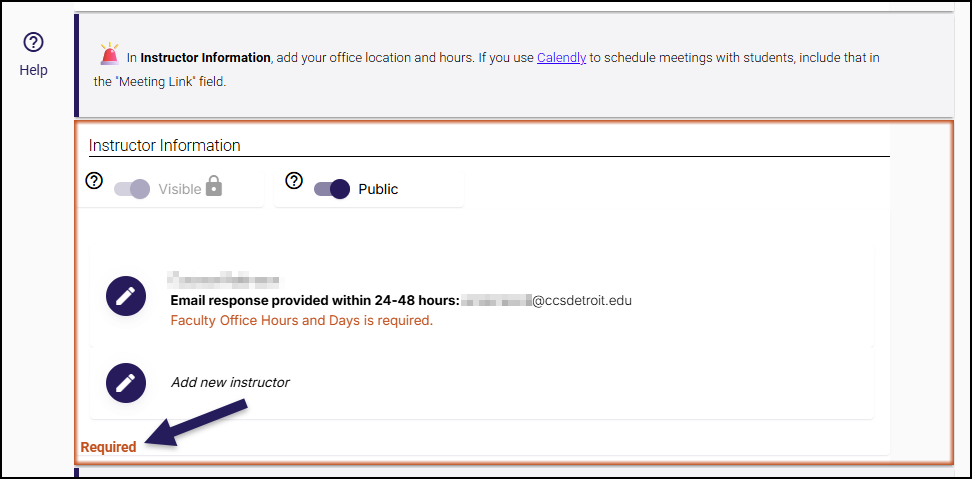
Some Simple Syllabus components are already set by CCS or your department and cannot be edited. Other components (Example: “Instructor Information” shown below) can be edited by faculty.
Once all components are complete, click the Submit button at the bottom of the screen to have it sent for approval by your department. Once approved, students will be able to see your Simple Syllabus in the course navigation of the respective Canvas course.
Note:
Students will only be able to view approved syllabi. If any changes are made and submitted, students will see the previous syllabi until the changes are approved.
Additional Resources
Create Assignment Groups and Add Grade Weights to Canvas
00:07: How do I add an assignment group in a course?
00:10: In course, navigation, click the assignments link?
00:14: Click the add group button.
00:17: Type the assignment group name in the group name, field.
00:20: If you want to, wait the final grade for students using assignment groups, the percentage
00:25: will appear in percent of total grade field.
00:28: Click the save button.
00:31: View your assignment group.
00:33: To manage an assignment group, click the group’s options, drop down menu.
00:38: To edit the assignment group, click the edit link, you can edit the assignment
00:43: group name and the weighted percentage if applicable After
00:47: you’ve added assignments to your assignment group, you can also edit the assignment
00:51: group to set assignment group rules.
00:54: To delete the assignment group, click the delete link.
00:58: To move all content from an assignment group into another group.
01:01: Click the move contents link.
01:05: To move a reorder. An assignment group on the assignments page, click the move
01:09: groups, link,
01:11: If you want to delete an assignment group that has assignments in it, canvas
01:15: will ask you, if you want to delete the assignments, default or movie
01:20: assignments to another group.
01:22: When you are finished, click the delete group button.
01:26: This guide covered how to add an assignment group in a course.
Weight the final course grade based on assignment groups
00:07: How do I weight the final course grade based on assignment groups?
00:11: By default, Canvas calculates the Total grade based on the points possible for a student. Alternatively, you can weigh final grades based on the assignment groups.
00:22: If you are viewing the gradebook, expand the course navigation.
00:26: Navigate to the “Assignments”page of your course.
00:29: Verify that you have assignment groups that match your desired grading categories. If needed, additional assignment groups can be created by selecting the Add Group button.
00:40: Click the Assignments Options icon and select the Assignment Groups Weight option.
00:45: Click the Weight final grade based on assignment groups checkbox.
00:49: Enter the percentage weights for each of the different Assignment Groups. The weights will show up in the Gradebook for both students and instructors. In most cases the Total should equal 100%.
01:01: If using group for Extra Credit, it is best to weigh the group at 0% until the course nears completion. Then the extra credit group weight should be adjusted to the desired percentage of the total grade you want to provide as extra credit. Note that this will result in a total grade greater than 100%.
01:20: Click the Save button.
01:22: To see how the weights affect the Total grade in the course, navigate to the gradebook.
01:27: Confirm the assignment groups are weighted.
01:30: This guide covered how to weight the final course grade based on assignment groups.
00:10: In course, navigation, click the assignments link?
00:14: You can use the drag and drop option to reorder assignments.
00:17: Click the drag handle next to the assignment name.
00:20: Drop the assignment in the desired location by releasing the mouse.
00:33: In the move assignment. Sidebar, click the assignment group drop-down menu.
00:39: Then select the assignment group for the assignment.
00:41: If you want to keep the assignment in the existing assignment group, select
00:45: the existing assignment group name. However, if you want to move
00:49: the assignment into another assignment group, select the new assignment group name,
00:55: In the place, drop-down menu, select the placement of the assignment you are
00:59: moving.
01:01: You can move the assignments so that it is at the top of the section before, or
01:05: after a specific section or at the bottom of the section.
01:09: If you selected the before, or after option, click the third drop down menu.
01:15: Select the assignment that should be before or after the assignment you are moving.
01:21: Click the move button.
01:23: If you want to move all assignments, within an assignment group, click the options,
01:27: icon and select the move contents link.
01:30: In the move contents into sidebar, click the assignment group drop-down
01:34: menu.
01:36: Then select the assignment group choosing a placement for the assignment group.
01:41: Contents will place all contents in the same order as they currently exist in the
01:45: assignment group. After you have moved the contents, you can reorder
01:49: assignments within the assignment group individually.
01:52: In the place drop-down menu.
01:55: Select the placement of the contents you are moving.
01:58: You can move the contents to appear at the top of a new assignment group before
02:02: or after specific items within the selected assignment group or at
02:06: the bottom of the list of items in the selected assignment group.
02:10: If you selected the before, or after option, click the third drop down menu.
02:16: Select the assignment group content item that should be before or after the contents
02:21: you are moving. If you want to move the contents to another location, change,
02:25: the sidebar placement options again.
02:28: Click the move button.
00:10: In course, navigation, click the assignments link?
00:14: You can use the drag and drop option to reorder assignment groups.
00:18: Click the drag handle next to the assignment group name, drop the assignment
00:22: group in the desired, location by releasing the mouse.
00:26: You can also use the move group option to reorder an assignment group.
00:30: Click the options icon and select the move group link.
00:35: In the move assignment group sidebar, click the place drop down menu.
00:40: Select the placement of the assignment group you are moving.
00:43: You can move the group. So it is located at the top of the page before A
00:47: specific group after a specific group or at the bottom of the page.
00:53: If you selected the before or after option, click the second drop-down menu.
00:58: Select the assignment group that should be before or after the assignment group.
01:02: You are moving as indicated by the option selected in the previous menu.
01:07: If you want to move the assignment group to another location, change, the sidebar
01:11: placement options as needed.
01:14: Click the move button.
01:16: This guide covered how to move or reorder an assignment group.
00:07: How do I add or edit details in an assignment?
00:10: In course, navigation, click the assignments link?
00:14: To open an existing assignment. Click the assignment name.
00:18: To create a new assignment with details, click the add assignment button.
00:23: To create an assignment shell, with some details, click the add assignment icon
00:27: within an assignment group. Then open the assignment.
00:32: Click the edit button.
00:34: Type the assignment title in the assignment name field.
00:36: If you created your assignment, as an assignment shell, the assignment name
00:40: field is already populated for you, but you can change it if necessary.
00:45: Use the rich content Editor to add images, text links, equations,
00:50: or insert media.
00:53: Enter the total points possible for the assignment in the points field.
00:57: If you change the points possible for an existing assignment with graded submissions, you
01:02: must regrade the assignment. This warning message applies to any grading
01:06: type with assignment submissions, including changing points from, or to zero.
01:12: Select the assignment group for the assignment and the assignment group drop-down menu.
01:20: In the display grade is drop-down menu, select the method you want to use for grading.
01:25: You can grade your assignment by percentage complete incomplete points.
01:30: Letter, grade GPA scale or set is not graded if
01:34: you display grades as a letter grade or GPA scale, you can also create
01:38: a grading scheme or apply a grading scheme to your assignment.
01:43: By default, the submission type is set to online for creating online assignments.
01:47: To change the submission. Type click the submission, type drop-down menu,
01:53: Select the type of submission you want to except for the assignment.
01:57: No submission is when you do not want students to submit an assignment in canvas, This
02:01: assignment type can be used to create extra columns in the Gradebook or when
02:05: you want to create an assignment that involves multiple scores.
02:09: Submission type does not apply to not graded assignments.
02:13: Online is, when you want students to submit their assignments using canvas through an
02:17: online submission, option. Learn more about creating an online assignment.
02:22: On paper is when you want students to submit an assignment to you, but not through canvas.
02:27: This assignment type applies to traditional face-to-face courses or hybrid
02:31: courses, when you want the assignment turned in during class, but you still want to create
02:35: a column in the canvas, Gradebook for grading purposes.
02:39: External tool is when you want students to submit their assignments, using an external
02:43: app LTI enabled for your course.
02:46: You must enter a URL for the external tool.
02:49: Learn more about adding in assignment using an external application.
02:54: Lucid is when you want students to submit documents through lucidus Suite which
02:58: includes apps such as lucidchart in lucid’s bar.
03:01: If this option does not display contact your customer success manager, Learn
03:06: more about creating a lucid assignment.
03:10: Assignment settings are persistent. They default to the options.
03:13: You used when creating or editing the previous assignment in the course, Based
03:17: on prior assignments, one or more of these options may already be selected for you.
03:23: If you have selected, the online submission type the number of allowed attempts is unlimited
03:28: by default, However, you can limit submission attempts for the assignment.
03:33: As part of an assignment submission canvas, lets you set up an assignment as a group
03:37: assignment. You can also choose to grade students individually in
03:41: group assignments.
03:43: If you want to require students review each other’s work, you can create a peer review assignment
03:48: when requiring peer reviews, you can select whether to manually
03:52: assign peer reviews or automatically assigned peer reviews.
03:57: If you want to set up an assignment with additional reviews, you may be able to enable moderated
04:01: grading, Anonymous grading, or both.
04:04: Moderated grading, allows multiple graders to evaluate a student’s work
04:08: and create provisional grades.
04:11: Anonymous grading hide student names from Raiders when they view assignment submissions
04:16: in speedgrader. These options can be used together or independently.
04:21: If you want to assess submissions with Doc viewer in speedgrader, you can make all
04:25: instructor annotations and comments in docx viewer, supported submissions
04:29: anonymous. To enable Anonymous instructor, annotations
04:33: click the anonymous instructor, annotations checkbox,
04:38: By default canvas will set your assignment dates for everyone in your course.
04:42: You can also assign the assignment to individual students or course sections.
04:47: You can also assign to a group created due date for the assignment in
04:51: the due date field. The due date will already be populated for you
04:55: if you created an assignment shell, but you can change it if necessary, you
04:59: also have the option to add availability dates in the available from and until fields
05:03: to add additional assignments, click the assigned to button.
05:08: To notify users of the assignment, click the notify users that this content
05:12: has changed checkbox. Click the save button.
05:16: This guide covered how to add or edit details in an assignment.
00:07: How do I add or edit points for an assignment?
00:10: In course, navigation, click the assignments link?
00:14: Click the assignments options icon, then click the edit link.
00:19: Edit the points available for the assignment by typing in the points field.
00:24: Click the save button.
00:26: This guide covered how to add or edit points for an assignment.
Publish or unpublish an assignment as an instructor
00:07: How do I publish or unpublish an assignment as an instructor?
00:11: In course, navigation, click the assignments link?
00:15: On the assignments index page, you can view the status of each assignment.
00:20: Green icons indicate the assignment is published.
00:24: Great icons. Indicate unpublished assignments.
00:26: You can change the status of an assignment.
00:29: By toggling the published and unpublished icons,
00:34: To publish an assignment, click the assignments unpublished icon.
00:37: The hover text will confirm, you want to publish the assignment.
00:42: To unpublish an assignment hover over the assignments published icon
00:46: and view, its status If the assignment can be unpublished, the
00:50: hover text will confirm. You want to unpublish the assignment? Click
00:54: the icon to confirm.
00:57: Assignments with student, submissions, cannot be unpublished and the hover
01:01: text will notify you accordingly.
01:04: Within individual assignments, the assignment status is shown next to the assignment
01:08: name.
01:10: To publish an assignment. Click the assignments, published by button.
01:15: The button will change from Gray to Green.
01:18: To unpublish an assignment hover over the published button for the assignment
01:22: and view its status. If the assignment can be unpublished, the
01:26: hover text will confirm, you want to unpublish the assignment and the button will
01:30: change from green to red. Click the button to confirm.
01:35: Assignments with student submissions, cannot be unpublished.
01:39: Students cannot see any of the actions involved with published status such
01:43: as published and unpublished icons and setting icons.
01:47: Students will only see published assignments, which are posted in, great text.
01:53: This guide covered how to publish or unpublish an assignment as an instructor.