IgniteAI Generator for Rubrics

view_headline

Feature Preview

IgniteAI Generator for Rubrics is currently a Feature Preview. This means there may be ongoing updates outside of the regular release schedule.

The IgniteAI Generator for Rubrics allows instructors to generate criteria for a rubric that you can be used as a starting point. Criteria generated from IgniteAI can be edited to fit the needs of the rubric and the assignment.

Enabling IgniteAI Generator for Rubrics

In order to utilize IgniteAI Generator for Rubrics, two Feature Options need to be enabled within your Canvas course(s):

  1. Navigate to your Canvas course.
  2. Click on the Settings course navigation link on the bottom left-hand side of your screen.
  3. Click on the Feature Options tab at the top of the screen.
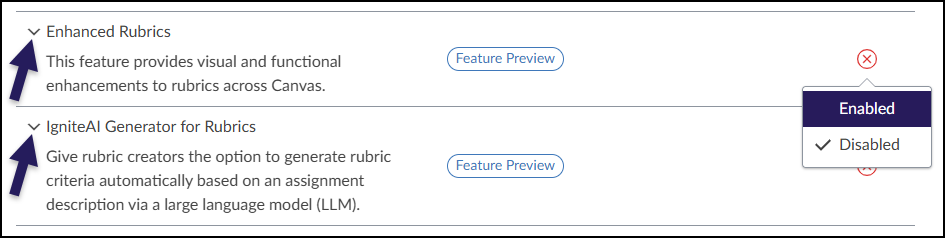
  4. Find the Enhanced Rubrics and IgniteAI Generator for Rubrics Feature Options rows.
    • Optional: Click on the > icon to expand and read the descriptions.
  5. Click on the red ❌ icon, and select Enabled for both Feature Options. A green ✅ checkmark icon will display indicating that the Feature Option has been enabled.
    • There is no Save button on this screen. Any Feature Options you enable or disable here are activated/inactivated immediately.
A screenshot of the Canvas LMS "Feature Options" screen lists two "Feature Preview" items. The first item, "Enhanced Rubrics," is described as providing "visual and functional enhancements to rubrics." A dark purple arrow points to the item's name, and a dropdown menu on the far right is expanded, showing options to "Enable" or "Disable" the feature, with "Disabled" currently checked. The second item, "IgniteAI Generator for Rubrics," is listed below with a description about generating rubric criteria via a large language model. It is marked with a dark purple arrow and a red X icon on the right, indicating it is currently disabled.

Using IgniteAI Generator for Rubrics

Although rubrics are stored on the Rubrics page of your Canvas course, IgniteAI Generator for Rubrics is used in conjunction with the Canvas Assignments page.

Create an assignment in your Canvas course following one of these Canvas guides:

Click on the ➕ Create Rubric button at the bottom of the assignment.

A screenshot of the "Cupcakes Presentation" assignment details page in Canvas showing the assignment description, points, and submission settings. At the bottom left of the interface, below the due date table, a purple arrow points directly to the "+ Create Rubric" button, which sits next to a "Find Rubric" button.

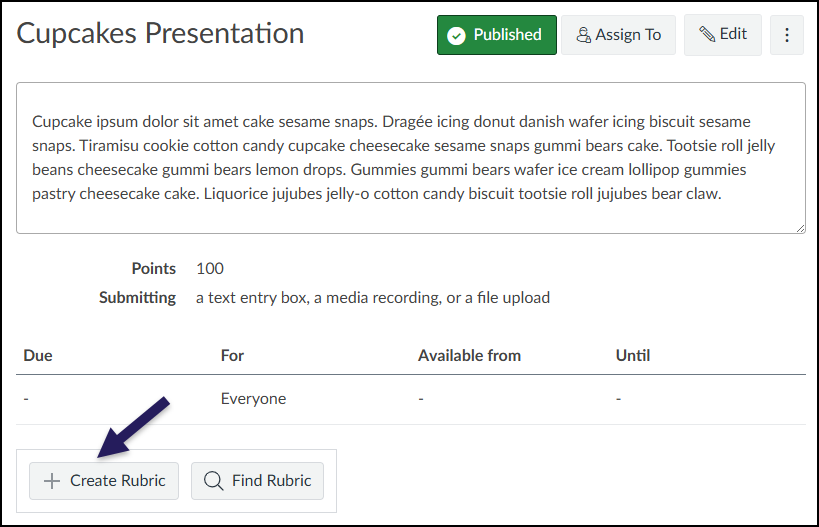
The Create Rubric interface with the IgniteAI Generator for Rubrics displays on the screen.

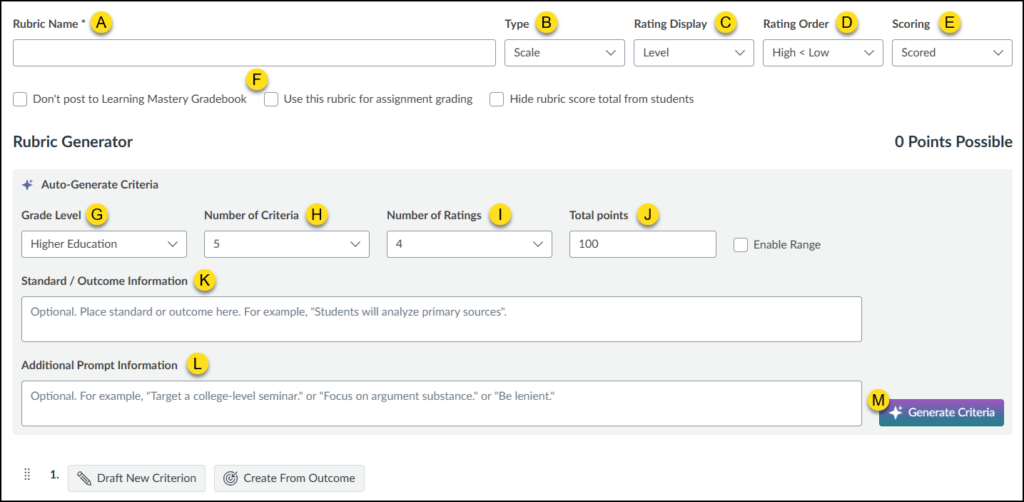
  1. Rubric Name (Required): Enter a name for the rubric.
  2. Type: Select from Scale or Written Feedback.
  3. Rating Display: Select from Level or Points.
  4. Rating Order: Select from High < Low or Low < High.
  5. Scoring: Select from Scored or Unscored.
  6. Use this rubric for assignment grading: Select this checkbox to ensure the rubric is used during grading.
  7. Grade Level: Select from Kindergarten through Higher Education.
  8. Number of Criteria: Select from 2-8.
  9. Number of Ratings: Select from 2-8.
  10. Total points: Enter total number of points for the rubric.
  11. Standard / Outcome Information: Enter standards / outcomes in this text box.
  12. Additional Prompt Information: Enter additional details as necessary.
  13. Generate Criteria: Click this button to have IgniteAI generate criteria for your rubric.
A screenshot of the Create Rubric interface in Canvas featuring the Rubric Generator, with thirteen interface elements labeled A through M. Letter A marks the "Rubric Name" field, while B through E label the dropdown menus for "Type," "Rating Display," "Rating Order," and "Scoring." Letter F highlights the checkboxes for rubric options, such as hiding scores. Under the "Auto-Generate Criteria" heading, letters G through J label the inputs for "Grade Level," "Number of Criteria," "Number of Ratings," and "Total points." Letters K and L mark the text entry boxes for "Standard / Outcome Information" and "Additional Prompt Information," respectively, and letter M points to the "Generate Criteria" button at the bottom right.

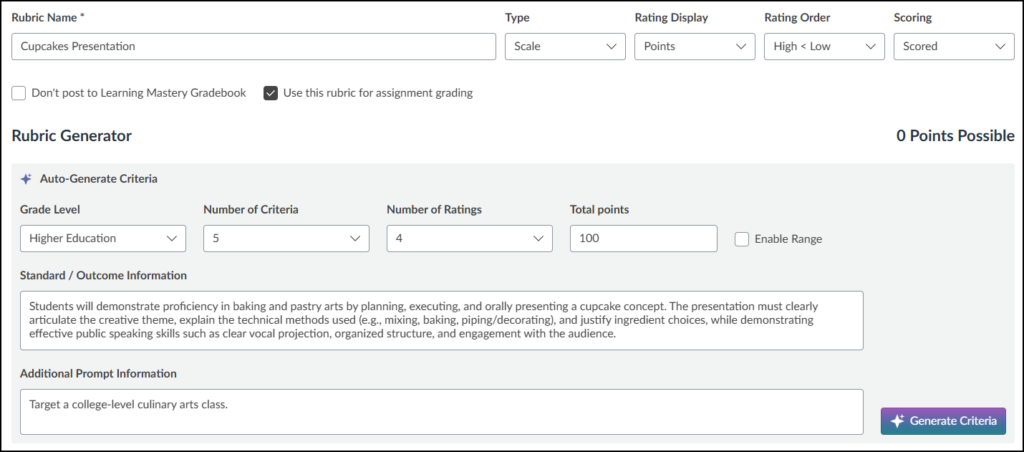
In the following example, a rubric for the Cupcakes Presentation assignment will be generated using IgniteAI.

A screenshot of the IgniteAI Rubric Generator in Canvas populated with settings for a "Cupcakes Presentation" rubric. The form is configured for "Higher Education" with 5 criteria, 4 ratings, and a total of 100 points. The "Standard / Outcome Information" text area contains a detailed prompt requiring students to demonstrate proficiency in baking and pastry arts by planning, executing, and orally presenting a cupcake concept, while the "Additional Prompt Information" field instructs the AI to "Target a college-level culinary arts class" just above the "Generate Criteria" button.

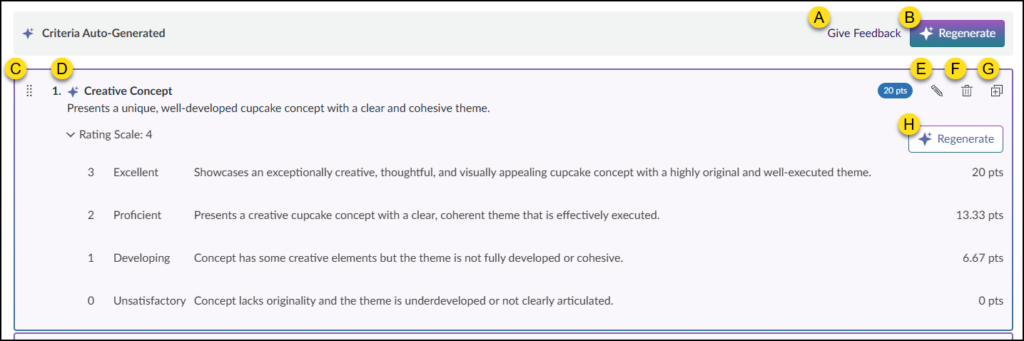
After clicking on the Generate Criteria button, IgniteAI will begin to generate criteria for your rubric based on the options you selected. An example of a single criterion generated by IgniteAI is shown below:

  1. Give Feedback: A link to provide feedback about the IgniteAI tool.
  2. Regenerate: Refine the overall rubric generated by IgniteAI.
  3. Move (eight dot drag handle): Move a criterion up/down in the list.
  4. IgniteAI icon: Indicates the criterion has been generated by IgniteAI.
  5. ✏️ Edit: Edit all details of the criterion.
  6. 🗑️ Delete: Delete the criterion from the rubric.
  7. Duplicate: Make a copy of the criterion.
  8. Regenerate: Refine the specific criterion generated by IgniteAI.
A screenshot of the Canvas interface displaying auto-generated rubric criteria. The header "Criteria Auto-Generated" is followed by top-level controls in the upper right: a "Give Feedback" link labeled A and a global purple "Regenerate" button labeled B. Below this is a detailed criterion box for "1. Creative Concept," labeled D, which includes a description and a drag handle icon labeled C on the far left. The top right of this specific criterion box holds action icons: a pencil icon for edit labeled E, a trash can icon for delete labeled F, and a duplicate icon labeled G. The lower section of the box displays an expanded rating scale with four levels (Excellent, Proficient, Developing, Unsatisfactory) along with their descriptions and point values. A specific "Regenerate" button for just this rating scale section is labeled H on the right side.

Depending on which Regenerate button (B) or (H) is selected, the Regenerate Criteria / Regenerate Criterion window will display on the screen.

A screenshot of the "Regenerate Criterion" modal dialog box within the Canvas interface. The dialog prompts the user with the text, "Please provide more information about how you would like to regenerate the criterion." Below this is a multi-line text input field labeled "Additional Prompt Information," which contains placeholder text giving examples like "Target a college-level seminar" or "Be lenient." At the bottom right of the dialog box are two buttons: a gray "Cancel" button and a purple "Regenerate" button featuring a small star icon.

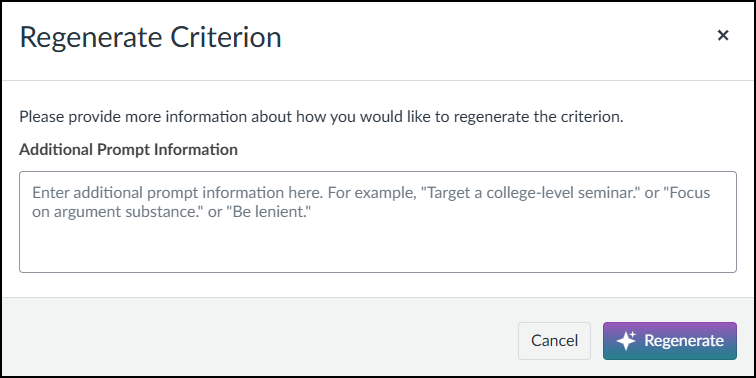
In the Additional Prompt Information textbox, enter additional information to refine the criteria or criterion.

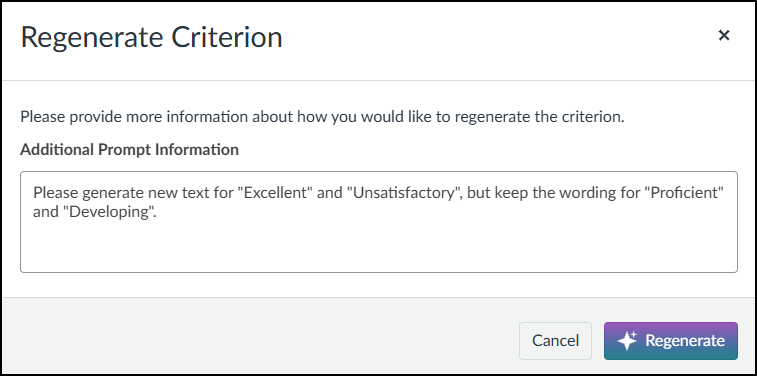
In the below example, the instructor asked IgniteAI to generate two new descriptions for Excellent and Unsatisfactory and not make edits to the descriptions for Proficient and Developing.

A screenshot of the "Regenerate Criterion" modal window in the Canvas LMS. The dialog asks the user to "Please provide more information about how you would like to regenerate the criterion." Below the "Additional Prompt Information" label, a text box contains the user's request: "Please generate new text for "Excellent" and "Unsatisfactory", but keep the wording for "Proficient" and "Developing"." At the bottom right of the window are two buttons: a gray "Cancel" button and a purple "Regenerate" button with a star icon.

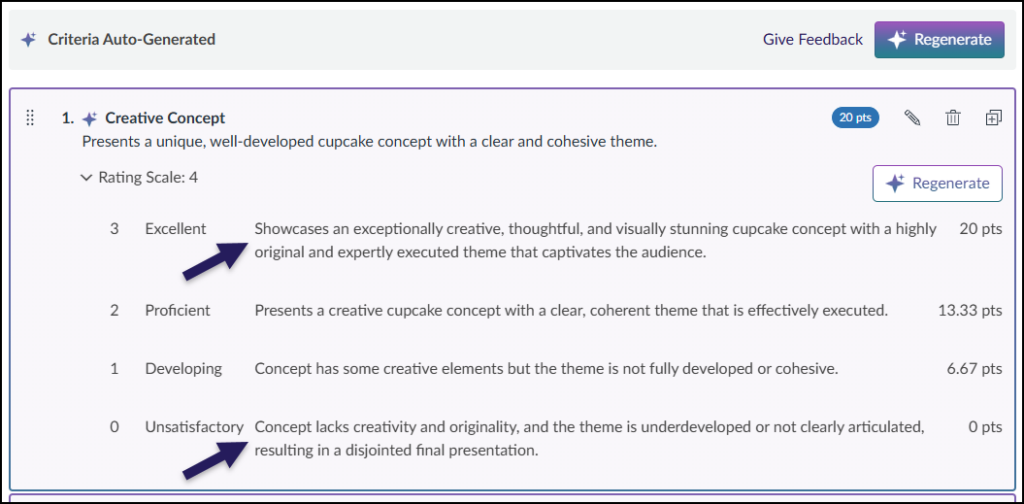
After clicking on the ✨ Regenerate button, IgniteAI will evaluate the additional information provided and display the results. In the below example, the descriptions for Excellent and Unsatisfactory were regenerated by IgniteAI.

A screenshot of a Canvas rubric criterion titled "Creative Concept" with a rating scale of 4. Two blue arrows indicate revised text for the "Excellent" and "Unsatisfactory" ratings, which now read, "Showcases an exceptionally creative, thoughtful, and visually stunning cupcake concept..." and "Concept lacks creativity and originality...", respectively. The descriptions for "Proficient" and "Developing" remain unchanged from the previous version, and the point values for each rating are listed on the right.

Editing a Criterion Created by IgniteAI

Edit any criterion that was generated by IgniteAI by clicking on the ✏️ Edit icon.

The Edit Criterion window will display on the screen. Make any modifications to the criterion that was generated by IgniteAI, and click on the Save Criterion button at the bottom of the screen.

A screenshot of the "Edit Criterion" modal window in the Canvas LMS. At the top, there are text input fields for "Criterion Name," populated with "Creative Concept," and "Criterion Description," populated with its corresponding text. Below this is an unchecked "Enable Range" checkbox and a "Points Possible" field set to "20". A table lists four ratings with editable fields for "Points," "Rating Name" (Excellent, Proficient, Developing, Unsatisfactory), and "Rating Description." Each rating row includes a trash can icon for deletion. At the bottom left, there are "Cancel" and "Save Criterion" buttons.

Saving the Rubric

When you are satisfied with all details of the rubric (name, points, rating scales, etc.), click on the Create Rubric button at the bottom of the screen.

Canvas will attach the rubric to the assignment in your course.

Additional Resources