
Use the following links to jump to specific areas within this guide:
Early student interaction and feedback is critical to student success, and Canvas has tools that can provide metrics on that interaction within the LMS. For in-person students, this could mean having them check the Syllabus for course expectations and Calendar for semester due dates. In an online course, early and ongoing engagement is vital to building meaningful learning experiences and students’ success. Check out the interactive “Blazing New Trails for Online Engagement” for examples in the online environment.
Below are some of the Canvas tools available to you to view student engagement in Canvas.
Course Analytics
Course Analytics provides the following visuals about your course(s) and students:
- Average Course Grades for all of your assignments
- Weekly Online Activity to see page views and participation
- Students to see their current course grade, their percentage of on-time submissions, participations, and page views
- Reports that display missing assignments, late assignments, excused assignments, a class roster, and course activity
- Online Attendance which automatically tracks specific interactions of your students
The easiest way to access Couse Analytics is by going to your Home page of a Canvas course and then clicking on the 📊 Course Analytics button on the right side of your screen.
- Alternatively, the Course Analytics course navigation menu can be enabled on the left side of your screen by going to your course Settings >> Navigation tab. Then, drag the Course Analytics button from the bottom (inactive) list to the top (active) list. See Configuring Course Navigation for more information.

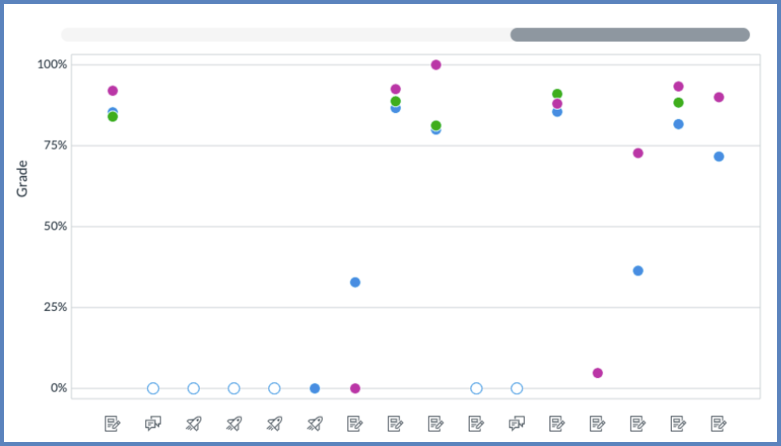
The Course Grade tab will show you the average course grade for various assignments in your course.
Click on any of the dots within the graph to view additional details about the assignment.
Use the “Message Students Who” button to send a message to students who:
- fall within a specific percentage
- have missing work
- have late work

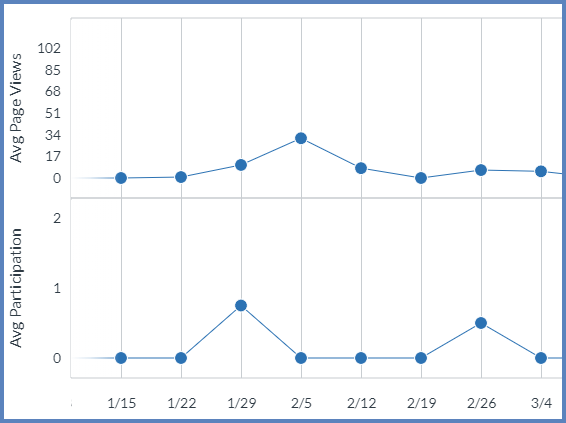
The Weekly Online Activity tab displays average page views, average participation, and a table of resource content in your course (Students, Page Views, and Participations).
Click on any of the dots within the graph to see additional information on page views, participation, and the resources that were viewed.
Use the Message Students Who button to send a message to students who:
- viewed a specific resource
- didn’t view a specific resource
- participated in a specific resource
- didn’t participate in a specific resource

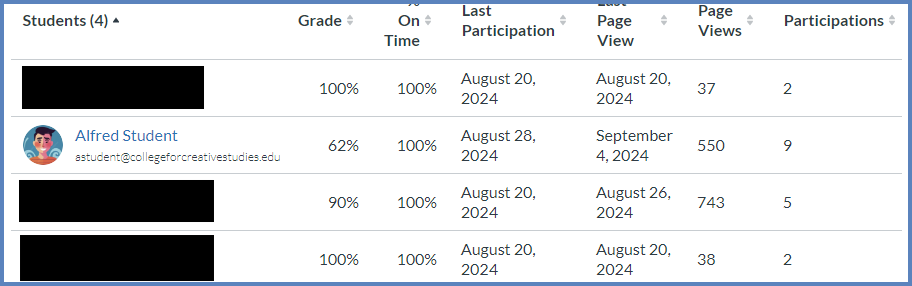
The Students tab will show you a complete listing of all students enrolled in your course. The table also displays:
- a student’s current course grade
- percentage of assignments submitted on time or before a due date
- the date when a student last interacted with the course
- the date when a user last accessed the course
- the count of total page views for a student within the course
- the count of total participations for a student within the course
On this screen, the same options are available for Message Students Who that are available on the Course Grade tab.

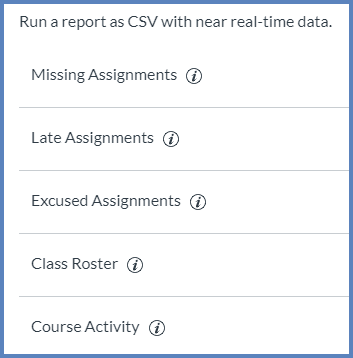
The Reports tab offers five reports that can be run from this screen. After running the report, you can download a CSV file to your computer to look at the data.

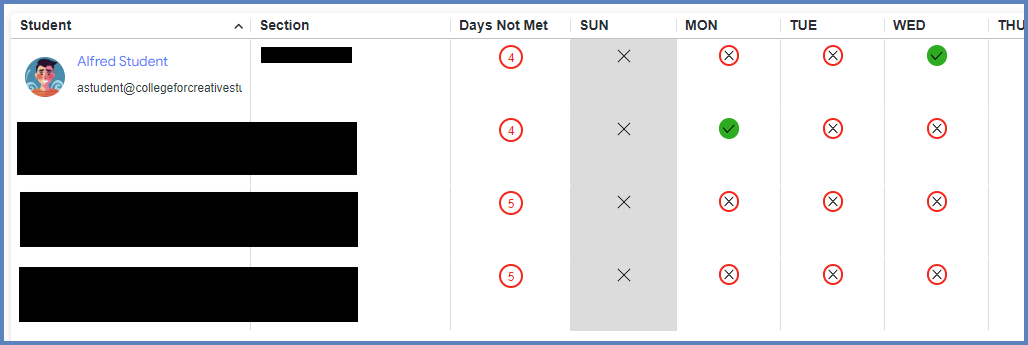
The Online Attendance report helps instructors identify students who may be disengaged or falling behind based on customizable engagement criteria. Criteria include:
- Course Access: student views a page in a course
- Posts: student posts a new comment to an announcement or a discussion
- Assignments: student submits an assignment
- Collaborations: student loads a collaboration to view/edit document
- Conferences: student joins a web conference
- Pages: student creates a page
- Quizzes: student starts taking or submits a classic quiz or submits a classic quiz
If a student meets the requirements of any selected criteria, he/she will be marked as present for that day in the Online Attendance report.
Additional Resources
How do I view Course Analytics in a course as an instructor?
00:07: How do I view new analytics in a course as an instructor? 00:11: In global navigation, click the courses link. 00:15: Then click the name of the course. 00:18: To open new analytics. Click the new analytics Link in course, navigation. 00:24: Or click the new analytics button in the course homepage. 00:28: If the course has been concluded, the analytics page includes a concluded 00:32: label. 00:33: Click the course grade table. 00:36: You can view the overall average course grade. 00:39: Grades on assignments, discussions and quizzes. 00:43: Are compared the average course grades to sections, students or assignments. 00:49: To view the students weekly online Activity. 00:51: Click the weekly online activity table. 00:56: Data is displayed as a chart with two rows average page views. 01:01: And average participation the following actions will generate participations. 01:06: Announcements posts. A new comment to an announcement assignments. 01:11: Submits an assignment collaborations loads, 01:15: a collaboration to view or edit a document conferences. 01:19: Joins a Web Conference discussions posts. 01:23: A new comment to a discussion Pages, creates a page quizzes, 01:28: submits a quiz quizzes, starts taking a quiz. 01:33: Data for the week. That is currently in progress as indicated by a dotted line. 01:39: To download a CSV of the weekly online activity data, click the 01:43: download button. 01:45: To view weekly online activity in a table, click the options icon. 01:51: And select the data table option. 01:54: The data table shows. The weak start date. 01:57: Number of page views. 01:59: And number of participations. 02:02: To view analytics for all students, in your course, click the students tab. 02:07: To view analytics for one student, in your course, click the name of the student. 02:13: To locate a student, you can sort the table by student name. 02:18: Or any other column header? The analytics table is paginated, so 02:22: you can view more students if you continue to scroll to the bottom of the page. 02:27: To view and run reports in your course, click the reports tab. 02:32: To view reports settings, click the settings button, 02:36: Missing assignments. This report will produce a list of assignments that have 02:40: not been submitted yet. 02:42: Late assignments. This report will produce a list of assignments that have 02:46: been submitted late. 02:49: Excused assignments. This report will produce a list of assignments that 02:53: are excused. 02:55: Class roster. This report will produce a list of students enrolled 02:59: in the course with student contact information such as email, sis 03:03: ID, Etc. Report data is up to 40 hours 03:07: delayed. 03:09: Course activity, this report provides a list of daily user interactions. 03:13: In course, resources, where each report entry captures a summary of user 03:18: views and participations. Report data are up to 40 hours, delayed 03:22: account time. Zone is applied to facilitate daily views, and participation 03:26: aggregates. Calendar filter only accommodates for 14 days 03:30: in the past. 03:33: To run a report, click the Run report button. 03:36: If enabled by your institution, you can also view an online attendance report 03:40: that indicates if students have met online, attendance criteria for designated 03:44: Class Days. Online attendance criteria is managed by your 03:48: Institution. 03:50: This guide covered how to view new analytics in a course as an instructor.
How do I view average course grade analytics in an interactive chart graph in Course Analytics?
00:07: How do I view? Average course, grade analytics, in an interactive chart graph in new 00:11: Analytics 00:13: In global navigation, click the courses link. 00:17: Then click the name of the course. 00:20: To open new analytics. Click the new analytics Link in course, navigation. 00:26: Or click the new analytics button in the course homepage. 00:30: Click the course grade table. 00:32: If the course has been concluded, the analytics page includes a concluded 00:36: label. 00:38: The analytics page is dynamic, based on filtered content, by default, 00:42: all results, display, the course average, which cannot be removed. 00:48: You can also view the average grade percentage for all students, which is not affected 00:52: by any filter. 00:54: By default analytics selects all assignment types to display within the 00:58: page. 01:00: Each assignment in the chart displays the appropriate icon for each visible assignment 01:05: type 01:07: To view additional assignments, click and drag the scroll bar. 01:11: To filter by assignment. Type remove the checkbox next to the assignment type. 01:16: The chart dynamically updates, the results based on the assignment type selected 01:20: or removed in the filter. 01:23: For analytical comparisons, you can compare graph data by filtering a 01:27: section student or assignment 01:31: On the students tab, you can also view the specific students that are part of each 01:35: filter. For each student, the table displays the following data. 01:40: Students, a list of students in the course sorted, by last name. 01:46: Crave the current course grade for the student. 01:50: On time the percentage of assignments submitted on or before the due 01:54: date. 01:55: Last participation. The date, the student last interacted with the course, 02:01: Last page view the date. The student last accessed. 02:04: The course. 02:06: Page views. The number of times, the student has viewed the page. 02:12: Participation, the total number of times. 02:14: The student has participated in interactions with the course, 02:19: By default the students table displaced 25 students at a 02:23: time. You can view additional pages in the pagination bar. 02:28: By default the table sorts by last name, first name. 02:32: However, you can sort any column in ascending or descending order by clicking 02:36: The Heading name. The sorted column is indicated by the sort Arrow. 02:42: To send a message to students whose grades are submissions are within specific criteria, 02:46: click the message button. 02:49: To export analytics data, as a CSV file, click the download 02:53: button. CSV data is exported according to the filter 02:57: data. CSV files display a student’s full name sortable, 03:02: name canvas user ID, sis user ID, or 03:06: email. If applicable overall course grade, the percent that 03:10: assignments have been on time the last page view, time, the last participation 03:15: time, and the last time, the student logged out 03:19: This guide covered how to view, average course grade analytics. 03:22: And an interactive chart graph in new Analytics.
00:07: How do I compare the course average chart graph with an assignment section or 00:11: student filter in new Analytics. 00:14: In global navigation, click the courses link. 00:18: Then click the name of the course. 00:21: To open new analytics. Click the new analytics Link in course, navigation. 00:27: Or click the new analytics button in the course homepage. 00:31: Click the course grade table. 00:34: Click, the filter field, type the name of a section student, or assignment 00:38: canvas will populate all matching results. 00:41: When the item displays in the menu, click the item name, You 00:46: can also click the filter field and use the scroll to locate and select a section 00:50: student or assignment. 00:53: To add another filter, locate the additional filter, the filter field 00:57: supports up to three filters. The all sections filter cannot be removed. 01:03: By default analytics selects all assignment types to display within the 01:07: page. 01:09: Each assignment in the chart displays the appropriate icon for each selected assignment 01:13: type. 01:15: To view additional assignments within the filtered results, click and drag the scroll 01:19: bar. 01:21: To filter by assignment. Type remove the checkbox next to the assignment type. 01:26: The chart dynamically updates, the results based on the assignment type selected 01:30: or removed in the filter. 01:33: The added filter displays in the analytics results, each filter is identified 01:38: by a specific color. Each filter displays as a data point within the table 01:43: When viewing filters, the default shape for each color is a circle, but you 01:47: can choose to enable shapes for improved contrast by clicking the chart options 01:51: icon and selecting the display shapes option. 01:55: To view data for a section, click the data point for the section, 02:00: In a section comparison details provided additional metrics for the section 02:04: named assignment. Name. Assignment, due date, average grade 02:08: for the assignment low and high grades by percentage. 02:11: And number of missing in late, submissions, You can hover over 02:15: a percentage bar and view the number of students who achieve each grade percentage. 02:21: To send a message to all students in the section, click the message icon. 02:27: When comparing sections, you can also view, submissions, by status missing 02:31: in late To view the names of students. 02:34: Within each status, click the link for the status 02:38: The card displays the student information for the submission, statuses, including 02:42: the names and last login date for each student. 02:46: To message these students specifically click the message icon 02:51: To export the submission status list as a CSV file click the download 02:55: link. 02:57: To view data for a student. Click the data point for the student. 03:02: In a student comparison details provided additional metrics for the student’s 03:07: full name last access date section, current course 03:11: grade, percentage assignment name and due date the students grade for 03:15: the assignment, the course average percentage and the status of the assignment 03:19: and submission date. 03:22: To send a message to the individual student, click the message icon. 03:27: To export analytics data, as a CSV file, click the download 03:31: CSV button CSV data is exported according 03:35: to the filter data. CSV files display a student’s 03:40: full name sortable, name canvas user ID, sis 03:44: user ID, or email. If applicable overall course grade, 03:48: the percent that assignments have been on time the last page view, time, 03:52: the last participation time, and the last time, the student logged 03:56: out 03:58: This guide covered how to compare the course, average chart graph with an assignment section 04:02: or student filter in new Analytics.
How do I send a message to all students based on specific course criteria in Course Analytics?
00:07: How do I send a message to all students based on specific course criteria, in 00:11: new Analytics? 00:13: In global navigation, click the courses link. 00:17: Then click the name of the course. 00:20: To open new analytics. Click the new analytics Link in course, navigation. 00:26: Or click the new analytics button in the course homepage. 00:30: To view course grade analytics. Click the course grade table. 00:34: Message, recipients are automatically populated based on selected Criterion 00:38: as well as any applied filters. If you want to filter analytics 00:43: for a specific assignment section or student search for and 00:47: select the intended filter in the filter field, 00:51: Then click the message icon. 00:53: The message students who window defaults to the score range Criterion which allows 00:57: you to message students based on a specific current grade percentage range in the course. 01:03: The range field determines the specified percentage range. 01:34: To select a new Range, enter the minimum and maximum current grade percentage 01:38: in the percentage fields. 01:41: The BCC field displays the updated number of students and or sections 01:45: who have great percentages within the specified range. 01:49: The missing and late criteria options. 01:51: Do not include any additional Criterion. 01:54: Selected students are based on submission status and the number of affected 01:58: students displays in the BCC field, Again, any 02:02: filters included in the analytics page. Also display as intended. 02:05: Recipients 02:08: For any Criterion, you can manage the users who will be sent the message if 02:12: needed. Click the link that includes the number of students. 02:17: Then view the expanded BCC field. 02:20: To remove a student from the message. Click the students remove icon. 02:26: To reset student names, back to the originally specified list. 02:29: Click the reset names, linked. 02:32: In the subject field, enter a subject for you message. 02:37: In the message field, enter the description of your message. 02:41: Click the send button. 02:43: This guide covered how to send a message to all students based on specific course 02:47: criteria in new Analytics.
How do I send a message to an individual student in Course Analytics?
00:07: How do I send a message to an individual student in new Analytics? 00:12: In global navigation, click the courses link. 00:16: Then click the name of the course. 00:18: To open new analytics. Click the new analytics Link in course, navigation. 00:24: Or click the new analytics button in the course homepage. 00:28: To view course grade analytics. Click the course grade table. 00:33: In the filter field search for, and select the name of the intended student. 00:38: Then click the message icon. 00:41: In the subject field enter a subject for your message. 00:45: In the message field, enter the description of your message. 00:50: Click the send button. 00:52: This guide covered how to send a message to an individual student in new Analytics.
How do I view weekly online activity analytics in an interactive chart graph in Course Analytics?
00:07: How do I view weekly online activity analytics in an interactive chart graph 00:11: in new Analytics? 00:13: In global navigation, click the courses link. 00:17: Then click the name of the course. 00:20: To open new analytics. Click the new analytics Link in course, navigation. 00:26: Or click the new analytics button in the course homepage. 00:30: Click the weekly online activity table. 00:33: If the course has been concluded, the analytics page includes a concluded 00:37: label. 00:39: The analytics page is dynamic, based on filtered content, by default. 00:43: All sections are displayed in cannot be removed. 00:48: Filter data is displayed as a chart with two rows average page views. 00:54: And average participation. The following actions will generate participations 00:58: announcements posts. 01:01: A new comment to an announcement assignments. 01:03: Submits an assignment collaborations loads, 01:07: a collaboration to view. Edit a document conferences, joins 01:12: a Web Conference discussions posts. 01:15: A new comment to a discussion Pages, creates a page quizzes, 01:19: submits a quiz quizzes. 01:22: Starts taking a quiz. 01:25: Data for the week. That is currently in progress as indicated by a dotted line. 01:31: For analytical comparisons, you can compare graph data by filtering a 01:35: section or student. 01:38: You can also view the amount of page views and participation for a specific resource 01:42: in the course. In the resources tab, you can view the resource 01:46: name. 01:47: The number of students who access the page. 01:51: The number of views for the page. 01:53: And the number of participation for the page. 01:57: To send a message to students who did or did not view or participate with a 02:01: specified resource, click the message button, 02:05: To export analytics data, as a CSV zip file, click the download 02:09: CSV button. CSV data is exported according 02:13: to the filter data. The downloaded zip file includes CSV 02:18: files for chart data student table data and resources table 02:22: data. CSV files May display a student’s. 02:25: Full name sortable name Week start filters average 02:30: and total page views, average and total participation and the 02:34: resource. 02:36: This guide covered out of you weekly online activity analytics in an interactive 02:40: chart graph in new Analytics.
00:14: In global navigation, click the courses link. 00:18: Then click the name of the course. 00:20: To open new analytics. Click the new analytics Link in course, navigation. 00:26: Or click the new analytics button in the course homepage. 00:30: Click the weekly online activity table. 01:40: The last time analytics were updated. 01:43: The current filter View. 01:48: Total participation. 01:50: And the student and resources table. 01:53: To download a CSV of the data, click the download CSV link.
00:07: How do I send a message to all students based on specific course? Participation 00:11: criteria in new Analytics. 00:14: In global navigation, click the courses link. 00:18: Then click the name of the course. 00:21: To open new analytics. Click the new analytics Link in course, navigation. 00:27: Or click the new analytics button in the course homepage. 00:31: To view course grade analytics. Click the course grade table. 00:50: Click the message icon. 01:26: To select a new resource. Choose a resource from the resource drop-down menu. 01:31: The BCC field displays the updated number of students and or sections 01:35: who have viewed, the specified resource 02:00: For any Criterion, you can manage the users who will be sent the message if 02:04: needed. Click the link that includes the number of students then 02:08: view the expanded BCC field. 02:12: To remove a student from the message, click remove icon next to the student’s 02:16: name. 02:18: To reset student names, back to the originally specified list. 02:21: Click the reset names, linked. 02:25: In the subject field enter a subject for your message. 02:29: In the message field, enter the description of your message. 02:33: Click the send button. 02:35: This guide covered how to send a message to all students based on specific course. 02:40: Participation criteria in new Analytics.
00:07: How do I send a message to an individual student? Based on specific course, 00:11: participation criteria in new Analytics 00:14: In global navigation, click the courses link. 00:18: Then click the name of the course. 00:21: To open new analytics. Click the new analytics Link in course, navigation. 00:27: Or click the new analytics button in the course homepage. 00:31: Click the weekly online activity table. 00:35: In the filter field search for, and select the name of the intended student. 00:40: Then click the message icon. 00:43: Select a participation status to message the student about 00:47: In the resource, drop-down menu, select all a specific resource. 00:53: In the subject field enter a subject for your message. 00:57: In the message field, enter the description of your message. 01:01: Click the send button. 01:03: This guide covered how to send a message to an individual student based on specific 01:07: course. Participation criteria in new Analytics.
How do I view and download reports in Course Analytics?
00:07: How do I view and download reports in new Analytics? 00:10: In global navigation, click the courses link. 00:14: Then click the name of the course. 00:17: To open new analytics. Click the new analytics Link in course, navigation. 00:23: Or click the new analytics button in the course homepage. 00:27: Click the reports tab view the new analytics reports. 00:30: The following reports are available. 00:34: Missing assignments a list of assignments that have not been submitted yet. 00:39: Late assignments, a list of assignments that have been submitted late. 00:45: Excused assignments. A list of assignments that are excused. 00:50: Class roster a list of students enrolled in the course or section with 00:54: student contact information such as email and sis ID. 00:59: Course, activity a list of daily user views and participations. 01:04: To view more information about the report, click the information icon. 01:10: To open and configure a report, click the Run report button for the corresponding 01:14: report. 01:16: To add a filter for the report, click the add filter button. 01:21: Click the filter by drop-down menu and select filters for the report. 01:26: To remove a filter, click the delete button. 01:30: To run the report and download the CSV file. 01:32: Click the Run report button. 01:35: Locate the CSV file for the report to open and view the report. 01:40: View the report. 01:43: To view the online. Attendance report, click the online, attendance tab. 01:48: This guide covered how to view and download reports in new Analytics.