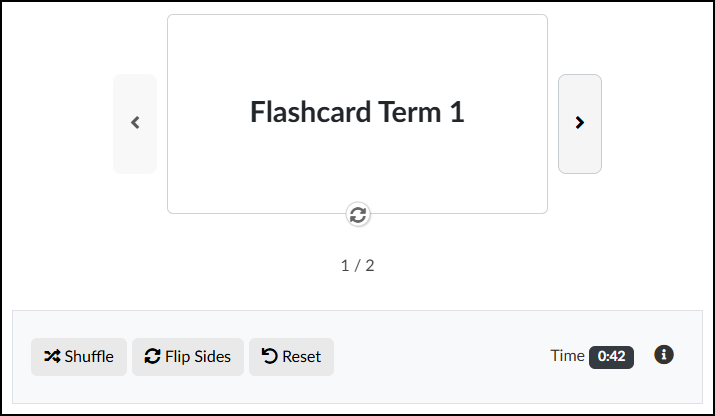
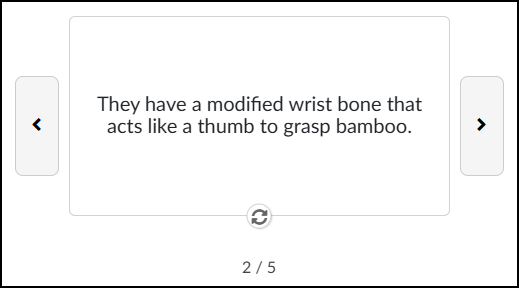
You can create Flashcards on any content page of your Canvas course using the the DesignPLUS Sidebar. Students can use the arrow icons to move from Flashcard to Flashcard. Use the 🔄️ circular arrows icon to flip the Flashcard over to the other side.
Some use cases of Flashcards may include (but are not limited to):
- Vocabulary and Language Learning: They are perfect for pairing a word in a new language with its native translation, or for learning complex jargon in fields like medicine or law.
- Memorizing Factual Data: If an answer is absolute and unchanging, it belongs on a Flashcard. This includes historical dates, geographical locations, state capitals, and the periodic table.
- Formulas and Equations: Flashcards are excellent for drilling math, physics, or chemistry formulas so that you can recall them instantly during an exam.
- Self-Testing: Using Flashcards helps you quickly identify your knowledge gaps. If you flip the card and don’t know the answer, you immediately know where to focus your study time.
- Adding Flashcards to a Content Page
- Design Assistant Panel
- Content Panel
- Style Panel
- Advanced Panel
- Additional Resources
Adding Flashcards to a Content Page
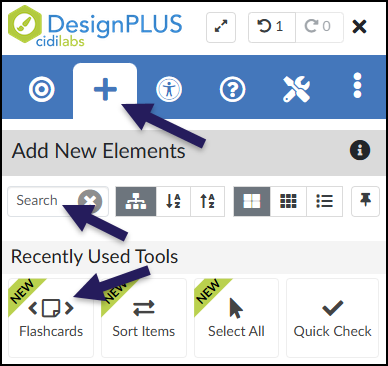
While editing content in your Canvas course, launch the DesignPLUS Sidebar by clicking on the 🚀 rocket ship icon at the top right corner of the screen.
- Alternatively, press Alt/Option + Shift + D on your keyboard.
Place your cursor in the RCE (Rich Content Editor) where you want to add the Flashcard interface.
In the DesignPLUS Sidebar, click on the ➕ Add New Elements tab.
Click the Flashcards button (found under the Interactive Exercises or Recently Used Tools headings).
- Alternatively, use the Search textbox to search for Flashcards. DesignPLUS will show results in real-time. Click the ✖️ icon to clear your search.
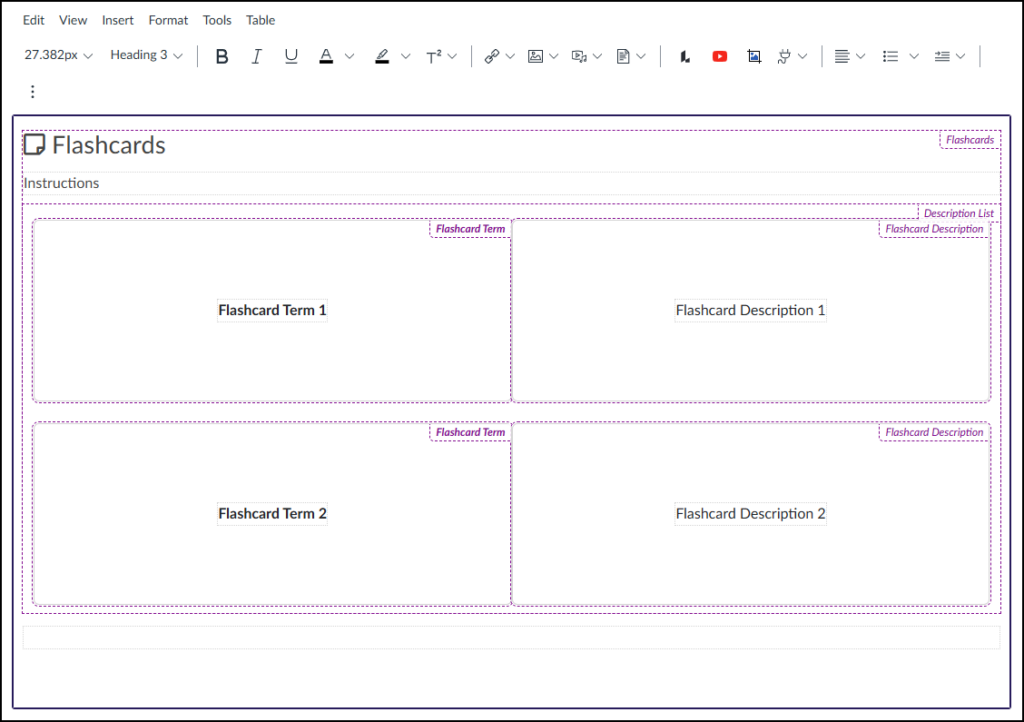
After clicking on the Flashcards button, that interface will be added to the RCE.
- While editing your content page, the Flashcards interface may not look exactly like what you and your students will see after the page is saved. This is by design.
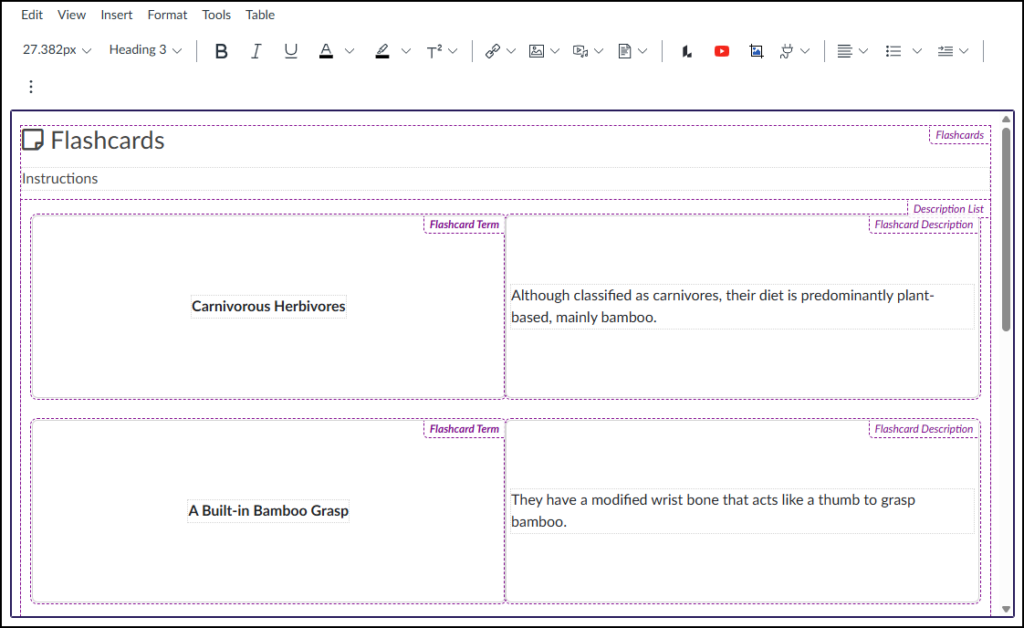
To edit the front side of your Flashcards (Example: Flashcard Term 1, Flashcard Term 2), refer to the section on Content Panel in this guide.
To edit the back side of your Flashcards (Example: Flashcard Description 1, Flashcard Description 2), place your cursor in those areas within the RCE, and make edits as needed.
Design Assistant Panel
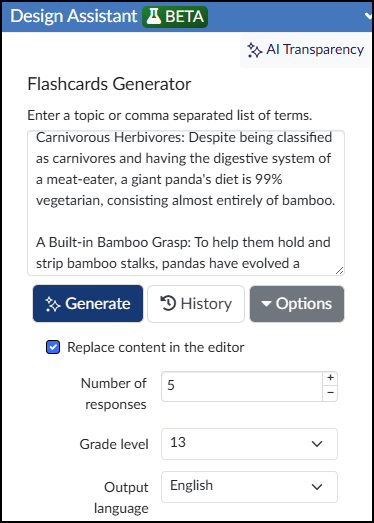
The Design Assistant is currently a beta tool in the DesignPLUS Sidebar. It uses AI (Artificial Intelligence) to generate content that can be inserted into Flashcards. An ✨ AI Transparency link provides additional details and a link to How is Cidi Labs approaching the use of AI?.
After adding Flashcards to your content page, if you do not see the Design Assistant panel within the DesignPLUS Sidebar, you will need to enable beta tools in your Sidebar.
Within the Design Assistant panel, you can use the following tools to set up your Flashcards:
- Topic Input: Enter a single topic or a comma-separated list of terms into the text box.
- ✨ Generate: Click this button to create your Flashcard content based on your input.
- History: View a time-stamped log of your previously generated AI content.
- Options: Adjust your output settings, including the Number of responses, Grade level, Output language, and whether to Replace content in the editor.
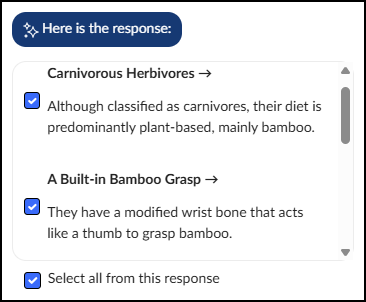
After the Design Assistant generates your content, you can choose exactly what gets added to your Flashcards:
- To pick specific items: Place a ☑️ checkmark next to the individual results you want to use.
- To use everything: Place a ☑️ checkmark next to Select all from this response to include the entire batch.
Once your Flashcards are generated, you have three options:
- Add Flashcards: Inserts the generated content directly into the RCE.
- Start Over: Clears the current results so you can begin a new prompt.
- Refine results: If you want to adjust the current content, type your feedback into the text box, and click ✨ Refine to generate updated text.
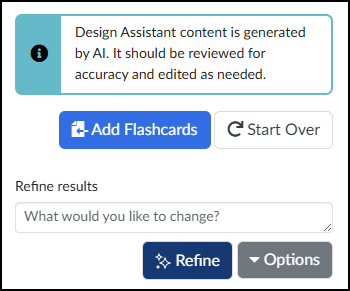
After clicking on the Add Flashcards button, the AI-generated content will be added to the RCE.
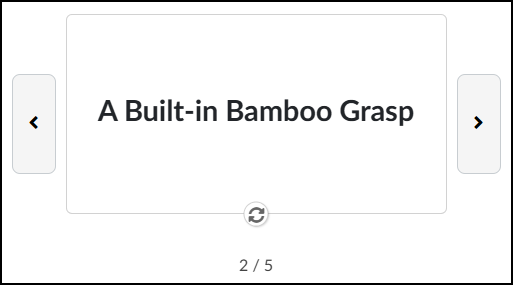
When students view the Flashcards, the interface provides simple, interactive controls:
- Flip the card: Click the 🔄️ circular arrows icon at the bottom center to reveal the other side.
- Navigate the deck: Click the
<or>buttons to move to the previous or next Flashcard.
Content Panel
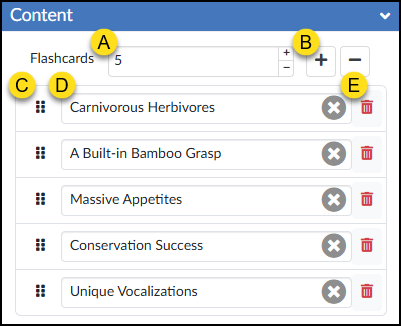
The Content panel allows you to edit certain properties of your Flashcards.
- Flashcards: Type a number in the textbox to increase/decrease the number of Flashcards in your set, and press Enter. Increase/Decrease the number of Flashcards using the ➕ / ➖ buttons.
- ➕ and ➖: Add or remove a Flashcard.
- ⁝⁝ Move: Click and drag the six vertical dots to move a Flashcard item up/down.
- Text: Update the Flashcard name text, or click the ✖️ icon to clear the text completely.
- 🗑️ Delete: Remove a Flashcard.
Style Panel
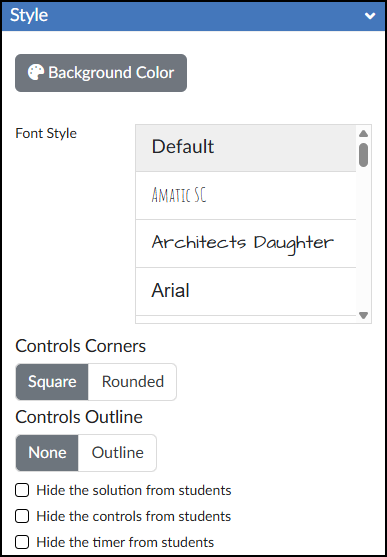
The Style panel of the Flashcards tool allows you to customize the look of your Flashcards.
- 🎨 Background Color: Set the background color displayed behind the possible answers in your Flashcards activity.
- Font Style: Select a font style for your Flashcards.
- Controls Corners: Choose Square or Rounded corners for the control bar at the bottom of the activity (which houses the Shuffle, Flip Sides, and Reset button, and timer).
- Controls Outline: Select Outline to add a border around the entire Flashcards interface and the bottom control bar, or select None to leave it borderless.
- ☑️ Hide the solution from students: Check this box to prevent the “Solution” button from appearing after students check their answers. Works in conjunction with the Input Check option in the Advanced panel.
- ☑️ Hide the controls from students: Check this box to hide the Shuffle, Flip Sides, and Reset buttons, and timer entirely.
- ☑️ Hide the timer from students: Check this box to hide only the timer in the bottom right corner of the activity.
Advanced Panel
The Advanced panel contains additional settings for your Flashcards that can modify the way your Flashcards function for your students.
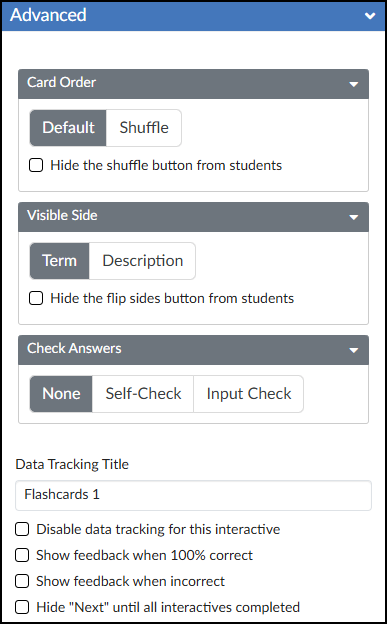
- Card Order: Select between Default and Shuffle. Optionally, you may ☑️ Hide the shuffle button from students.
- Visible Side: Select between Term and Description. Optionally, you may ☑️ Hide the flip sides button from students.
- Check Answers: Select among None, Self-Check, and Input Check.
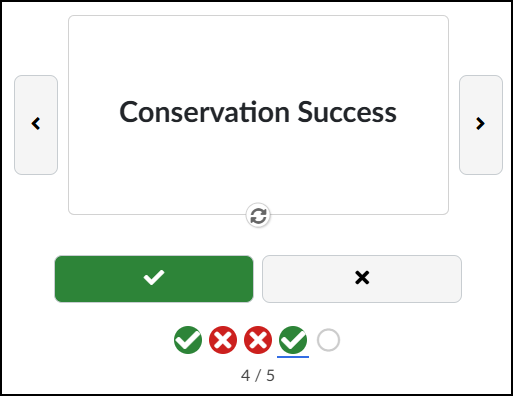
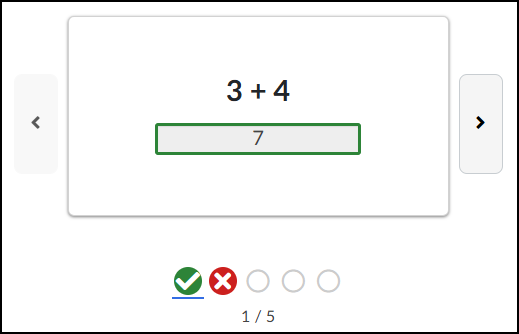
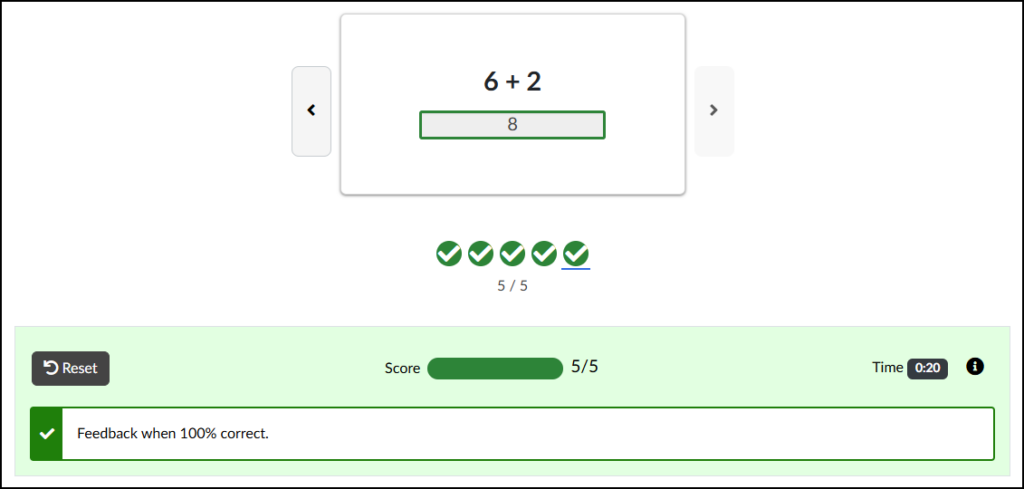
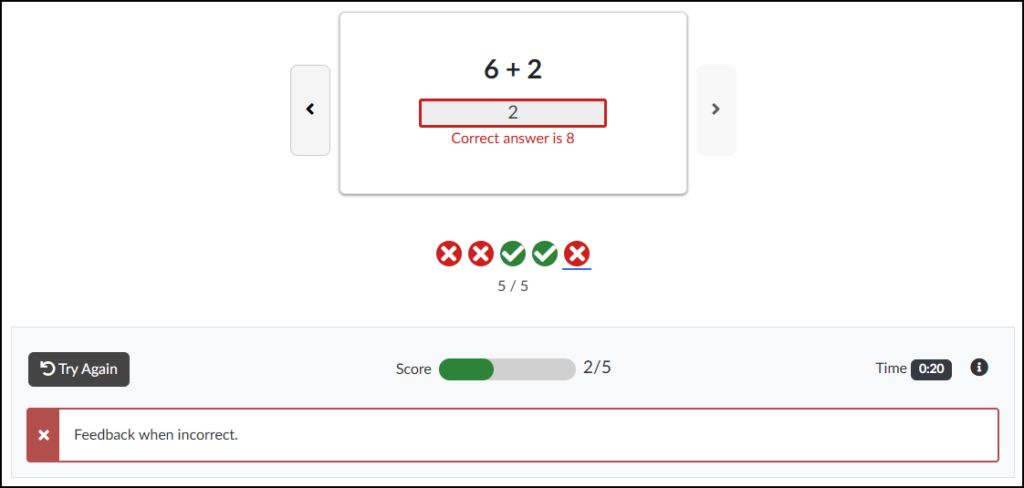
The Self-Check interface adds ✔️ (correct) and ❌ (incorrect) buttons below each Flashcard. As students test their knowledge, they can click the appropriate button to track their accuracy. Their overall progress is displayed directly below these buttons.
Important Note: Self-Check Flashcards are strictly for practice and do not integrate with the Canvas Gradebook.
- Data Tracking Title: Enter a custom name to track anonymous usage data for this specific activity. (Review the DesignPLUS Interactive Data guide for more information.)
- ☑️ Disable data tracking for this interactive: Check this box to opt out of collecting anonymous usage data for this specific tool.
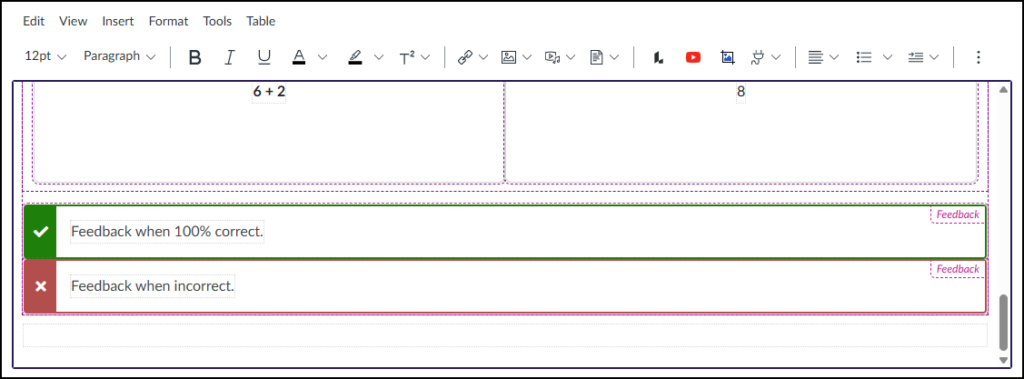
- ☑️ Show feedback when 100% correct: Check this box to provide a custom success message. Selecting this adds a green placeholder box in the Rich Content Editor (RCE) where you can type your feedback.
- ☑️ Show feedback when incorrect: Check this box to provide a custom “try again” message. Selecting this adds a red placeholder box in the RCE where you can type your feedback.
- ☑️ Hide “Next” until all interactives completed: Check this box to hide the Canvas “Next” button at the bottom of the page until the student successfully completes the activity.
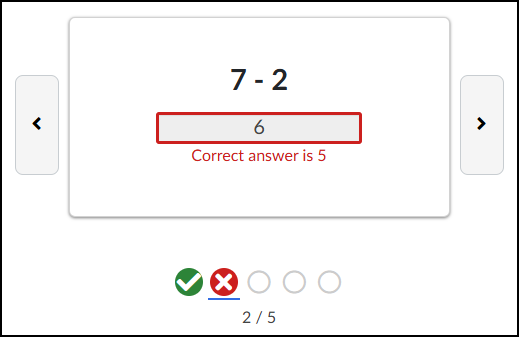
From a student perspective, correct or incorrect feedback will look similar to the following:
If a student does not get all questions correct, he/she will see your custom feedback message in a red area below the Flashcards.
A Try Again button returns all questions as unanswered. It does not keep track of questions that were answered correctly.
Additional Resources
Portions of this guide were created in collaboration with generative AI to brainstorm and refine ideas and grammar.