In Cidiscape, Quick Views are like “favorite” views of columns you frequently use to view course data. Quick Views can be saved so that you don’t have to re-create them over and over again. Quick Views settings (not the actual data) can also be shared with others.
In Cidiscape, the concept of Quick Views and Batches [see Adding Batches in Cidiscape (for Department Chairs and Program Managers)] can be confusing. Think of it like this:
- Batch: The “Who” (The actual list of courses being scanned).
- Quick View: The “What” (A saved filter that determines which columns of data you see for those courses, such as “Accessibility Scores” or “DesignPLUS Usage”).
The “Lens” Analogy
Think of the Batch as the Landscape (the courses you are looking at) and the Quick View as the Binoculars (the specific lens you use to look at them). You can switch your binoculars (Quick View) to look for different things without ever leaving the landscape (Batch).
- Quick View Use Cases
- Accessing Cidiscape within Canvas
- Accessing Quick Views within Cidiscape
- Creating Quick Views and Filters within Cidiscape
- Applying a Quick View to a Batch
Quick View Use Cases
Instructor Design Adoption & Ownership Quick View
This Quick View is designed for Department Chairs or Program Managers who need to track which instructors in their department are effectively utilizing the DesignPLUS tools and to ensure that courses are correctly mapped to a specific Team (or department sub-group) for organizational clarity.
| Column Name | Metric Focus | Rationale |
|---|---|---|
| Team | Organizational Mapping | Crucial for the manager to verify the course is correctly categorized under their team/department. |
| Instructor | Personnel Accountability | Identifies the individual faculty member responsible for the course. |
| DP: Content (%) using DesignPLUS | Overall Adoption Rate | Provides a single, simple metric for tracking the instructor’s general use of the tool. |
| DP: Content (%) using DesignPLUS v2 | Latest Version Encouragement | Tracks the adoption of the current tool version, which is often a goal for institutional support. |
Instructor Accountability & Engagement Audit
Scenario:
The Vice Provost’s office wants a clear report on which departments and instructors are actively engaging with the accessibility tools (UDOIT) provided, and which are lagging behind. They are auditing all courses that have been active for at least two months.
The Goal of the Analysis:
To generate a data set that shows:
- Which courses have a large number of fixed issues (High Engagement).
- Which courses have been scanned recently but show little to no activity (Low Engagement/High Risk).
- The volume of issues requiring manual review (Manual Workload).
The “Quick View” Setup (e.g., “UDOIT Accountability”):
This view focuses heavily on the progress and activity metrics you provided:
| Column Category | Actual Column Name | Purpose in Analysis |
|---|---|---|
| Canvas Data | Course Name | Identification. |
| Canvas Data | Instructor Name | Target for praise or outreach. |
| Activity/Progress | UDOIT: Last scan date | Measure of currency/recency. |
| Summary | UDOIT: Error count | Scale of the problem. |
| Activity/Progress | UDOIT: Issues fixed | Automated fixes made by UDOIT or the instructor. |
| Activity/Progress | UDOIT: Issues manually resolved | Issues requiring instructor effort (e.g., writing alt text). |
| Activity/Progress | UDOIT: Issues manually resolved (%) | Percentage of manual issues addressed—a key metric for effort. |
| Specific Issue | PDF issues | Often requires significant manual work or replacement. |
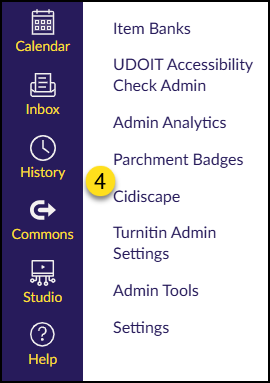
Accessing Cidiscape within Canvas
- Log in to your Canvas account via the CCS Access Manager.
- From the Canvas Dashboard, click on the Admin icon on the left-hand global navigation menu.
- From the slide-out menu that appears on the left side of your screen, select a sub-account (Example: FILM, LIBERAL ARTS, TRANSPORTATION DESIGN, etc.)
- Find and click on the Cidiscape link on the left side of your screen.
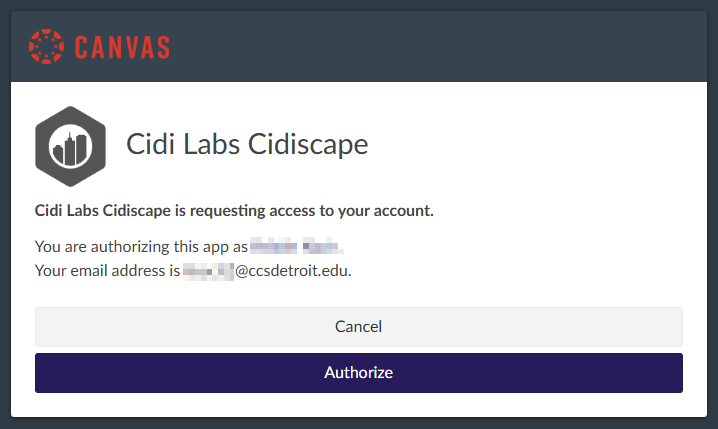
If this is your first time accessing Cidiscape, you will see a screen asking you to authorize your account. Click the Authorize button to continue.
Accessing Quick Views within Cidiscape
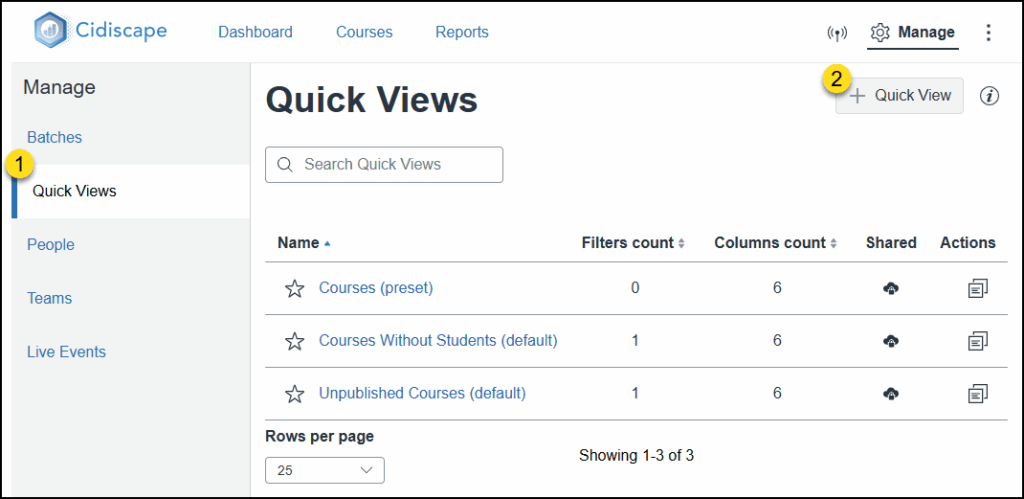
From the Cidiscape Welcome, Dashboard, Courses, or Reports screen, click on the ⚙️ Manage link at the top right corner of the screen.
- Click on the Quick Views link under the Manage heading.
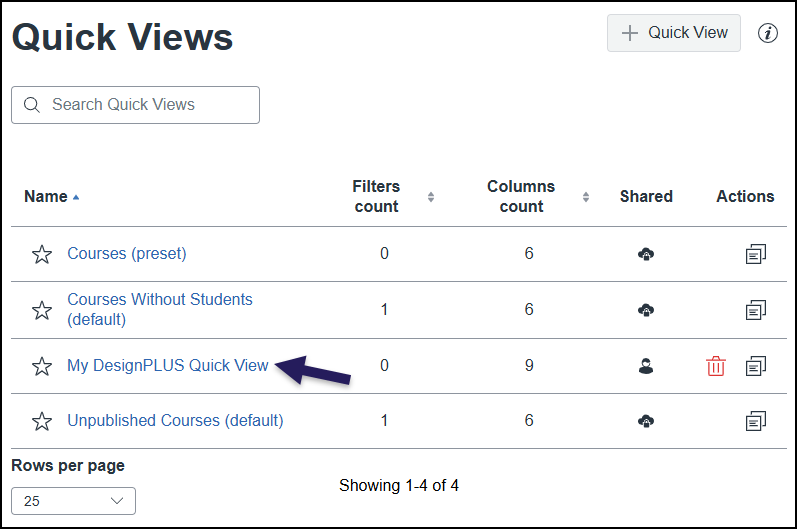
The Quick Views screen will display showing a table with the Name of currently available Quick Views, the Filter count, Columns count, a Shared icon, and an Actions icon. You can also click on the ⭐ star icon next to a Quick View name to mark it as a favorite. Clicking on the name of a Quick View in the table shows you the columns used in that Quick View and their column order.
- Click on the ➕ Quick View button
Creating Quick Views and Filters within Cidiscape
Cidiscape allows you to create Quick Views with and without filters which help to narrow down your list of courses that will be displayed in your Quick View. In this guide, we’ll first look a creating a Quick View, and then we’ll look at creating a Filter.
Creating a Quick View
On the New Quick View screen:
- Enter a Name for your new Quick View in the Enter Quick View Title text box.
- Optional: Click on the Share toggle switch to share your Quick View settings (not the data) with others. Additional information about the Share toggle switch can be found by clicking on the ℹ️ Information icon.
- Optional: Click on the Save as Favorite toggle switch to save your Quick View as a favorite.
- Optional: Under the Column Order heading, click and drag the eight vertical dots icon up/down to re-arrange any of the columns currently listed on the screen.
- Optional: Click the 🗑️ Delete icon to remove a column from the currently displayed Column Order.
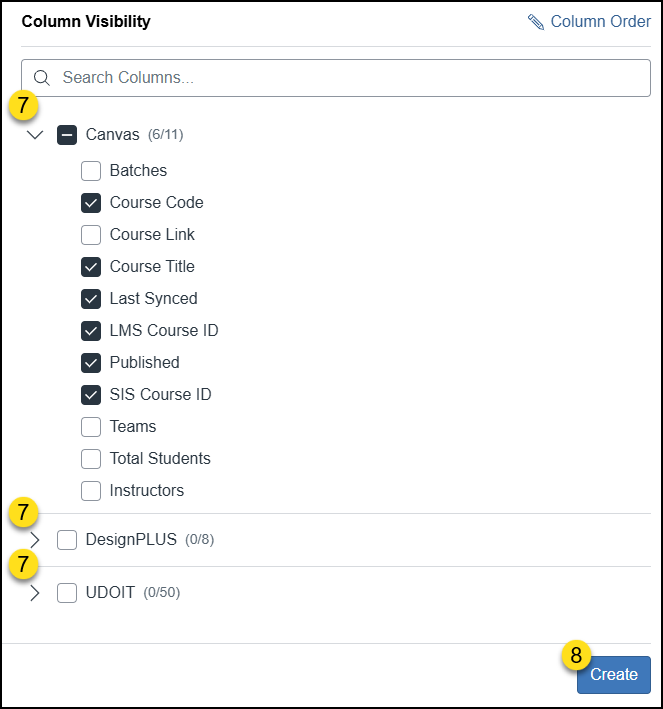
- Click the ✏️ Column Visibility link to add/remove columns to your Quick View.
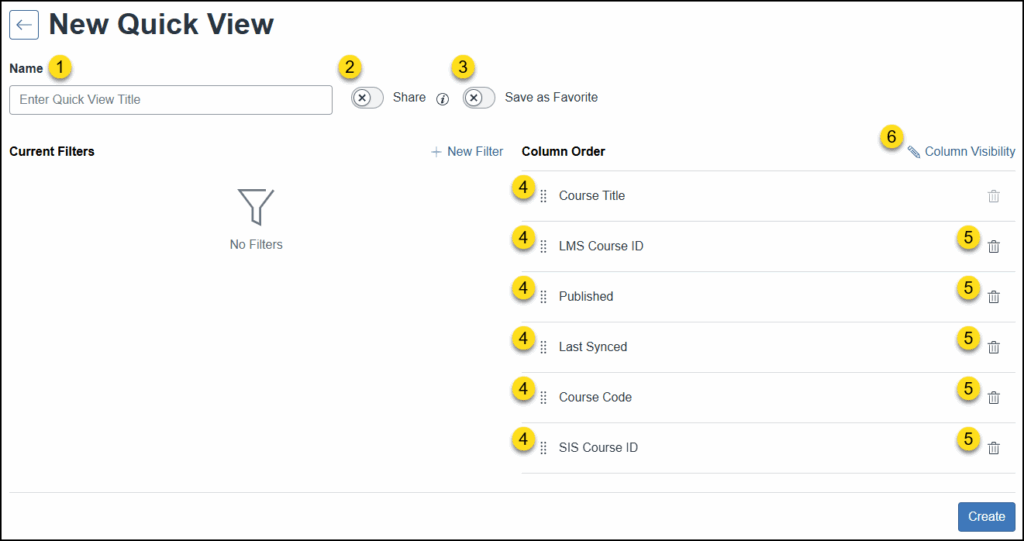
- Click on the Expand/Collapse arrows next to the group headings (Canvas, DesignPLUS, and UDOIT) to view additional column options. Add or remove a ✅ checkmark next to any column name that you would like to include in your Quick View.
- Click the Create button to save your new Quick View.
Once your new Quick View has been created, it will display on the Quick Views screen within the table.
- The ⭐ star icon may already be filled in if you enabled the toggle switch (Step #3 above) for it.
- The Filters count column displays the number of filters that have been applied to the Quick View.
- The Columns count column displays the number of columns you’ve selected for your Quick View.
- For Quick Views that you have created, the Shared column will display one of two icons depending on if you enabled the Share toggle switch (Step #2 above). Hover over the icon to learn more about it.
- Click on the🗑️ Delete icon to delete your Quick View.
- Click on the Duplicate (Copy) icon to make a copy of any Quick View.
Creating a Filter
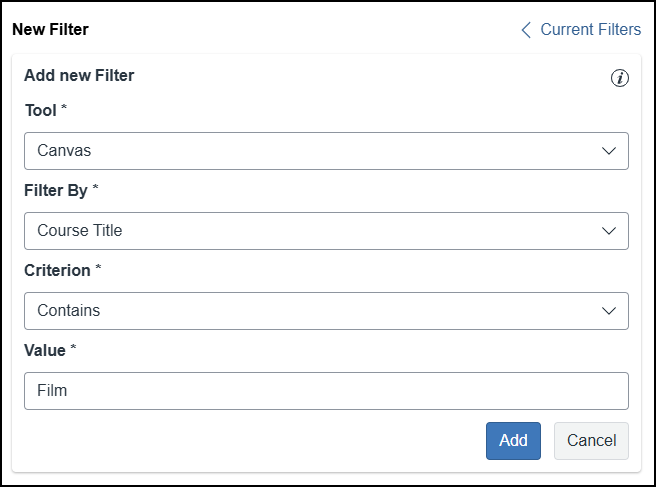
One or more filters can be created for a single Quick View. You can create a filter at the same time you are creating your Quick View. But, you can also add a filter to a Quick View at a later time by clicking on the name of your Quick View. In either scenario, click on the ➕ New Filter link.

The below screenshot is an example of a filter that could be created for a Quick View. Based on the selection you choose from the Tool drop-down list, the drop-down lists below it will change. Continue selecting criteria for your filter, and click the Add button when finished.
- If you were to later edit a filter, the Add button is replaced with an Update button.
Applying a Quick View to a Batch
In Adding Batches in Cidiscape (for Department Chairs and Program Managers), you learned how to create a Batch in Cidiscape. Now it is time to apply a Quick View to that Batch.
Make sure that you are on the Courses tab of Cidiscape.
- Under Filter by Batch, use the Select Batches drop-down list to select the name of the batch you want to look at.
- Under Apply a Quick View, use the Courses (present) drop-down list to select a Quick View to apply to your Batch.
- Quick Views in this drop-down list are organized by My Quick Views, Cidi Labs Quick Views, and Shared Quick Views.
