
- Creating a Group Set
- Assigning Students to Groups in a Group Set
- Assigning Group Sets to Discussion Topics and Assignments
- Additional Resources
Groups in a Canvas course can be a powerful way for students to work together. Examples of how groups could be used include (assuming 20 students in the course):
- Divide students up into five groups of four students each. Ask them to discuss a specific topic within a Discussion thread in your Canvas course.
- Divide students up into ten groups of two students each. Each group of two students will work together to complete a group assignment. The two students in each group will receive the same score for their submitted assignment.
Creating a Group Set
Think of a Group Set like a container to hold multiple groups. Using the first example above, a Group Set might be titled the same as a Discussion topic in the course. The groups within the Group Set will live here. Groups might be called Green Team, Red Team, Blue Team, Orange Team, and Purple Team. Students can then be assigned to each of these group team names automatically or manually.
Similarly, a second Group Set could be created for the group assignment…again, naming it the same as the group assignment. In this Group Set, there would be ten groups of two students each.
In a Canvas course:
- In Course Navigation, click the People link.
- Click on the + Group Set button on the upper right-hand corner of the screen.
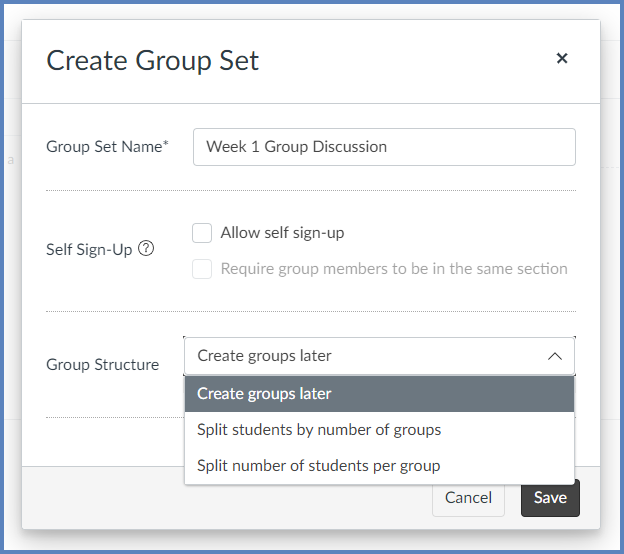
- In the Create Group Set window that appears, provide a name for the Group Set (Example: Week 1 Group Discussion, Team Art Project, etc.)
- Select other options in the Self Sign-Up and Group Structure areas of this screen.
- Additional options will appear on the screen depending on what is selected in these two areas.
- If either Split students by number of groups or Split number of students per group is selected, Canvas will automatically place students in groups.
Assigning Students to Groups in a Group Set
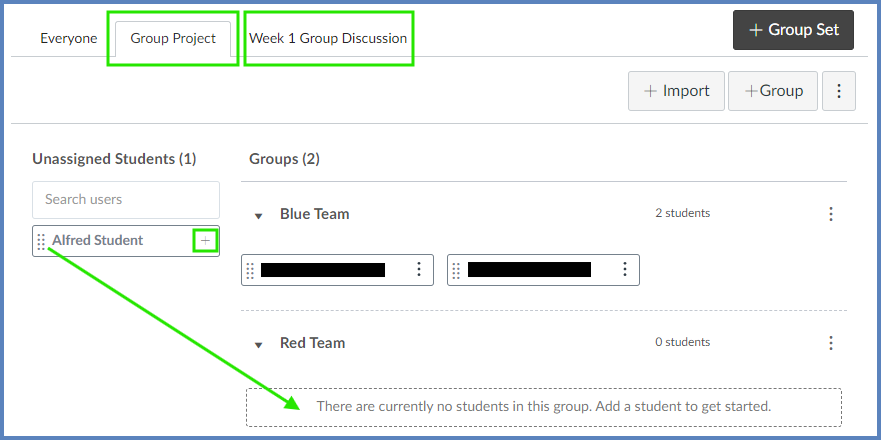
If Create groups later was selected for the Group Structure (see above), students can be manually assigned to each of the groups.
- On the People page, additional tabs will display each Group Set that has been created. In the below example, two Group Sets have been created: Group Project and Week 1 Group Discussion. The Group Project Group Set is currently selected.
- Students will be listed under the Unassigned Students heading. To manually assign students to groups, click on the ▶️ triangle next to each group name to expand the group details, and then either:
- Click on the eight vertical dots icon to the left of a student’s name to drag that person to the appropriate group.
- Click the ➕ sign to the right of a students’ name, and then select the appropriate group name the student should be placed in.
Assigning Group Sets to Discussion Topics and Assignments
Once Group Sets and groups have been created via the People page of a course, Group Sets can be assigned to Discussion Topics and Assignments in the Canvas course.
Discussion Topics
When editing the details of a discussion topic:
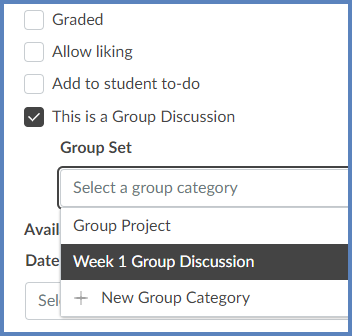
- Select the This is a Group Discussion checkbox.
- From the Group Set drop-down list, select the appropriate Group Set created above.
- NOTE: You are not selecting the group/team names you created earlier. Rather, you are selecting the Group Set name. Canvas does the rest of the leg work for you to figure out the students who need to be together for their group discussion conversations.
Assignments
When editing the details of an assignment (which must be of the type: No Submission, Online, or On Paper):
- Select the This is a Group Assignment checkbox.
- Optional: Select the Assign Grades to Each Student Individually checkbox.
- Select the Group Set from the Select a group category drop-down list.
- NOTE: You are not selecting the group/team names you created earlier. Rather, you are selecting the Group Set name. Canvas does the rest of the leg work for you to figure out the students who need to be together for their group project assignment.
![This is a screenshot of the "Group Assignment" settings section within the Canvas LMS interface. A yellow circle with the number '1' highlights the checked checkbox labeled "This is a Group Assignment". Below it, a yellow circle with the number '2' highlights the unchecked checkbox for "Assign Grades to Each Student Individually". A yellow circle with the number '3' indicates the expanded "Group Set" dropdown menu, which lists the options: "Select a group category" (currently highlighted), "Group Project," "Week 1 Group Discussion," and "[ Create New Group Set ]".](http://campus.collegeforcreativestudies.edu/ed-tech/wp-content/uploads/sites/53/2024/10/Assignment_GroupSet.png)